Epson PowerLite 735c User Manual - Page 16
Projecting the Image, Turning on Your Equipment, Turning on the Projector
 |
View all Epson PowerLite 735c manuals
Add to My Manuals
Save this manual to your list of manuals |
Page 16 highlights
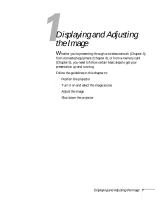
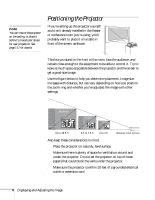
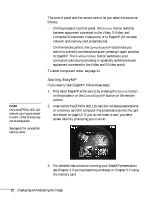
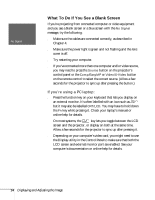
Projecting the Image Make sure your projector and other equipment are set up as described in Chapter 3 (for wireless network presentations), Chapter 4 (for directly connected computer or video equipment), or Chapter 5 (for memory card presentations). Then follow the instructions below to start the projector and display an image. Turning on Your Equipment If you're projecting from computer or video equipment that's directly connected to the projector, turn it on before starting the projector; this lets the projector automatically detect the image source. Otherwise, you may need to select the image source after you turn on the projector. note To shut down the projector, see page 20. Shutting down the projector correctly prevents premature lamp failure and possible damage from overheating. Turning on the Projector Follow these steps to turn on the projector: 1. Remove the lens cap. 2. Plug in the projector, as shown below. The P power light on top turns orange, indicating that the projector is receiving power. 10 Displaying and Adjusting the Image
-
 1
1 -
2
-
3
-
4
-
5
-
6
-
7
-
8
-
9
-
10
-
 11
11 -
 12
12 -
 13
13 -
 14
14 -
 15
15 -
 16
16 -
 17
17 -
 18
18 -
 19
19 -
 20
20 -
 21
21 -
22
-
23
-
24
-
25
-
26
-
27
-
28
-
29
-
30
-
31
-
32
-
33
-
34
-
35
-
36
-
37
-
38
-
39
-
40
-
41
-
42
-
43
-
44
-
45
-
46
-
47
-
48
-
49
-
50
-
51
-
52
-
53
-
54
-
55
-
56
-
57
-
58
-
59
-
60
-
61
-
62
-
63
-
64
-
65
-
66
-
67
-
68
-
69
-
70
-
71
-
72
-
73
-
74
-
75
-
76
-
77
-
78
-
79
-
80
-
81
-
82
-
83
-
84
-
85
-
86
-
87
-
88
-
89
-
90
-
91
-
92
-
93
-
94
-
95
-
96
-
97
-
98
-
99
-
100
-
101
-
102
-
103
-
104
-
105
-
106
-
107
-
108
-
109
-
110
-
111
-
112
-
113
-
114
-
115
-
116
-
117
-
118
-
119
-
120
-
121
-
122
-
123
-
124
-
125
-
126
-
127
-
128
-
129
-
130
-
131
-
132
-
133
-
134
-
135
-
136
-
137
-
138
-
139
-
140
-
141
-
142
-
143
-
144
 |
 |