Epson PowerLite 735c User Manual - Page 17
Selecting the Image Source, warning
 |
View all Epson PowerLite 735c manuals
Add to My Manuals
Save this manual to your list of manuals |
Page 17 highlights
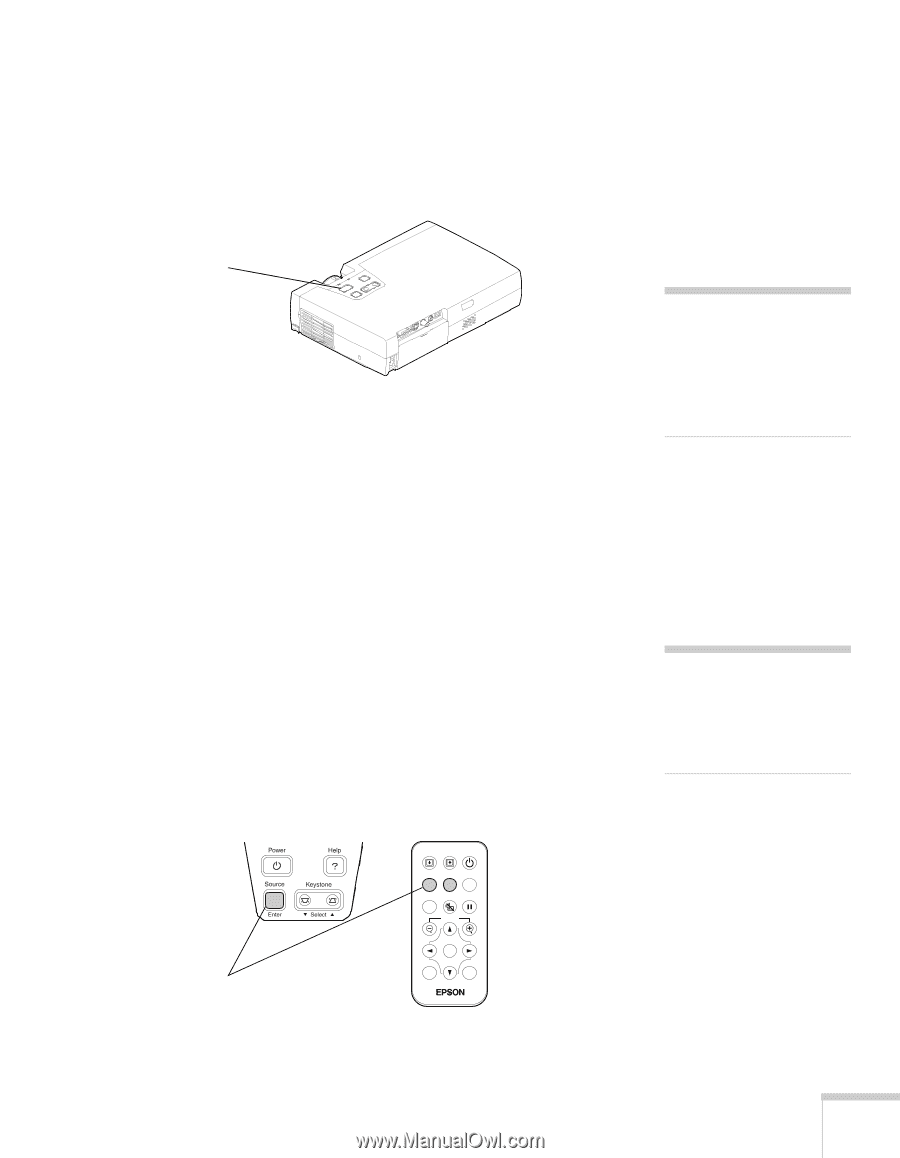
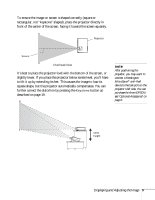
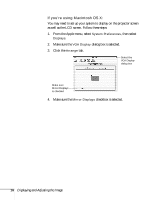
3. Press the red P Power button on top of the projector. You can also use the P Power button on the remote control. (If this is your first time using the remote, be sure to remove the plastic tape as shown on page 22.) Power button The P power light flashes green as the projector warms up, and the projection lamp comes on in about 40 seconds. 4. If you've connected a Windows-based computer to the projector, you may see a New Hardware Wizard saying your computer has found a plug-and-play monitor; if so, click Cancel. warning Never look into the lens when the lamp is on. This can damage your eyes, and is especially dangerous for children. Selecting the Image Source Selecting the image source lets you switch between images input from different pieces of equipment connected to the projector (such as a computer or DVD player), or turn on EasyMP (for wireless network or memory card presentations). If you don't see the image you want, make sure the correct source is selected, using either the Source button on the projector, or the Comp/EasyMP and S-Video/Video buttons on the remote control. Control panel Remote control Page down Page up Power Comp/EasyMP S-Video/Video Color Mode Menu A/V Mute Freeze E-Zoom Select image source Enter Auto ESC note To focus and adjust the image, see page 17. If a projected image fails to appear, see page 14 for help. Displaying and Adjusting the Image 11
-
 1
1 -
2
-
3
-
4
-
5
-
6
-
7
-
8
-
9
-
10
-
11
-
 12
12 -
 13
13 -
 14
14 -
 15
15 -
 16
16 -
 17
17 -
 18
18 -
 19
19 -
 20
20 -
 21
21 -
 22
22 -
23
-
24
-
25
-
26
-
27
-
28
-
29
-
30
-
31
-
32
-
33
-
34
-
35
-
36
-
37
-
38
-
39
-
40
-
41
-
42
-
43
-
44
-
45
-
46
-
47
-
48
-
49
-
50
-
51
-
52
-
53
-
54
-
55
-
56
-
57
-
58
-
59
-
60
-
61
-
62
-
63
-
64
-
65
-
66
-
67
-
68
-
69
-
70
-
71
-
72
-
73
-
74
-
75
-
76
-
77
-
78
-
79
-
80
-
81
-
82
-
83
-
84
-
85
-
86
-
87
-
88
-
89
-
90
-
91
-
92
-
93
-
94
-
95
-
96
-
97
-
98
-
99
-
100
-
101
-
102
-
103
-
104
-
105
-
106
-
107
-
108
-
109
-
110
-
111
-
112
-
113
-
114
-
115
-
116
-
117
-
118
-
119
-
120
-
121
-
122
-
123
-
124
-
125
-
126
-
127
-
128
-
129
-
130
-
131
-
132
-
133
-
134
-
135
-
136
-
137
-
138
-
139
-
140
-
141
-
142
-
143
-
144
 |
 |