HP Integrity rx2800 HP Integrity iLO 3 Operations Guide - Page 103
Installing directory services, Schema documentation, Directory services support
 |
View all HP Integrity rx2800 manuals
Add to My Manuals
Save this manual to your list of manuals |
Page 103 highlights
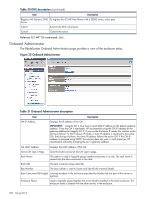
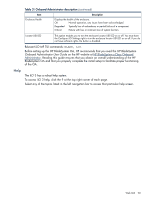
Installing directory services To successfully enable directory-enabled management on any iLO 3: 1. Plan. Review the following sections: • "Directory services" (page 102) • "Directory services schema (LDAP)" (page 133) • "Directory-enabled remote management" (page 128) 2. Install. a. Download the HP Lights-Out Directory Package containing the schema installer, the management snap-in installer, and the migrations utilities from the HP website (http:// www.hp.com/servers/lights-out). b. Run the schema installer once to extend the schema. See "Schema onstaller" (page 104). c. Run the management snap-in installer and install the appropriate snap-in for your directory service on one or more management workstations. See "Management snap-in installer" (page 106). 3. Update. a. With the directory-enabled firmware, flash the ROM on iLO 3. b. From the Directory Settings in the iLO 3 user interface, set directory server settings and the distinguished name of the iLO 3 objects. 4. Manage. a. Create a management device object and a role object using the snap-in. See "Directory services objects" (page 112). b. Assign rights to the role object, as necessary, and associate the role with the management device object. c. Add users to the role object. For more information about managing directory service, see "Directory-enabled remote management" (page 128). Examples are available in: "Directory services for Active Directory" (page 106) and "Directory services for eDirectory" (page 116). Schema documentation To assist with the planning and approval process, HP documents the changes made to the schema during the schema setup process. To review the changes made to your existing schema, see "Directory services schema (LDAP)" (page 133). Directory services support Integrity iLO 3 supports the following directory services: • Microsoft Active Directory • Windows Server 2003 Active Directory • Novell eDirectory 8.6.2 • Novell eDirectory 8.7 The iLO 3 software is designed to run within the Microsoft Active Directory Users and Computers, and Novell ConsoleOne management tools. This enables you to manage user accounts on Microsoft Active Directory or Novell eDirectory. There is no distinction made between eDirectory running on NetWare, Linux, or Windows operating systems. To spawn an eDirectory schema extension, you must have Java 1.4.2 or later for SSL authentication. Directory services 103
-
 1
1 -
2
-
3
-
4
-
5
-
6
-
7
-
8
-
9
-
10
-
11
-
12
-
13
-
14
-
15
-
16
-
17
-
18
-
19
-
20
-
21
-
22
-
23
-
24
-
25
-
26
-
27
-
28
-
29
-
30
-
31
-
32
-
33
-
34
-
35
-
36
-
37
-
38
-
39
-
40
-
41
-
42
-
43
-
44
-
45
-
46
-
47
-
48
-
49
-
50
-
51
-
52
-
53
-
54
-
55
-
56
-
57
-
58
-
59
-
60
-
61
-
62
-
63
-
64
-
65
-
66
-
67
-
68
-
69
-
70
-
71
-
72
-
73
-
74
-
75
-
76
-
77
-
78
-
79
-
80
-
81
-
82
-
83
-
84
-
85
-
86
-
87
-
88
-
89
-
90
-
91
-
92
-
93
-
94
-
95
-
96
-
97
-
 98
98 -
 99
99 -
 100
100 -
 101
101 -
 102
102 -
 103
103 -
 104
104 -
 105
105 -
 106
106 -
 107
107 -
 108
108 -
109
-
110
-
111
-
112
-
113
-
114
-
115
-
116
-
117
-
118
-
119
-
120
-
121
-
122
-
123
-
124
-
125
-
126
-
127
-
128
-
129
-
130
-
131
-
132
-
133
-
134
-
135
-
136
-
137
-
138
-
139
-
140
-
141
-
142
-
143
-
144
-
145
-
146
-
147
-
148
-
149
-
150
-
151
-
152
 |
 |