HP Integrity rx2800 HP Integrity iLO 3 Operations Guide - Page 90
User Administration>Local Accounts, Table 22 Licensing description, Local Accounts
 |
View all HP Integrity rx2800 manuals
Add to My Manuals
Save this manual to your list of manuals |
Page 90 highlights
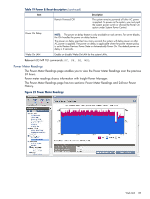
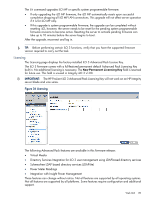
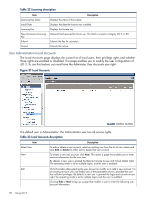
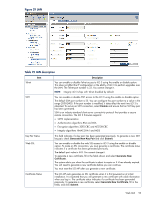
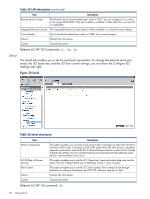
Table 22 Licensing description Item Licensing Key Status Install Date Licensing Key New Permanent Licensing Key Submit Cancel Description Displays the status of the license. Displays the date the license was installed. Displays the license key. Optional field reserved for future use. This field is unused in Integrity iLO 3 v1.00. Submits the key for activation. Cancels the action. User Administration>Local Accounts The Local Accounts page displays the current list of local users, their privilege rights and whether those rights are enabled or disabled. This page enables you to modify the user configuration of iLO 3. To use this feature, you must have the Administer User Accounts user right. Figure 27 Local Accounts The default user is Administrator. The Administrator user has all access rights. Table 23 Local Accounts description Item Select User New Description To edit or delete a user account, select an existing user from the list of user names and click Edit or Delete to either edit or delete that user account. To create a new user account, click New. This opens a page that enables you to enter account information for the new user. By default, a new user is granted the Remote Console Access and Virtual Media rights. The operating mode is set to multiple logins, and the user is enabled. Edit Click this button after selecting the user account to modify or to add a new account. For an existing account, you can modify any of the parameters shown, provided the user has sufficient privileges. By default, a new user is granted the login and console access right, the operating mode is set to multiple logins and the user is enabled. Clicking Edit or New brings up a page that enables a user to enter the following user account information: 90 Using iLO 3
-
 1
1 -
2
-
3
-
4
-
5
-
6
-
7
-
8
-
9
-
10
-
11
-
12
-
13
-
14
-
15
-
16
-
17
-
18
-
19
-
20
-
21
-
22
-
23
-
24
-
25
-
26
-
27
-
28
-
29
-
30
-
31
-
32
-
33
-
34
-
35
-
36
-
37
-
38
-
39
-
40
-
41
-
42
-
43
-
44
-
45
-
46
-
47
-
48
-
49
-
50
-
51
-
52
-
53
-
54
-
55
-
56
-
57
-
58
-
59
-
60
-
61
-
62
-
63
-
64
-
65
-
66
-
67
-
68
-
69
-
70
-
71
-
72
-
73
-
74
-
75
-
76
-
77
-
78
-
79
-
80
-
81
-
82
-
83
-
84
-
 85
85 -
 86
86 -
 87
87 -
 88
88 -
 89
89 -
 90
90 -
 91
91 -
 92
92 -
 93
93 -
 94
94 -
 95
95 -
96
-
97
-
98
-
99
-
100
-
101
-
102
-
103
-
104
-
105
-
106
-
107
-
108
-
109
-
110
-
111
-
112
-
113
-
114
-
115
-
116
-
117
-
118
-
119
-
120
-
121
-
122
-
123
-
124
-
125
-
126
-
127
-
128
-
129
-
130
-
131
-
132
-
133
-
134
-
135
-
136
-
137
-
138
-
139
-
140
-
141
-
142
-
143
-
144
-
145
-
146
-
147
-
148
-
149
-
150
-
151
-
152
 |
 |