HP Integrity rx2800 HP Integrity iLO 3 Operations Guide - Page 127
Certificate services, Installing certificate services, Verifying directory services
 |
View all HP Integrity rx2800 manuals
Add to My Manuals
Save this manual to your list of manuals |
Page 127 highlights
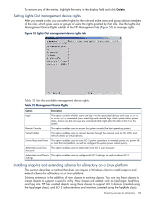
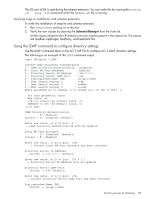
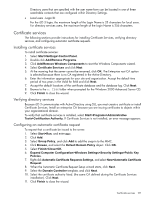
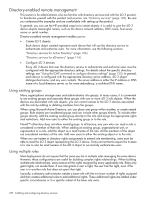
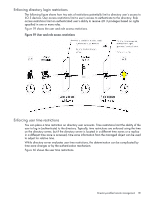
Directory users that are specified with the user name form can be located in one of three searchable contexts that are configured within Directory Settings. • Local users - Login ID For the iLO 3 login, the maximum length of the Login Name is 25 characters for local users. For directory services users, the maximum length of the Login Name is 256 characters. Certificate services The following sections provide instructions for installing Certificate Services, verifying directory services, and configuring automatic certificate requests. Installing certificate services To install certificate services: 1. Select Start>Settings>Control Panel. 2. Double-click Add/Remove Programs. 3. Click Add/Remove Windows Components to start the Windows Components wizard. 4. Select Certificate Services and click Next. 5. At the warning that the server cannot be renamed, click OK. The Enterprise root CA option is selected because there is no CA registered in the Active Directory. 6. Enter the information appropriate for your site and organization. Accept the default time period of two years in the Valid for field and click Next. 7. Accept the default locations of the certificate database and the database log. Click Next. 8. Browse to the c: I386 folder when prompted for the Windows 2000 Advanced Server CD. 9. Click Finish to close the wizard. Verifying directory services Because iLO 3 communicates with Active Directory using SSL, you must create a certificate or install Certificate Services. Install an enterprise CA because you are issuing certificates to objects within your organizational domain. To verify that certificate services is installed, select Start>Programs>Administrative Tools>Certification Authority. If Certificate Services is not installed, an error message appears. Configuring an automatic certificate request To request that a certificate be issued to the server: 1. Select Start>Run, and enter mmc. 2. Click Add. 3. Select Group Policy, and click Add to add the snap-in to the MMC. 4. Click Browse, and select the Default Domain Policy object. Click OK. 5. Select Finish>Close>OK. 6. Expand Computer Configuration>Windows Settings>Security Settings>Public Key Policies. 7. Right-click Automatic Certificate Requests Settings, and select New>Automatic Certificate Request. 8. When the Automatic Certificate Request Setup wizard starts, click Next. 9. Select the Domain Controller template, and click Next. 10. Select the certificate authority listed. (the same CA defined during the Certificate Services installation). Click Next. 11. Click Finish to close the wizard. Certificate services 127
-
 1
1 -
2
-
3
-
4
-
5
-
6
-
7
-
8
-
9
-
10
-
11
-
12
-
13
-
14
-
15
-
16
-
17
-
18
-
19
-
20
-
21
-
22
-
23
-
24
-
25
-
26
-
27
-
28
-
29
-
30
-
31
-
32
-
33
-
34
-
35
-
36
-
37
-
38
-
39
-
40
-
41
-
42
-
43
-
44
-
45
-
46
-
47
-
48
-
49
-
50
-
51
-
52
-
53
-
54
-
55
-
56
-
57
-
58
-
59
-
60
-
61
-
62
-
63
-
64
-
65
-
66
-
67
-
68
-
69
-
70
-
71
-
72
-
73
-
74
-
75
-
76
-
77
-
78
-
79
-
80
-
81
-
82
-
83
-
84
-
85
-
86
-
87
-
88
-
89
-
90
-
91
-
92
-
93
-
94
-
95
-
96
-
97
-
98
-
99
-
100
-
101
-
102
-
103
-
104
-
105
-
106
-
107
-
108
-
109
-
110
-
111
-
112
-
113
-
114
-
115
-
116
-
117
-
118
-
119
-
120
-
121
-
 122
122 -
 123
123 -
 124
124 -
 125
125 -
 126
126 -
 127
127 -
 128
128 -
 129
129 -
 130
130 -
 131
131 -
 132
132 -
133
-
134
-
135
-
136
-
137
-
138
-
139
-
140
-
141
-
142
-
143
-
144
-
145
-
146
-
147
-
148
-
149
-
150
-
151
-
152
 |
 |
