HP LX195 HP LX195 MediaSmart Server - User Guide - Page 126
Finder, Applications, HP MediaSmart Server Control, Center, Preferences, value, Delete and Continue - hard drive
 |
UPC - 884420857396
View all HP LX195 manuals
Add to My Manuals
Save this manual to your list of manuals |
Page 126 highlights
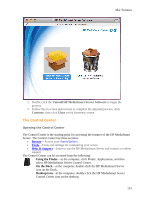
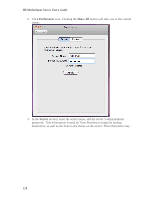
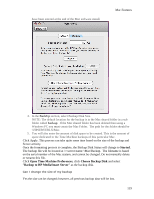
HP MediaSmart Server User's Guide 1. Open Finder, click Applications, click HP MediaSmart Server Control Center. 2. Click Preferences icon. 3. In the Backup Disk Status, click Stop 4. Enter a new value in the Backup Disk Size. 5. Click Apply 6. A pop up warning will appear informing you the file already exists, and that continuing will erase their existing backup data and start over. To continue with the new size click Delete and Continue. How our Mac Restore Works We have implemented a restore process where you can restore your data that has been backed up. We have not implemented a program where you can recover your Mac Operating System. Restoring your Mac from a failed hard drive scenario will involve the following steps: 1. Install the new hard drive 2. Install Mac OS X 10.5 from the "Mac OS X Install Disc" 3. Install Mac OS X operating system updates, to ensure everything is up-to-date 4. Install HP MediaSmart Server Mac Client software 5. Configure HP MediaSmart Server Mac Client settings including: server name, administrator password, backup location (using the same share that was used for the backup) and enable backup disk 6. Choose the disk called "Backup to the HP MediaSmart Server" disk in the Time Machine System Preferences 7. Launch Time Machine and ask to restore to the latest backup 120
-
 1
1 -
2
-
3
-
4
-
5
-
6
-
7
-
8
-
9
-
10
-
11
-
12
-
13
-
14
-
15
-
16
-
17
-
18
-
19
-
20
-
21
-
22
-
23
-
24
-
25
-
26
-
27
-
28
-
29
-
30
-
31
-
32
-
33
-
34
-
35
-
36
-
37
-
38
-
39
-
40
-
41
-
42
-
43
-
44
-
45
-
46
-
47
-
48
-
49
-
50
-
51
-
52
-
53
-
54
-
55
-
56
-
57
-
58
-
59
-
60
-
61
-
62
-
63
-
64
-
65
-
66
-
67
-
68
-
69
-
70
-
71
-
72
-
73
-
74
-
75
-
76
-
77
-
78
-
79
-
80
-
81
-
82
-
83
-
84
-
85
-
86
-
87
-
88
-
89
-
90
-
91
-
92
-
93
-
94
-
95
-
96
-
97
-
98
-
99
-
100
-
101
-
102
-
103
-
104
-
105
-
106
-
107
-
108
-
109
-
110
-
111
-
112
-
113
-
114
-
115
-
116
-
117
-
118
-
119
-
120
-
 121
121 -
 122
122 -
 123
123 -
 124
124 -
 125
125 -
 126
126 -
 127
127 -
 128
128 -
 129
129 -
 130
130 -
 131
131 -
132
-
133
-
134
-
135
-
136
-
137
-
138
-
139
-
140
-
141
-
142
-
143
-
144
-
145
-
146
-
147
-
148
-
149
-
150
-
151
-
152
-
153
-
154
-
155
-
156
-
157
-
158
-
159
-
160
-
161
-
162
-
163
-
164
-
165
-
166
-
167
-
168
-
169
-
170
-
171
-
172
-
173
-
174
-
175
-
176
-
177
-
178
-
179
-
180
-
181
-
182
-
183
-
184
-
185
-
186
-
187
-
188
-
189
-
190
-
191
-
192
-
193
-
194
-
195
-
196
-
197
-
198
-
199
-
200
-
201
-
202
-
203
-
204
-
205
-
206
-
207
-
208
-
209
-
210
-
211
-
212
-
213
-
214
-
215
-
216
-
217
-
218
-
219
-
220
-
221
-
222
-
223
-
224
-
225
-
226
-
227
-
228
-
229
-
230
-
231
-
232
-
233
-
234
-
235
-
236
 |
 |