HP OmniBook 7150 HP OmniBook 7100/7150 Reference Guide - Not Orderable - Page 104
Keyboard and Pointing Device Problems
 |
View all HP OmniBook 7150 manuals
Add to My Manuals
Save this manual to your list of manuals |
Page 104 highlights
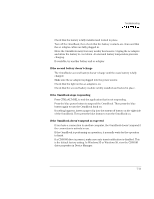
Troubleshooting Solving Problems Right click on the drive, then click Properties, Tools, Error Checking. Keyboard and Pointing Device Problems If the pointer is difficult to control • To customize all pointing devices, use the Mouse icon in Control Panel (Start, Settings, Control Panel). • To customize the operation of the pointing stick, use the pointing stick icon available on the Taskbar (or in the Windows Control panel) to access TrackPoint Properties. If the touch pad or pointing stick doesn't work • Make sure the touch pad or pointing stick is enabled in the BIOS Setup utility. 1. From the Start menu, shut down, then restart the OmniBook. 2. When you see the HP logo, press F2 to enter the BIOS Setup utility. 3. From the System Devices menu, check Internal Pointing Devices. 4. Select the desired pointing device. 5. Press F10 to Save and Exit the BIOS Setup utility. • Reset the OmniBook. • Don't touch the pointing stick or the touch pad while booting or resuming. If the embedded numeric keypad doesn't work • Make sure Num Lock is on. • Make sure the embedded Keypad Lock (Fn+F8) is on-or that you press and hold the Fn key to temporarily access the embedded keypad. • Don't touch the pointing stick or the touch pad while booting or resuming. If a special feature on the PS/2 mouse doesn't work • The built-in pointing device must be disabled for special mouse features to work. In the BIOS Setup utility, check that the PS/2 Pointing Devices option is set to Auto in the System Devices menu. See page 1-12. 7-6
-
 1
1 -
2
-
3
-
4
-
5
-
6
-
7
-
8
-
9
-
10
-
11
-
12
-
13
-
14
-
15
-
16
-
17
-
18
-
19
-
20
-
21
-
22
-
23
-
24
-
25
-
26
-
27
-
28
-
29
-
30
-
31
-
32
-
33
-
34
-
35
-
36
-
37
-
38
-
39
-
40
-
41
-
42
-
43
-
44
-
45
-
46
-
47
-
48
-
49
-
50
-
51
-
52
-
53
-
54
-
55
-
56
-
57
-
58
-
59
-
60
-
61
-
62
-
63
-
64
-
65
-
66
-
67
-
68
-
69
-
70
-
71
-
72
-
73
-
74
-
75
-
76
-
77
-
78
-
79
-
80
-
81
-
82
-
83
-
84
-
85
-
86
-
87
-
88
-
89
-
90
-
91
-
92
-
93
-
94
-
95
-
96
-
97
-
98
-
 99
99 -
 100
100 -
 101
101 -
 102
102 -
 103
103 -
 104
104 -
 105
105 -
 106
106 -
 107
107 -
 108
108 -
 109
109 -
110
-
111
-
112
-
113
-
114
-
115
-
116
-
117
-
118
-
119
-
120
-
121
-
122
-
123
-
124
-
125
-
126
-
127
-
128
-
129
-
130
-
131
-
132
-
133
-
134
-
135
 |
 |
