HP OmniBook 7150 HP OmniBook 7100/7150 Reference Guide - Not Orderable - Page 75
To make an infrared connection, Printing to an Infrared Printer
 |
View all HP OmniBook 7150 manuals
Add to My Manuals
Save this manual to your list of manuals |
Page 75 highlights
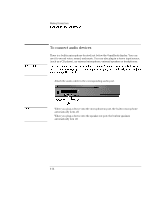
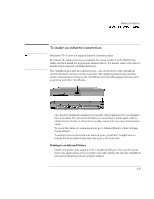
Making Connections Connecting External Devices To make an infrared connection Note Windows NT 4.0 does not support infrared communication. By default, the infrared port is not enabled. You must enable it in the BIOS Setup utility and then install the appropriate infrared driver. For details, refer to the driver's Readme file located in \OmniBook\Drivers. The OmniBook provides two infrared ports-one on the front of the OmniBook (below the latch) and one on the rear panel. The infrared ports provide wireless, serial communication between the OmniBook and other IR-equipped devices such as printers and other OmniBooks. • Line up the OmniBook's infrared port and the other infrared port in as straight a line as possible. The two ports should be no more than 1 meter apart, with no obstructions in between. Noise from nearby equipment can cause transmission errors. • To check the status of communications, go to Infrared Monitor (Start, Settings, Control Panel). • To switch between front and rear infrared ports, press Fn+F. A light turns on behind the front infrared lens when the front port is selected. Printing to an Infrared Printer • Install your printer and assign it to the OmniBook's IR port. You can then print from your applications as you would to any other printer. Be sure the OmniBook and printer infrared ports are properly aligned. 4-15
-
 1
1 -
2
-
3
-
4
-
5
-
6
-
7
-
8
-
9
-
10
-
11
-
12
-
13
-
14
-
15
-
16
-
17
-
18
-
19
-
20
-
21
-
22
-
23
-
24
-
25
-
26
-
27
-
28
-
29
-
30
-
31
-
32
-
33
-
34
-
35
-
36
-
37
-
38
-
39
-
40
-
41
-
42
-
43
-
44
-
45
-
46
-
47
-
48
-
49
-
50
-
51
-
52
-
53
-
54
-
55
-
56
-
57
-
58
-
59
-
60
-
61
-
62
-
63
-
64
-
65
-
66
-
67
-
68
-
69
-
 70
70 -
 71
71 -
 72
72 -
 73
73 -
 74
74 -
 75
75 -
 76
76 -
 77
77 -
 78
78 -
 79
79 -
 80
80 -
81
-
82
-
83
-
84
-
85
-
86
-
87
-
88
-
89
-
90
-
91
-
92
-
93
-
94
-
95
-
96
-
97
-
98
-
99
-
100
-
101
-
102
-
103
-
104
-
105
-
106
-
107
-
108
-
109
-
110
-
111
-
112
-
113
-
114
-
115
-
116
-
117
-
118
-
119
-
120
-
121
-
122
-
123
-
124
-
125
-
126
-
127
-
128
-
129
-
130
-
131
-
132
-
133
-
134
-
135
 |
 |
