HP OmniBook 7150 HP OmniBook 7100/7150 Reference Guide - Not Orderable - Page 17
To set up the OmniBook, The Windows Setup program starts automatically.
 |
View all HP OmniBook 7150 manuals
Add to My Manuals
Save this manual to your list of manuals |
Page 17 highlights
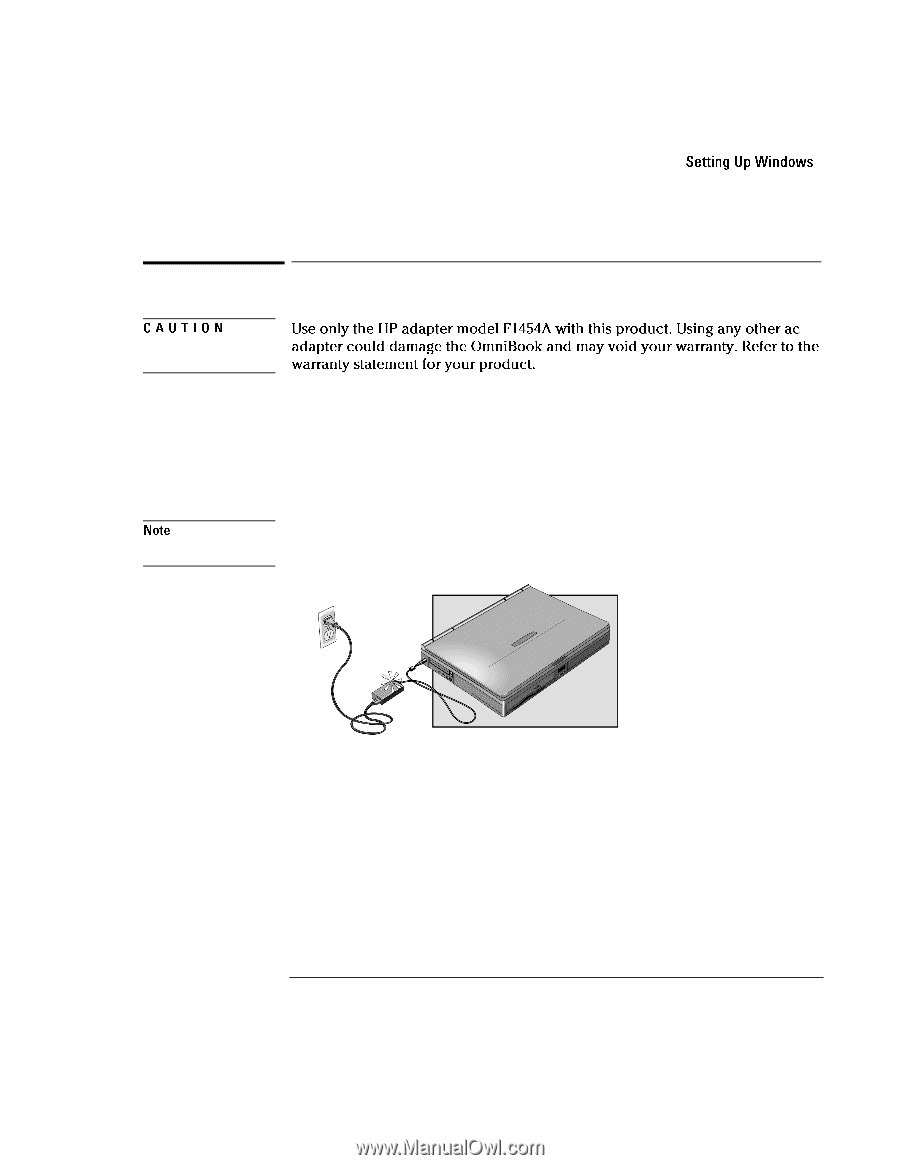
Introducing the OmniBook Setting Up Windows CAUTION Note To set up the OmniBook Use only the HP adapter model F1454A with this product. Using any other ac adapter could damage the OmniBook and may void your warranty. Refer to the warranty statement for your product. 1. Install the OmniBook's battery. (See the Quick Start sheet or page 3-7 of this manual). 2. Connect the power cord to the ac adapter, then plug the cord into an ac outlet. The indicator light on the ac adapter shines when the adapter is powered. 3. Connect the ac adapter to the OmniBook's left side, as shown. The OmniBook battery starts charging. Let the battery charge a full 24 hours to completely charge the internal clock battery. Otherwise, the OmniBook may not keep the correct date and time. 4. Press the blue power button. The Windows Setup program starts automatically. 5. Follow the instructions as they appear on the screen. During setup, you will be prompted to accept the License Agreement and enter the Product ID (printed on the Certificate of Authenticity on the Microsoft Windows manual). If you are prompted to set up a user account and password. You can either set up the account, or press ESC to skip this step. 1-9
-
 1
1 -
2
-
3
-
4
-
5
-
6
-
7
-
8
-
9
-
10
-
11
-
 12
12 -
 13
13 -
 14
14 -
 15
15 -
 16
16 -
 17
17 -
 18
18 -
 19
19 -
 20
20 -
 21
21 -
 22
22 -
23
-
24
-
25
-
26
-
27
-
28
-
29
-
30
-
31
-
32
-
33
-
34
-
35
-
36
-
37
-
38
-
39
-
40
-
41
-
42
-
43
-
44
-
45
-
46
-
47
-
48
-
49
-
50
-
51
-
52
-
53
-
54
-
55
-
56
-
57
-
58
-
59
-
60
-
61
-
62
-
63
-
64
-
65
-
66
-
67
-
68
-
69
-
70
-
71
-
72
-
73
-
74
-
75
-
76
-
77
-
78
-
79
-
80
-
81
-
82
-
83
-
84
-
85
-
86
-
87
-
88
-
89
-
90
-
91
-
92
-
93
-
94
-
95
-
96
-
97
-
98
-
99
-
100
-
101
-
102
-
103
-
104
-
105
-
106
-
107
-
108
-
109
-
110
-
111
-
112
-
113
-
114
-
115
-
116
-
117
-
118
-
119
-
120
-
121
-
122
-
123
-
124
-
125
-
126
-
127
-
128
-
129
-
130
-
131
-
132
-
133
-
134
-
135
 |
 |