HP Photosmart Premium Fax All-in-One Printer - C309 Full User Guide - Page 106
Solution 6: Align the printer, Print Quality Report
 |
View all HP Photosmart Premium Fax All-in-One Printer - C309 manuals
Add to My Manuals
Save this manual to your list of manuals |
Page 106 highlights
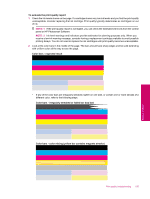
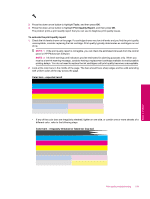
Chapter 13 If this did not solve the issue, try the next solution. Solution 6: Align the printer Solution: Align the printer. Aligning the printer can help ensure excellent print quality. To align the printer from the HP Photosmart Software 1. Load letter, A4, or legal unused plain white paper into the input tray. 2. In the HP Solution Center, click Settings. 3. In the Print Settings area, click Printer Toolbox. NOTE: You can also open the Printer Toolbox from the Print Properties dialog box. In the Print Properties dialog box, click the Features tab, and then click Printer Services. The Printer Toolbox appears. 4. Click the Device Services tab. 5. Click Align the Printer. The product prints a test page, aligns the print head, and calibrates the printer. Recycle or discard the page. Cause: The printer needed to be aligned. If this did not solve the issue, try the next solution. Solution 7: Clean the printhead Solution: If the previous solutions did not resolve the issue, try cleaning the printhead. To clean the printhead from the control panel 1. Press Setup. Solve a problem 2. Press the down arrow button to highlight Tools, and then press OK. 3. Press the down arrow button to highlight Clean Printhead, and then press OK. The product cleans the printhead. 4. Press any button to return to the Tools menu. After cleaning the printhead, print a print quality report. Evaluate the print quality report to see if the print quality problem still exists. To print a print quality report 1. Load letter or A4 unused plain white paper into the input tray. 2. Press Setup. 3. Press the down arrow button to highlight Tools, and then press OK. 4. Press the down arrow button to highlight Print Quality Report, and then press OK. The product prints a print quality report that you can use to diagnose print quality issues. 104 Solve a problem
-
 1
1 -
2
-
3
-
4
-
5
-
6
-
7
-
8
-
9
-
10
-
11
-
12
-
13
-
14
-
15
-
16
-
17
-
18
-
19
-
20
-
21
-
22
-
23
-
24
-
25
-
26
-
27
-
28
-
29
-
30
-
31
-
32
-
33
-
34
-
35
-
36
-
37
-
38
-
39
-
40
-
41
-
42
-
43
-
44
-
45
-
46
-
47
-
48
-
49
-
50
-
51
-
52
-
53
-
54
-
55
-
56
-
57
-
58
-
59
-
60
-
61
-
62
-
63
-
64
-
65
-
66
-
67
-
68
-
69
-
70
-
71
-
72
-
73
-
74
-
75
-
76
-
77
-
78
-
79
-
80
-
81
-
82
-
83
-
84
-
85
-
86
-
87
-
88
-
89
-
90
-
91
-
92
-
93
-
94
-
95
-
96
-
97
-
98
-
99
-
100
-
 101
101 -
 102
102 -
 103
103 -
 104
104 -
 105
105 -
 106
106 -
 107
107 -
 108
108 -
 109
109 -
 110
110 -
 111
111 -
112
-
113
-
114
-
115
-
116
-
117
-
118
-
119
-
120
-
121
-
122
-
123
-
124
-
125
-
126
-
127
-
128
-
129
-
130
-
131
-
132
-
133
-
134
-
135
-
136
-
137
-
138
-
139
-
140
-
141
-
142
-
143
-
144
-
145
-
146
-
147
-
148
-
149
-
150
-
151
-
152
-
153
-
154
-
155
-
156
-
157
-
158
-
159
-
160
-
161
-
162
-
163
-
164
-
165
-
166
-
167
-
168
-
169
-
170
-
171
-
172
-
173
-
174
-
175
-
176
-
177
-
178
-
179
-
180
-
181
-
182
-
183
-
184
-
185
-
186
-
187
-
188
-
189
-
190
-
191
-
192
-
193
-
194
-
195
-
196
-
197
-
198
-
199
-
200
-
201
-
202
-
203
-
204
-
205
-
206
-
207
-
208
-
209
-
210
-
211
-
212
-
213
-
214
-
215
-
216
-
217
-
218
-
219
-
220
-
221
-
222
-
223
-
224
-
225
-
226
-
227
-
228
-
229
-
230
-
231
-
232
-
233
-
234
-
235
-
236
-
237
-
238
-
239
-
240
-
241
-
242
-
243
-
244
 |
 |
