HP Photosmart Premium Fax All-in-One Printer - C309 Full User Guide - Page 180
The fax test failed, The Fax Hardware Test failed
 |
View all HP Photosmart Premium Fax All-in-One Printer - C309 manuals
Add to My Manuals
Save this manual to your list of manuals |
Page 180 highlights
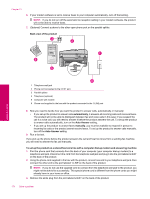
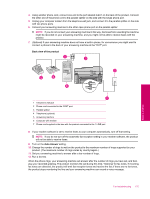
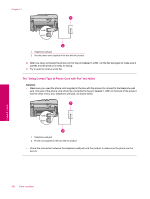
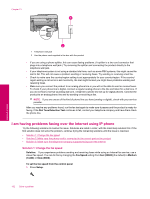
Chapter 13 The fax test failed If you tried to run the fax test from your computer and the fax test failed to run, the product might be busy with another task or have an error condition preventing it from running the fax test. What to check • The product is set up properly, connected to a power supply, and is connected to your computer. For more information on setting up the product, see the Setup Guide that came with the product. • The product is turned on. If it is not, press the On button to turn on the product. • The print cartridges are installed correctly, the print cartridge carriage is not blocked, and the print cartridge door is closed. • The product is not currently busy with another task such as aligning the printer. Check the display. If the product is busy, wait until it completes the current task and run the fax test again. • The rear door is attached to the back of the product. • There are no error messages on the display. If there is an error message, resolve the problem and run the fax test again. If you run the fax test and the product reports that the test failed, read the following information carefully to determine how to correct any problems with your fax setup. Different portions of the fax test might fail for different reasons. • The "Fax Hardware Test" failed • The "Fax Connected to Active Telephone Wall Jack" test failed • The "Phone Cord Connected to Correct Port on Fax" test failed • The "Using Correct Type of Phone Cord with Fax" test failed • The "Fax Line Condition" test failed • The "Dial Tone Detection" test failed The "Fax Hardware Test" failed Solution • Turn off the product by pressing the On button located on the control panel and then unplug the power cord from the back of the product. After a few seconds, plug the power cord back in and turn the power on. Run the test again. If the test fails again, continue reviewing the troubleshooting information in this section. NOTE: Depending how long the product is unplugged, the date and time might be erased. You might need to reset the date and time later, when you plug the power cord back in. • Try to send or receive a test fax. If you can send or receive a fax successfully, there might not be a problem. • If you are running the test from the Fax Setup Wizard, make sure the product is not busy completing another task, such as making a copy. Check the display for a message indicating that the product is busy. If it is busy, wait until it is finished and in the idle state, before running the test. After you resolve any problems found, run the fax test again to make sure it passes and the product is ready for faxing. If the Fax Hardware Test continues to fail and you experience problems faxing, contact HP Support. Go to www.hp.com/support. If prompted, choose your country/region, and then click Contact HP for information on calling for technical support. The "Fax Connected to Active Telephone Wall Jack" test failed Solution • Check the connection between the telephone wall jack and the product to make sure the phone cord is secure. • Make sure you use the phone cord that came with the product. If you do not use the supplied phone cord to connect from the telephone wall jack to the product, you might not be able to send or receive faxes. After you plug in the phone cord that came with the product, run the fax test again. • Make sure you have correctly connected the product to the telephone wall jack. Using the phone cord supplied in the box with the product, connect one end to your telephone wall jack, then connect the other 178 Solve a problem Solve a problem
-
 1
1 -
2
-
3
-
4
-
5
-
6
-
7
-
8
-
9
-
10
-
11
-
12
-
13
-
14
-
15
-
16
-
17
-
18
-
19
-
20
-
21
-
22
-
23
-
24
-
25
-
26
-
27
-
28
-
29
-
30
-
31
-
32
-
33
-
34
-
35
-
36
-
37
-
38
-
39
-
40
-
41
-
42
-
43
-
44
-
45
-
46
-
47
-
48
-
49
-
50
-
51
-
52
-
53
-
54
-
55
-
56
-
57
-
58
-
59
-
60
-
61
-
62
-
63
-
64
-
65
-
66
-
67
-
68
-
69
-
70
-
71
-
72
-
73
-
74
-
75
-
76
-
77
-
78
-
79
-
80
-
81
-
82
-
83
-
84
-
85
-
86
-
87
-
88
-
89
-
90
-
91
-
92
-
93
-
94
-
95
-
96
-
97
-
98
-
99
-
100
-
101
-
102
-
103
-
104
-
105
-
106
-
107
-
108
-
109
-
110
-
111
-
112
-
113
-
114
-
115
-
116
-
117
-
118
-
119
-
120
-
121
-
122
-
123
-
124
-
125
-
126
-
127
-
128
-
129
-
130
-
131
-
132
-
133
-
134
-
135
-
136
-
137
-
138
-
139
-
140
-
141
-
142
-
143
-
144
-
145
-
146
-
147
-
148
-
149
-
150
-
151
-
152
-
153
-
154
-
155
-
156
-
157
-
158
-
159
-
160
-
161
-
162
-
163
-
164
-
165
-
166
-
167
-
168
-
169
-
170
-
171
-
172
-
173
-
174
-
 175
175 -
 176
176 -
 177
177 -
 178
178 -
 179
179 -
 180
180 -
 181
181 -
 182
182 -
 183
183 -
 184
184 -
 185
185 -
186
-
187
-
188
-
189
-
190
-
191
-
192
-
193
-
194
-
195
-
196
-
197
-
198
-
199
-
200
-
201
-
202
-
203
-
204
-
205
-
206
-
207
-
208
-
209
-
210
-
211
-
212
-
213
-
214
-
215
-
216
-
217
-
218
-
219
-
220
-
221
-
222
-
223
-
224
-
225
-
226
-
227
-
228
-
229
-
230
-
231
-
232
-
233
-
234
-
235
-
236
-
237
-
238
-
239
-
240
-
241
-
242
-
243
-
244
 |
 |
