HP Photosmart Premium Fax All-in-One Printer - C309 Full User Guide - Page 150
Solution 2: Turn on the product, Solution 3: Make sure you are using the correct type of phone cord
 |
View all HP Photosmart Premium Fax All-in-One Printer - C309 manuals
Add to My Manuals
Save this manual to your list of manuals |
Page 150 highlights
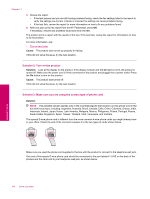
Chapter 13 5. Review the report. • If the test passes and you are still having problems faxing, check the fax settings listed in the report to verify the settings are correct. A blank or incorrect fax setting can cause problems faxing. • If the test fails, review the report for more information on how to fix any problems found. 6. After you pick up the fax report from the HP Photosmart, press OK. If necessary, resolve any problems found and rerun the test. The product prints a report with the results of the test. If the test fails, review the report for information on how to fix the problem. For more information, see: • The fax test failed Cause: The product was not set up properly for faxing. If this did not solve the issue, try the next solution. Solution 2: Turn on the product Solution: Look at the display on the product. If the display is blank and the On light is not lit, the product is turned off. Make sure the power cord is firmly connected to the product and plugged into a power outlet. Press the On button to turn on the product. Cause: The product was turned off. If this did not solve the issue, try the next solution. Solution 3: Make sure you are using the correct type of phone cord Solution NOTE: This possible solution applies only in the countries/regions that receive a 2-wire phone cord in the box with the product, including: Argentina, Australia, Brazil, Canada, Chile, China, Colombia, Greece, India, Indonesia, Ireland, Japan, Korea, Latin America, Malaysia, Mexico, Philippines, Poland, Portugal, Russia, Saudi Arabia, Singapore, Spain, Taiwan, Thailand, USA, Venezuela, and Vietnam. This special 2-wire phone cord is different from the more common 4-wire phone cords you might already have in your office. Check the end of the cord and compare it to the two types of cords shown below. Solve a problem Make sure you used the phone cord supplied in the box with the product to connect to the telephone wall jack. One end of this special 2-wire phone cord should be connected to the port labeled 1-LINE on the back of the product and the other end to your telephone wall jack, as shown below. 148 Solve a problem
-
 1
1 -
2
-
3
-
4
-
5
-
6
-
7
-
8
-
9
-
10
-
11
-
12
-
13
-
14
-
15
-
16
-
17
-
18
-
19
-
20
-
21
-
22
-
23
-
24
-
25
-
26
-
27
-
28
-
29
-
30
-
31
-
32
-
33
-
34
-
35
-
36
-
37
-
38
-
39
-
40
-
41
-
42
-
43
-
44
-
45
-
46
-
47
-
48
-
49
-
50
-
51
-
52
-
53
-
54
-
55
-
56
-
57
-
58
-
59
-
60
-
61
-
62
-
63
-
64
-
65
-
66
-
67
-
68
-
69
-
70
-
71
-
72
-
73
-
74
-
75
-
76
-
77
-
78
-
79
-
80
-
81
-
82
-
83
-
84
-
85
-
86
-
87
-
88
-
89
-
90
-
91
-
92
-
93
-
94
-
95
-
96
-
97
-
98
-
99
-
100
-
101
-
102
-
103
-
104
-
105
-
106
-
107
-
108
-
109
-
110
-
111
-
112
-
113
-
114
-
115
-
116
-
117
-
118
-
119
-
120
-
121
-
122
-
123
-
124
-
125
-
126
-
127
-
128
-
129
-
130
-
131
-
132
-
133
-
134
-
135
-
136
-
137
-
138
-
139
-
140
-
141
-
142
-
143
-
144
-
 145
145 -
 146
146 -
 147
147 -
 148
148 -
 149
149 -
 150
150 -
 151
151 -
 152
152 -
 153
153 -
 154
154 -
 155
155 -
156
-
157
-
158
-
159
-
160
-
161
-
162
-
163
-
164
-
165
-
166
-
167
-
168
-
169
-
170
-
171
-
172
-
173
-
174
-
175
-
176
-
177
-
178
-
179
-
180
-
181
-
182
-
183
-
184
-
185
-
186
-
187
-
188
-
189
-
190
-
191
-
192
-
193
-
194
-
195
-
196
-
197
-
198
-
199
-
200
-
201
-
202
-
203
-
204
-
205
-
206
-
207
-
208
-
209
-
210
-
211
-
212
-
213
-
214
-
215
-
216
-
217
-
218
-
219
-
220
-
221
-
222
-
223
-
224
-
225
-
226
-
227
-
228
-
229
-
230
-
231
-
232
-
233
-
234
-
235
-
236
-
237
-
238
-
239
-
240
-
241
-
242
-
243
-
244
 |
 |
