HP Photosmart Premium Fax All-in-One Printer - C309 Full User Guide - Page 126
The text edges are jagged, Solution 2: Wait while the ink dries
 |
View all HP Photosmart Premium Fax All-in-One Printer - C309 manuals
Add to My Manuals
Save this manual to your list of manuals |
Page 126 highlights
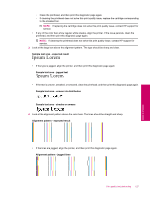
Chapter 13 3. Print a document with little or no text. 4. Check the back of the paper for ink. If there is still ink on the back of the paper, try printing on another page of plain paper. Cause: Ink accumulated inside the product, where the back of the paper rests during printing. If this did not solve the issue, try the next solution. Solution 2: Wait while the ink dries Solution: Wait at least thirty minutes for the ink inside the product to dry, then try the print job again. Cause: The excess ink in the product needed to dry out. The text edges are jagged Try the following solutions if the text in your printouts is not sharp and the edges are rough. NOTE: For this issue, there is not a problem with your ink supplies. Therefore, replacing the ink cartridges or printhead is not necessary. • Solution 1: Use TrueType or OpenType fonts • Solution 2: Align the printer • Solution 3: Clean the printhead Solution 1: Use TrueType or OpenType fonts Solution: Use TrueType or OpenType fonts to ensure that the product is able to print smooth fonts. When selecting a font, look for the TrueType or OpenType icon. TrueType icon OpenType icon Cause: The font was a custom size. Some software applications offer custom fonts that have jagged edges when enlarged or printed. Also, if you want to print bitmapped text, it might have jagged edges when enlarged or printed. If this did not solve the issue, try the next solution. Solution 2: Align the printer Solution: Align the printer. Aligning the printer can help ensure excellent print quality. To align the printer from the HP Photosmart Software 1. Load letter, A4, or legal unused plain white paper into the input tray. 2. In the HP Solution Center, click Settings. Solve a problem 124 Solve a problem
-
 1
1 -
2
-
3
-
4
-
5
-
6
-
7
-
8
-
9
-
10
-
11
-
12
-
13
-
14
-
15
-
16
-
17
-
18
-
19
-
20
-
21
-
22
-
23
-
24
-
25
-
26
-
27
-
28
-
29
-
30
-
31
-
32
-
33
-
34
-
35
-
36
-
37
-
38
-
39
-
40
-
41
-
42
-
43
-
44
-
45
-
46
-
47
-
48
-
49
-
50
-
51
-
52
-
53
-
54
-
55
-
56
-
57
-
58
-
59
-
60
-
61
-
62
-
63
-
64
-
65
-
66
-
67
-
68
-
69
-
70
-
71
-
72
-
73
-
74
-
75
-
76
-
77
-
78
-
79
-
80
-
81
-
82
-
83
-
84
-
85
-
86
-
87
-
88
-
89
-
90
-
91
-
92
-
93
-
94
-
95
-
96
-
97
-
98
-
99
-
100
-
101
-
102
-
103
-
104
-
105
-
106
-
107
-
108
-
109
-
110
-
111
-
112
-
113
-
114
-
115
-
116
-
117
-
118
-
119
-
120
-
 121
121 -
 122
122 -
 123
123 -
 124
124 -
 125
125 -
 126
126 -
 127
127 -
 128
128 -
 129
129 -
 130
130 -
 131
131 -
132
-
133
-
134
-
135
-
136
-
137
-
138
-
139
-
140
-
141
-
142
-
143
-
144
-
145
-
146
-
147
-
148
-
149
-
150
-
151
-
152
-
153
-
154
-
155
-
156
-
157
-
158
-
159
-
160
-
161
-
162
-
163
-
164
-
165
-
166
-
167
-
168
-
169
-
170
-
171
-
172
-
173
-
174
-
175
-
176
-
177
-
178
-
179
-
180
-
181
-
182
-
183
-
184
-
185
-
186
-
187
-
188
-
189
-
190
-
191
-
192
-
193
-
194
-
195
-
196
-
197
-
198
-
199
-
200
-
201
-
202
-
203
-
204
-
205
-
206
-
207
-
208
-
209
-
210
-
211
-
212
-
213
-
214
-
215
-
216
-
217
-
218
-
219
-
220
-
221
-
222
-
223
-
224
-
225
-
226
-
227
-
228
-
229
-
230
-
231
-
232
-
233
-
234
-
235
-
236
-
237
-
238
-
239
-
240
-
241
-
242
-
243
-
244
 |
 |