HP Photosmart Premium Fax All-in-One Printer - C309 Full User Guide - Page 175
Solution 2: Make sure paper is loaded in the input tray, The fax I received is blank
 |
View all HP Photosmart Premium Fax All-in-One Printer - C309 manuals
Add to My Manuals
Save this manual to your list of manuals |
Page 175 highlights
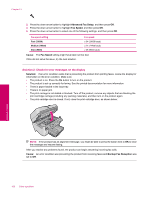
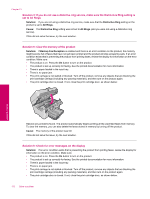
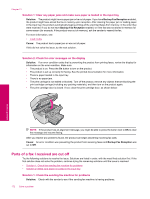
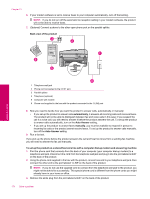
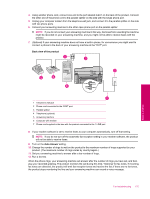
Cause: The sending fax machine had a problem. If this did not solve the issue, try the next solution. Solution 2: Make sure paper is loaded in the input tray Solution: Make sure you have paper loaded correctly. For more information, see: • Load media Cause: The paper-width guide was not positioned correctly. If this did not solve the issue, try the next solution. The fax I received is blank Solution: Check with the sender to see if the sending fax machine is having problems. Cause: The sending fax machine had a problem. The computer to which I am connecting has only one phone port Solution: This possible solution applies only in the countries/regions that receive a 2-wire phone cord in the box with the HP All-in-One, including: Argentina, Australia, Brazil, Canada, Chile, China, Colombia, Greece, India, Indonesia, Ireland, Japan, Korea, Latin America, Malaysia, Mexico, Philippines, Poland, Portugal, Russia, Saudi Arabia, Singapore, Spain, Taiwan, Thailand, USA, Venezuela, and Vietnam. If your computer has only one phone port, you will need to purchase a parallel splitter (also called a coupler), as shown below. (A parallel splitter has one RJ-11 port on the front and two RJ-11 ports on the back. Do not use a 2-line phone splitter, a serial splitter, or a parallel splitter which has two RJ-11 ports on the front and a plug on the back.) Example of a parallel splitter To set up the product on a shared fax/voice line with a computer dial-up modem 1. Find the phone cord that connects from the back of your computer (your computer dial-up modem) to a telephone wall jack. Disconnect the cord from the telephone wall jack and plug it into the port labeled 2-EXT on the back of the product. 2. Using the phone cord supplied in the box with the product, connect one end to your telephone wall jack, then connect the other end to the port labeled 1-LINE on the back of the product. NOTE: If you do not use the supplied cord to connect from the telephone wall jack to the product, you might not be able to fax successfully. This special phone cord is different from the phone cords you might already have in your home or office. 3. Remove the white plug from the port labeled 2-EXT on the back of the product. 4. Using another phone cord, connect one end to the port labeled 2-EXT on the back of the product. Connect the other end of the phone cord to the parallel splitter on the side with the single phone port. 5. Unplug your computer modem from the telephone wall jack, and connect it to the parallel splitter on the side with two phone ports. Fax troubleshooting 173 Solve a problem
-
 1
1 -
2
-
3
-
4
-
5
-
6
-
7
-
8
-
9
-
10
-
11
-
12
-
13
-
14
-
15
-
16
-
17
-
18
-
19
-
20
-
21
-
22
-
23
-
24
-
25
-
26
-
27
-
28
-
29
-
30
-
31
-
32
-
33
-
34
-
35
-
36
-
37
-
38
-
39
-
40
-
41
-
42
-
43
-
44
-
45
-
46
-
47
-
48
-
49
-
50
-
51
-
52
-
53
-
54
-
55
-
56
-
57
-
58
-
59
-
60
-
61
-
62
-
63
-
64
-
65
-
66
-
67
-
68
-
69
-
70
-
71
-
72
-
73
-
74
-
75
-
76
-
77
-
78
-
79
-
80
-
81
-
82
-
83
-
84
-
85
-
86
-
87
-
88
-
89
-
90
-
91
-
92
-
93
-
94
-
95
-
96
-
97
-
98
-
99
-
100
-
101
-
102
-
103
-
104
-
105
-
106
-
107
-
108
-
109
-
110
-
111
-
112
-
113
-
114
-
115
-
116
-
117
-
118
-
119
-
120
-
121
-
122
-
123
-
124
-
125
-
126
-
127
-
128
-
129
-
130
-
131
-
132
-
133
-
134
-
135
-
136
-
137
-
138
-
139
-
140
-
141
-
142
-
143
-
144
-
145
-
146
-
147
-
148
-
149
-
150
-
151
-
152
-
153
-
154
-
155
-
156
-
157
-
158
-
159
-
160
-
161
-
162
-
163
-
164
-
165
-
166
-
167
-
168
-
169
-
 170
170 -
 171
171 -
 172
172 -
 173
173 -
 174
174 -
 175
175 -
 176
176 -
 177
177 -
 178
178 -
 179
179 -
 180
180 -
181
-
182
-
183
-
184
-
185
-
186
-
187
-
188
-
189
-
190
-
191
-
192
-
193
-
194
-
195
-
196
-
197
-
198
-
199
-
200
-
201
-
202
-
203
-
204
-
205
-
206
-
207
-
208
-
209
-
210
-
211
-
212
-
213
-
214
-
215
-
216
-
217
-
218
-
219
-
220
-
221
-
222
-
223
-
224
-
225
-
226
-
227
-
228
-
229
-
230
-
231
-
232
-
233
-
234
-
235
-
236
-
237
-
238
-
239
-
240
-
241
-
242
-
243
-
244
 |
 |
