HP Photosmart Premium Fax All-in-One Printer - C309 Full User Guide - Page 222
Use a dry swab or lint-free cloth to wipe the contacts., Reinstall the ink cartridge.
 |
View all HP Photosmart Premium Fax All-in-One Printer - C309 manuals
Add to My Manuals
Save this manual to your list of manuals |
Page 222 highlights
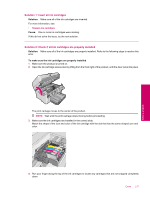
Chapter 13 4. Hold the ink cartridge by its sides with the bottom pointing up and locate the electrical contacts on the ink cartridge. The electrical contacts are four small rectangles of copper or gold-colored metal on the bottom of the ink cartridge. 1 Ink window 2 Electrical contacts 5. Wipe the contacts with a dry swab or lint-free cloth. 6. On the inside of the product, locate the contacts in the printhead. The contacts look like a set of four copper or gold-colored pins positioned to meet the contacts on the ink cartridge. 7. Use a dry swab or lint-free cloth to wipe the contacts. 8. Reinstall the ink cartridge. 220 Solve a problem Solve a problem
-
 1
1 -
2
-
3
-
4
-
5
-
6
-
7
-
8
-
9
-
10
-
11
-
12
-
13
-
14
-
15
-
16
-
17
-
18
-
19
-
20
-
21
-
22
-
23
-
24
-
25
-
26
-
27
-
28
-
29
-
30
-
31
-
32
-
33
-
34
-
35
-
36
-
37
-
38
-
39
-
40
-
41
-
42
-
43
-
44
-
45
-
46
-
47
-
48
-
49
-
50
-
51
-
52
-
53
-
54
-
55
-
56
-
57
-
58
-
59
-
60
-
61
-
62
-
63
-
64
-
65
-
66
-
67
-
68
-
69
-
70
-
71
-
72
-
73
-
74
-
75
-
76
-
77
-
78
-
79
-
80
-
81
-
82
-
83
-
84
-
85
-
86
-
87
-
88
-
89
-
90
-
91
-
92
-
93
-
94
-
95
-
96
-
97
-
98
-
99
-
100
-
101
-
102
-
103
-
104
-
105
-
106
-
107
-
108
-
109
-
110
-
111
-
112
-
113
-
114
-
115
-
116
-
117
-
118
-
119
-
120
-
121
-
122
-
123
-
124
-
125
-
126
-
127
-
128
-
129
-
130
-
131
-
132
-
133
-
134
-
135
-
136
-
137
-
138
-
139
-
140
-
141
-
142
-
143
-
144
-
145
-
146
-
147
-
148
-
149
-
150
-
151
-
152
-
153
-
154
-
155
-
156
-
157
-
158
-
159
-
160
-
161
-
162
-
163
-
164
-
165
-
166
-
167
-
168
-
169
-
170
-
171
-
172
-
173
-
174
-
175
-
176
-
177
-
178
-
179
-
180
-
181
-
182
-
183
-
184
-
185
-
186
-
187
-
188
-
189
-
190
-
191
-
192
-
193
-
194
-
195
-
196
-
197
-
198
-
199
-
200
-
201
-
202
-
203
-
204
-
205
-
206
-
207
-
208
-
209
-
210
-
211
-
212
-
213
-
214
-
215
-
216
-
 217
217 -
 218
218 -
 219
219 -
 220
220 -
 221
221 -
 222
222 -
 223
223 -
 224
224 -
 225
225 -
 226
226 -
 227
227 -
228
-
229
-
230
-
231
-
232
-
233
-
234
-
235
-
236
-
237
-
238
-
239
-
240
-
241
-
242
-
243
-
244
 |
 |

4.
Hold the ink cartridge by its sides with the bottom pointing up and locate the electrical contacts on the ink
cartridge.
The electrical contacts are four small rectangles of copper or gold-colored metal on the bottom of the ink
cartridge.
1
Ink window
2
Electrical contacts
5.
Wipe the contacts with a dry swab or lint-free cloth.
6.
On the inside of the product, locate the contacts in the printhead.
The contacts look like a set of four copper or gold-colored pins positioned to meet the contacts on the ink
cartridge.
7.
Use a dry swab or lint-free cloth to wipe the contacts.
8.
Reinstall the ink cartridge.
Chapter 13
220
Solve a problem
Solve a problem