HP Photosmart Premium Fax All-in-One Printer - C309 Full User Guide - Page 121
Print Quality Report, Clean Printhead
 |
View all HP Photosmart Premium Fax All-in-One Printer - C309 manuals
Add to My Manuals
Save this manual to your list of manuals |
Page 121 highlights
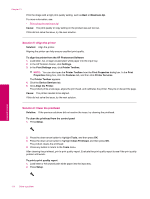
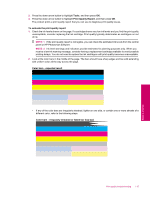
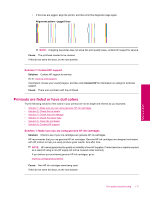
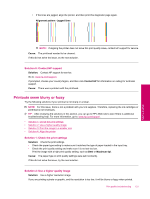
3. Press the down arrow button to highlight Clean Printhead, and then press OK. The product cleans the printhead. 4. Press any button to return to the Tools menu. After cleaning the printhead, print a print quality report. Evaluate the print quality report to see if the print quality problem still exists. To print a print quality report 1. Load letter or A4 unused plain white paper into the input tray. 2. Press Setup. 3. Press the down arrow button to highlight Tools, and then press OK. 4. Press the down arrow button to highlight Print Quality Report, and then press OK. The product prints a print quality report that you can use to diagnose print quality issues. To evaluate the print quality report 1. Check the ink levels shown on the page. If a cartridge shows very low ink levels and you find the print quality unacceptable, consider replacing that ink cartridge. Print quality typically deteriorates as cartridges run out of ink. NOTE: 1 If the print quality report is not legible, you can check the estimated ink levels from the control panel or HP Photosmart Software. NOTE: 2 Ink level warnings and indicators provide estimates for planning purposes only. When you receive a low-ink warning message, consider having a replacement cartridge available to avoid possible printing delays. You do not need to replace the ink cartridges until print quality becomes unacceptable. 2. Look at the color bars in the middle of the page. The bars should have sharp edges and be solid extending with uniform color all the way across the page. Color bars - expected result • If any of the color bars are irregularly streaked, lighter on one side, or contain one or more streaks of a different color, refer to the following steps. Color bars - irregularly streaked or faded bar (top bar) Print quality troubleshooting 119 Solve a problem
-
 1
1 -
2
-
3
-
4
-
5
-
6
-
7
-
8
-
9
-
10
-
11
-
12
-
13
-
14
-
15
-
16
-
17
-
18
-
19
-
20
-
21
-
22
-
23
-
24
-
25
-
26
-
27
-
28
-
29
-
30
-
31
-
32
-
33
-
34
-
35
-
36
-
37
-
38
-
39
-
40
-
41
-
42
-
43
-
44
-
45
-
46
-
47
-
48
-
49
-
50
-
51
-
52
-
53
-
54
-
55
-
56
-
57
-
58
-
59
-
60
-
61
-
62
-
63
-
64
-
65
-
66
-
67
-
68
-
69
-
70
-
71
-
72
-
73
-
74
-
75
-
76
-
77
-
78
-
79
-
80
-
81
-
82
-
83
-
84
-
85
-
86
-
87
-
88
-
89
-
90
-
91
-
92
-
93
-
94
-
95
-
96
-
97
-
98
-
99
-
100
-
101
-
102
-
103
-
104
-
105
-
106
-
107
-
108
-
109
-
110
-
111
-
112
-
113
-
114
-
115
-
 116
116 -
 117
117 -
 118
118 -
 119
119 -
 120
120 -
 121
121 -
 122
122 -
 123
123 -
 124
124 -
 125
125 -
 126
126 -
127
-
128
-
129
-
130
-
131
-
132
-
133
-
134
-
135
-
136
-
137
-
138
-
139
-
140
-
141
-
142
-
143
-
144
-
145
-
146
-
147
-
148
-
149
-
150
-
151
-
152
-
153
-
154
-
155
-
156
-
157
-
158
-
159
-
160
-
161
-
162
-
163
-
164
-
165
-
166
-
167
-
168
-
169
-
170
-
171
-
172
-
173
-
174
-
175
-
176
-
177
-
178
-
179
-
180
-
181
-
182
-
183
-
184
-
185
-
186
-
187
-
188
-
189
-
190
-
191
-
192
-
193
-
194
-
195
-
196
-
197
-
198
-
199
-
200
-
201
-
202
-
203
-
204
-
205
-
206
-
207
-
208
-
209
-
210
-
211
-
212
-
213
-
214
-
215
-
216
-
217
-
218
-
219
-
220
-
221
-
222
-
223
-
224
-
225
-
226
-
227
-
228
-
229
-
230
-
231
-
232
-
233
-
234
-
235
-
236
-
237
-
238
-
239
-
240
-
241
-
242
-
243
-
244
 |
 |