HP Photosmart Premium Fax All-in-One Printer - C309 Full User Guide - Page 149
The product is having problems sending and receiving faxes
 |
View all HP Photosmart Premium Fax All-in-One Printer - C309 manuals
Add to My Manuals
Save this manual to your list of manuals |
Page 149 highlights
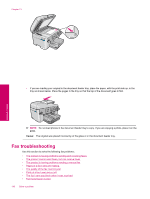
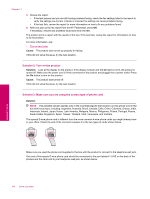
• Fax tones are recorded on my answering machine • The product cannot receive faxes, but can send faxes • The product is having problems receiving a manual fax • The product is not answering incoming fax calls • Pages of a fax I received are missing • Faxes are received but do not print • Parts of a fax I received are cut off • The fax I received is blank • The computer to which I am connecting has only one phone port • I hear static on my telephone line since connecting the product • The fax test failed • I am having problems faxing over the Internet using IP phone • The fax log report shows an error For more Fax troubleshooting, you can access the HP Guided Solutions by clicking . The product is having problems sending and receiving faxes Try the following solutions to resolve the issue. Solutions are listed in order, with the most likely solution first. If the first solution does not solve the problem, continue trying the remaining solutions until the issue is resolved. • Solution 1: Make sure the product is set up for faxing correctly • Solution 2: Turn on the product • Solution 3: Make sure you are using the correct type of phone cord • Solution 4: Make sure other office equipment is connected correctly • Solution 5: Try removing the splitter • Solution 6: Make sure the telephone wall jack works properly • Solution 7: Check the phone line for noise • Solution 8: Make sure extension phones or other equipment on the phone line are not in use • Solution 9: Make sure the product is connected to an analog phone line • Solution 10: If you use a DSL service, make sure you have a DSL filter installed • Solution 11: If you use a DSL service, make sure the DSL modem is properly grounded • Solution 12: If you use a PBX or ISDN converter, make sure you are using a port designated for fax and phone use • Solution 13: Check for and resolve any error messages • Solution 14: Lower the fax speed • Solution 15: If you are faxing over the Internet using IP phone, resend the fax at a later time Solution 1: Make sure the product is set up for faxing correctly Solution: Make sure you set up the product properly for faxing, based on the equipment and services you have on the same phone line as the product. For more information, see Set up the HP Photosmart for faxing. Then, run a fax test to check the status of the product and to make sure you set it up properly. To test your fax setup from the control panel 1. Load letter or A4 unused plain white paper into the input tray. 2. Press Setup. 3. Press the down arrow button to highlight Tools, and then press OK. 4. Press the down arrow button to highlight Run Fax Test, and then press OK. The HP Photosmart displays the status of the test on the display and prints a report. Fax troubleshooting 147 Solve a problem
-
 1
1 -
2
-
3
-
4
-
5
-
6
-
7
-
8
-
9
-
10
-
11
-
12
-
13
-
14
-
15
-
16
-
17
-
18
-
19
-
20
-
21
-
22
-
23
-
24
-
25
-
26
-
27
-
28
-
29
-
30
-
31
-
32
-
33
-
34
-
35
-
36
-
37
-
38
-
39
-
40
-
41
-
42
-
43
-
44
-
45
-
46
-
47
-
48
-
49
-
50
-
51
-
52
-
53
-
54
-
55
-
56
-
57
-
58
-
59
-
60
-
61
-
62
-
63
-
64
-
65
-
66
-
67
-
68
-
69
-
70
-
71
-
72
-
73
-
74
-
75
-
76
-
77
-
78
-
79
-
80
-
81
-
82
-
83
-
84
-
85
-
86
-
87
-
88
-
89
-
90
-
91
-
92
-
93
-
94
-
95
-
96
-
97
-
98
-
99
-
100
-
101
-
102
-
103
-
104
-
105
-
106
-
107
-
108
-
109
-
110
-
111
-
112
-
113
-
114
-
115
-
116
-
117
-
118
-
119
-
120
-
121
-
122
-
123
-
124
-
125
-
126
-
127
-
128
-
129
-
130
-
131
-
132
-
133
-
134
-
135
-
136
-
137
-
138
-
139
-
140
-
141
-
142
-
143
-
 144
144 -
 145
145 -
 146
146 -
 147
147 -
 148
148 -
 149
149 -
 150
150 -
 151
151 -
 152
152 -
 153
153 -
 154
154 -
155
-
156
-
157
-
158
-
159
-
160
-
161
-
162
-
163
-
164
-
165
-
166
-
167
-
168
-
169
-
170
-
171
-
172
-
173
-
174
-
175
-
176
-
177
-
178
-
179
-
180
-
181
-
182
-
183
-
184
-
185
-
186
-
187
-
188
-
189
-
190
-
191
-
192
-
193
-
194
-
195
-
196
-
197
-
198
-
199
-
200
-
201
-
202
-
203
-
204
-
205
-
206
-
207
-
208
-
209
-
210
-
211
-
212
-
213
-
214
-
215
-
216
-
217
-
218
-
219
-
220
-
221
-
222
-
223
-
224
-
225
-
226
-
227
-
228
-
229
-
230
-
231
-
232
-
233
-
234
-
235
-
236
-
237
-
238
-
239
-
240
-
241
-
242
-
243
-
244
 |
 |
