IBM 620410U User Guide - Page 66
Laser radiation when open. Do not stare into the beam, do not view, diode. Note the following.
 |
UPC - 087944665410
View all IBM 620410U manuals
Add to My Manuals
Save this manual to your list of manuals |
Page 66 highlights
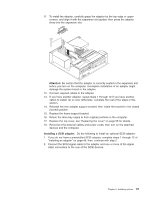
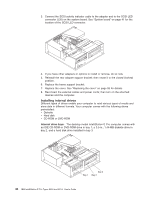
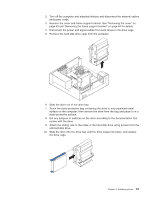
DANGER Some laser products contain an embedded Class 3A or Class 3B laser diode. Note the following. Laser radiation when open. Do not stare into the beam, do not view directly with optical instruments, and avoid direct exposure to the beam. 8. Touch the static-protective bag containing the drive to any unpainted metal surface on the computer; then remove the drive from the bag and place it on a static-protective surface. 9. Set any jumpers or switches on the drive according to the documentation that comes with the drive. 10. Slide the drive into the drive bay, and then attach the drive to the drive cage. 11. Connect one end of the diskette or IDE signal cable into the back of the drive and the other end of the cable into the diskette or IDE connector on the system board. For the location of the diskette or IDE connectors, see "System board internal cable connectors" on page 42. Note: Make sure to route the signal cable so that it does not block the air flow to the rear of the drives or over the microprocessor. 12. Connect the power cable to the back of the drive. The connectors are keyed and can be inserted only one way. 13. If you have other options to install or remove, do so now. 14. Replace the cover. See "Replacing the cover" on page 55 for details. 15. Reconnect the external cables and power cords; then turn on the attached devices and the computer. Installing a hard disk drive: To replace a hard disk drive in the desktop model computer, do the following: 1. Read the information in "Preinstallation steps" on page 49. 50 IBM IntelliStation E Pro Types 6204 and 6214: User's Guide
-
 1
1 -
2
-
3
-
4
-
5
-
6
-
7
-
8
-
9
-
10
-
11
-
12
-
13
-
14
-
15
-
16
-
17
-
18
-
19
-
20
-
21
-
22
-
23
-
24
-
25
-
26
-
27
-
28
-
29
-
30
-
31
-
32
-
33
-
34
-
35
-
36
-
37
-
38
-
39
-
40
-
41
-
42
-
43
-
44
-
45
-
46
-
47
-
48
-
49
-
50
-
51
-
52
-
53
-
54
-
55
-
56
-
57
-
58
-
59
-
60
-
 61
61 -
 62
62 -
 63
63 -
 64
64 -
 65
65 -
 66
66 -
 67
67 -
 68
68 -
 69
69 -
 70
70 -
 71
71 -
72
-
73
-
74
-
75
-
76
-
77
-
78
-
79
-
80
-
81
-
82
-
83
-
84
-
85
-
86
-
87
-
88
-
89
-
90
-
91
-
92
-
93
-
94
-
95
-
96
-
97
-
98
-
99
-
100
-
101
-
102
-
103
-
104
-
105
-
106
-
107
-
108
-
109
-
110
-
111
-
112
-
113
-
114
-
115
-
116
-
117
-
118
-
119
-
120
-
121
-
122
-
123
-
124
-
125
-
126
-
127
-
128
-
129
-
130
-
131
-
132
-
133
-
134
-
135
-
136
-
137
-
138
-
139
-
140
-
141
-
142
-
143
-
144
-
145
-
146
-
147
-
148
-
149
-
150
-
151
-
152
-
153
-
154
-
155
-
156
-
157
-
158
-
159
-
160
-
161
-
162
-
163
-
164
-
165
-
166
 |
 |
