IBM 620410U User Guide - Page 83
Installing internal drives, CD-ROM or DVD-ROM
 |
UPC - 087944665410
View all IBM 620410U manuals
Add to My Manuals
Save this manual to your list of manuals |
Page 83 highlights
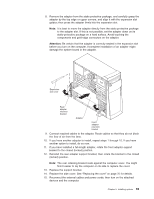
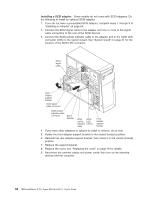
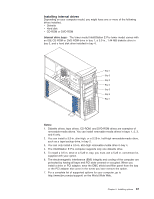
Installing internal drives Depending on your computer model, you might have one or more of the following drives installed. v Diskette v Hard disk v CD-ROM or DVD-ROM Internal drive bays: The tower model IntelliStation E Pro tower model comes with an IDE CD-ROM or DVD-ROM drive in bay 1, a 3.5-in., 1.44 MB diskette drive in bay 3, and a hard disk drive installed in bay 4. Notes: 1. Diskette drives, tape drives, CD-ROM, and DVD-ROM drives are examples of removable-media drives. You can install removable-media drives in bays 1, 2, 3, and 4 only. 2. You can install a 3.5-in. slim-high, or a 5.25-in. half-high removable-media drive, such as a tape backup drive, in bay 2. 3. You can only install a 3.5-in. slim-high removable-media drive in bay 4. 4. The IntelliStation E Pro computer supports only one diskette drive. 5. To install a 3.5-in. drive in a 5.25-in. bay, you must use a 5.25 in. conversion kit, supplied with your option. 6. The electromagnetic interference (EMI) integrity and cooling of the computer are protected by having all bays and PCI slots covered or occupied. When you install a drive or PCI adapter, save the EMC shield and filler panel from the bay or the PCI adapter slot cover in the event you later remove the option. 7. For a complete list of supported options for your computer, go to http://www.ibm.com/pc/support/ on the World Wide Web. Chapter 5. Installing options 67
-
 1
1 -
2
-
3
-
4
-
5
-
6
-
7
-
8
-
9
-
10
-
11
-
12
-
13
-
14
-
15
-
16
-
17
-
18
-
19
-
20
-
21
-
22
-
23
-
24
-
25
-
26
-
27
-
28
-
29
-
30
-
31
-
32
-
33
-
34
-
35
-
36
-
37
-
38
-
39
-
40
-
41
-
42
-
43
-
44
-
45
-
46
-
47
-
48
-
49
-
50
-
51
-
52
-
53
-
54
-
55
-
56
-
57
-
58
-
59
-
60
-
61
-
62
-
63
-
64
-
65
-
66
-
67
-
68
-
69
-
70
-
71
-
72
-
73
-
74
-
75
-
76
-
77
-
 78
78 -
 79
79 -
 80
80 -
 81
81 -
 82
82 -
 83
83 -
 84
84 -
 85
85 -
 86
86 -
 87
87 -
 88
88 -
89
-
90
-
91
-
92
-
93
-
94
-
95
-
96
-
97
-
98
-
99
-
100
-
101
-
102
-
103
-
104
-
105
-
106
-
107
-
108
-
109
-
110
-
111
-
112
-
113
-
114
-
115
-
116
-
117
-
118
-
119
-
120
-
121
-
122
-
123
-
124
-
125
-
126
-
127
-
128
-
129
-
130
-
131
-
132
-
133
-
134
-
135
-
136
-
137
-
138
-
139
-
140
-
141
-
142
-
143
-
144
-
145
-
146
-
147
-
148
-
149
-
150
-
151
-
152
-
153
-
154
-
155
-
156
-
157
-
158
-
159
-
160
-
161
-
162
-
163
-
164
-
165
-
166
 |
 |
