IBM 620410U User Guide - Page 89
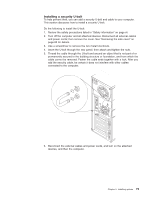
on vii., Turn off the computer and all attached devices. Disconnect all external cables
 |
UPC - 087944665410
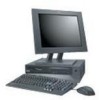
View all IBM 620410U manuals
Add to My Manuals
Save this manual to your list of manuals |
Page 89 highlights
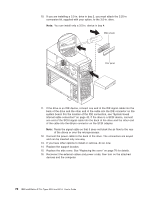
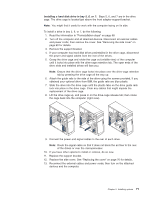
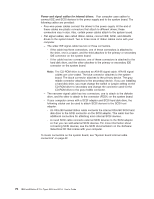
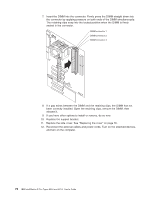
Review the following information before connecting power and signal cables to internal drives: v The drives that are preinstalled in your computer come with power and signal cables attached. If you replace any drives, remember which cable is attached to which drive. v When you install a drive, ensure that the drive connector at the end of the signal cable is connected to the drive and that the drive connector at the other end is connected to the system board. This reduces electronic noise from the computer. v If two IDE devices are used on a single cable, one must be designated as the primary device and the other as the secondary device; otherwise, the computer might not recognize some of the IDE devices. The primary and secondary designation is determined by switch or jumper settings on each IDE device. v If two IDE devices are on a single cable, and only one is a hard disk drive, the hard disk drive must be set as a primary device. v If you have only one IDE device on a cable, it must be set as a primary device. Installing memory modules Adding memory to your computer is an easy way to make programs run faster. You can increase the amount of memory in your computer by installing memory modules. Your IntelliStation E Pro computer uses industry-standard dual inline memory modules (DIMMs). Do the following to install a DIMM: Attention: When handling static-sensitive devices, take precautions to avoid damage from static electricity. For details on handling these devices, see "Handling static-sensitive devices" on page 39. 1. Review the safety precautions listed in the "Safety information" on page vii. 2. Turn off the computer and all attached devices. Disconnect all external cables and power cords; then remove the cover. See "Removing the side cover" on page 60 for details. 3. Remove the support bracket. See "Removing the support bracket" on page 61. 4. Touch the static-protective package containing the DIMM to any unpainted metal surface on the computer. Then remove the new DIMM from the package. 5. Open the retaining clips and, if necessary, remove any existing DIMM. 6. Gently open the retaining clip on each end of the DIMM slot. Turn the DIMM so that the pins align correctly with the connector. Chapter 5. Installing options 73
-
 1
1 -
2
-
3
-
4
-
5
-
6
-
7
-
8
-
9
-
10
-
11
-
12
-
13
-
14
-
15
-
16
-
17
-
18
-
19
-
20
-
21
-
22
-
23
-
24
-
25
-
26
-
27
-
28
-
29
-
30
-
31
-
32
-
33
-
34
-
35
-
36
-
37
-
38
-
39
-
40
-
41
-
42
-
43
-
44
-
45
-
46
-
47
-
48
-
49
-
50
-
51
-
52
-
53
-
54
-
55
-
56
-
57
-
58
-
59
-
60
-
61
-
62
-
63
-
64
-
65
-
66
-
67
-
68
-
69
-
70
-
71
-
72
-
73
-
74
-
75
-
76
-
77
-
78
-
79
-
80
-
81
-
82
-
83
-
 84
84 -
 85
85 -
 86
86 -
 87
87 -
 88
88 -
 89
89 -
 90
90 -
 91
91 -
 92
92 -
 93
93 -
 94
94 -
95
-
96
-
97
-
98
-
99
-
100
-
101
-
102
-
103
-
104
-
105
-
106
-
107
-
108
-
109
-
110
-
111
-
112
-
113
-
114
-
115
-
116
-
117
-
118
-
119
-
120
-
121
-
122
-
123
-
124
-
125
-
126
-
127
-
128
-
129
-
130
-
131
-
132
-
133
-
134
-
135
-
136
-
137
-
138
-
139
-
140
-
141
-
142
-
143
-
144
-
145
-
146
-
147
-
148
-
149
-
150
-
151
-
152
-
153
-
154
-
155
-
156
-
157
-
158
-
159
-
160
-
161
-
162
-
163
-
164
-
165
-
166
 |
 |