Lenovo NetVista X40 Quick Reference for NetVista 2179 and 6643 systems (Dutch) - Page 67
Internal drive bays, Notes
 |
View all Lenovo NetVista X40 manuals
Add to My Manuals
Save this manual to your list of manuals |
Page 67 highlights
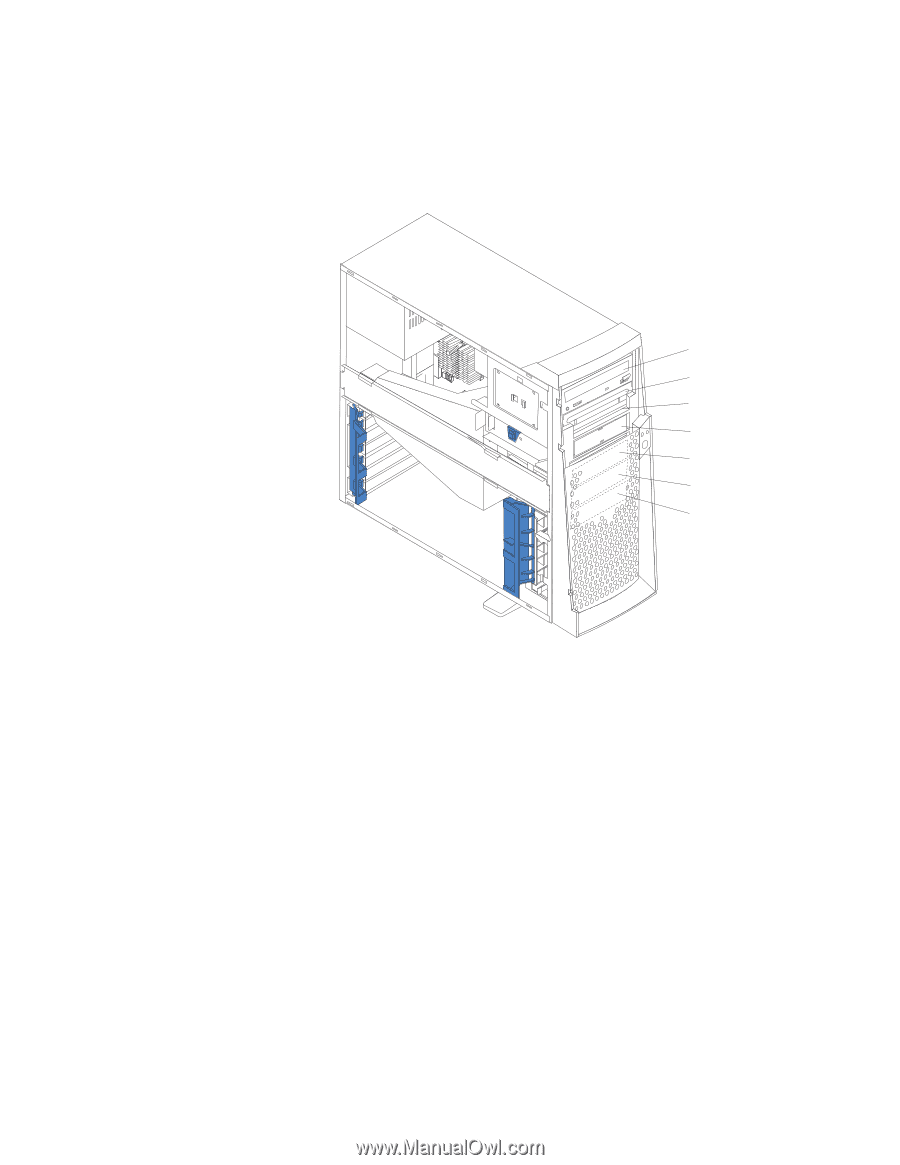
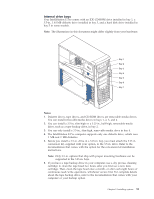
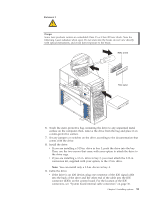
Internal drive bays Your IntelliStation E Pro comes with an IDE CD-ROM drive installed in bay 1, a 3.5-in., 1.44 MB diskette drive installed in bay 3, and a hard disk drive installed in bay 5 in some models. Note: The illustrations in this document might differ slightly from your hardware. Bay 1 Bay 2 Bay 3 Bay 4 Bay 5 Bay 6 Bay 7 Notes: 1. Diskette drives, tape drives, and CD-ROM drives are removable media drives. You can install removable-media drives in bays 1, 2, 3, and 4. 2. You can install a 3.5-in, slim-high or a 5.25-in., half-high, removable-media drive, such as a tape backup drive, in bay 2. 3. You can only install a 3.5-in., slim-high, removable-media drive in bay 4. 4. The IntelliStation E Pro computer supports only one diskette drive, which uses 1 MB and 2 MB diskettes. 5. Before you install a 3.5-in. drive in a 5.25-in. bay, you must attach the 5.25 in. conversion kit, supplied with your option, to the 3.5-in. drive. Refer to the documentation that comes with the option for the conversion kit installation instructions. Note: Only 3.5-in. options that ship with proper mounting hardware can be supported in the 5.25-in. bays. 6. If you have a tape backup drive in your computer, use a dry process cleaning cartridge to clean the tape head two hours after you first use a new data cartridge. Then, clean the tape head once a month, or after each eight hours of continuous read/write operations, whichever occurs first. For complete details about the tape backup drive, refer to the documentation that comes with your computer or your backup option. Chapter 5. Installing options 51
-
 1
1 -
2
-
3
-
4
-
5
-
6
-
7
-
8
-
9
-
10
-
11
-
12
-
13
-
14
-
15
-
16
-
17
-
18
-
19
-
20
-
21
-
22
-
23
-
24
-
25
-
26
-
27
-
28
-
29
-
30
-
31
-
32
-
33
-
34
-
35
-
36
-
37
-
38
-
39
-
40
-
41
-
42
-
43
-
44
-
45
-
46
-
47
-
48
-
49
-
50
-
51
-
52
-
53
-
54
-
55
-
56
-
57
-
58
-
59
-
60
-
61
-
 62
62 -
 63
63 -
 64
64 -
 65
65 -
 66
66 -
 67
67 -
 68
68 -
 69
69 -
 70
70 -
 71
71 -
 72
72 -
73
-
74
-
75
-
76
-
77
-
78
-
79
-
80
-
81
-
82
-
83
-
84
-
85
-
86
-
87
-
88
-
89
-
90
-
91
-
92
-
93
-
94
-
95
-
96
-
97
-
98
-
99
-
100
-
101
-
102
-
103
-
104
-
105
-
106
-
107
-
108
-
109
-
110
-
111
-
112
-
113
-
114
-
115
-
116
-
117
-
118
-
119
-
120
-
121
-
122
-
123
-
124
-
125
-
126
-
127
-
128
-
129
-
130
-
131
-
132
-
133
-
134
-
135
-
136
-
137
-
138
-
139
-
140
-
141
-
142
-
143
-
144
-
145
-
146
-
147
-
148
-
149
-
150
-
151
-
152
-
153
-
154
-
155
-
156
 |
 |