Lenovo NetVista X40 Quick Reference for NetVista 2179 and 6643 systems (Dutch) - Page 72
Save Settings, Attention, Install the DIMM
 |
View all Lenovo NetVista X40 manuals
Add to My Manuals
Save this manual to your list of manuals |
Page 72 highlights
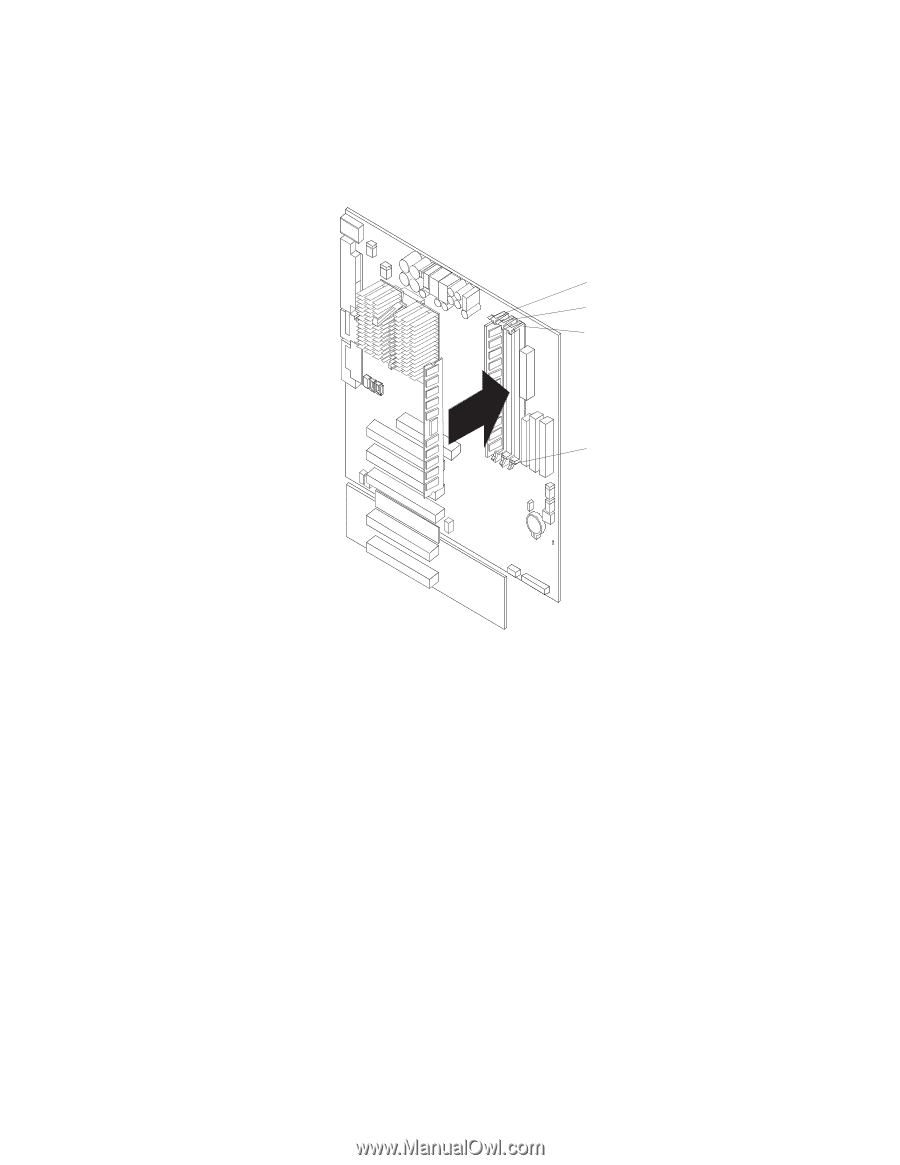
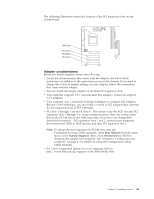
Utility program. When you restart the computer, the system displays a message indicating that the memory configuration has changed. Start the Configuration/Setup Utility program and select Save Settings. See "Chapter 4. Configuring your computer" on page 27 for more information. 4. The illustrations in this document might differ slightly from your hardware. DIMM connector 1 DIMM connector 2 DIMM connector 3 Retaining clip Complete the following steps to install a DIMM. Attention: When you handle ESD-sensitive devices, take precautions to avoid damage from static electricity. For details on handling these devices, see "Handling static-sensitive devices" on page 38. 1. Review the safety precautions listed in "Safety information" on page 39. 2. Remove any media (diskettes, CDs, or tapes) from the drives and shut down your operating system. 3. Turn off the computer and attached devices and disconnect all external cables and power cords; then, remove the cover (see "Removing the side cover" on page 45 for details). 4. Remove the support bracket assembly and disconnect the fan cable from the connector (SYSFA3) on the system board. See "Removing the support bracket assembly" on page 46 for removal instructions. 5. Touch the static-protective package containing the DIMM to any unpainted metal surface on the computer. Then, remove the DIMM from the package. 6. Install the DIMM: 7. a. If you are installing a DIMM in connector 1, remove the AGP adapter. Remove the AGP adapter only if you are replacing the DIMM in connector 1. See "System and PCI extender board option connectors" on page 35 for the location of the AGP slot. See "Installing an adapter" on page 48 for details about removing the AGP adapter. 56 IBM® IntelliStation® E Pro: User's Guide IntelliStation E Pro Types 6836, 6846
-
 1
1 -
2
-
3
-
4
-
5
-
6
-
7
-
8
-
9
-
10
-
11
-
12
-
13
-
14
-
15
-
16
-
17
-
18
-
19
-
20
-
21
-
22
-
23
-
24
-
25
-
26
-
27
-
28
-
29
-
30
-
31
-
32
-
33
-
34
-
35
-
36
-
37
-
38
-
39
-
40
-
41
-
42
-
43
-
44
-
45
-
46
-
47
-
48
-
49
-
50
-
51
-
52
-
53
-
54
-
55
-
56
-
57
-
58
-
59
-
60
-
61
-
62
-
63
-
64
-
65
-
66
-
 67
67 -
 68
68 -
 69
69 -
 70
70 -
 71
71 -
 72
72 -
 73
73 -
 74
74 -
 75
75 -
 76
76 -
 77
77 -
78
-
79
-
80
-
81
-
82
-
83
-
84
-
85
-
86
-
87
-
88
-
89
-
90
-
91
-
92
-
93
-
94
-
95
-
96
-
97
-
98
-
99
-
100
-
101
-
102
-
103
-
104
-
105
-
106
-
107
-
108
-
109
-
110
-
111
-
112
-
113
-
114
-
115
-
116
-
117
-
118
-
119
-
120
-
121
-
122
-
123
-
124
-
125
-
126
-
127
-
128
-
129
-
130
-
131
-
132
-
133
-
134
-
135
-
136
-
137
-
138
-
139
-
140
-
141
-
142
-
143
-
144
-
145
-
146
-
147
-
148
-
149
-
150
-
151
-
152
-
153
-
154
-
155
-
156
 |
 |