Netgear SRXN3205 SRXN3205 Reference Manual - Page 139
Configuring the Client IP Address Range, SSL VPN, Enable Full Tunnel Support, DNS Suffix
 |
UPC - 606449057461
View all Netgear SRXN3205 manuals
Add to My Manuals
Save this manual to your list of manuals |
Page 139 highlights
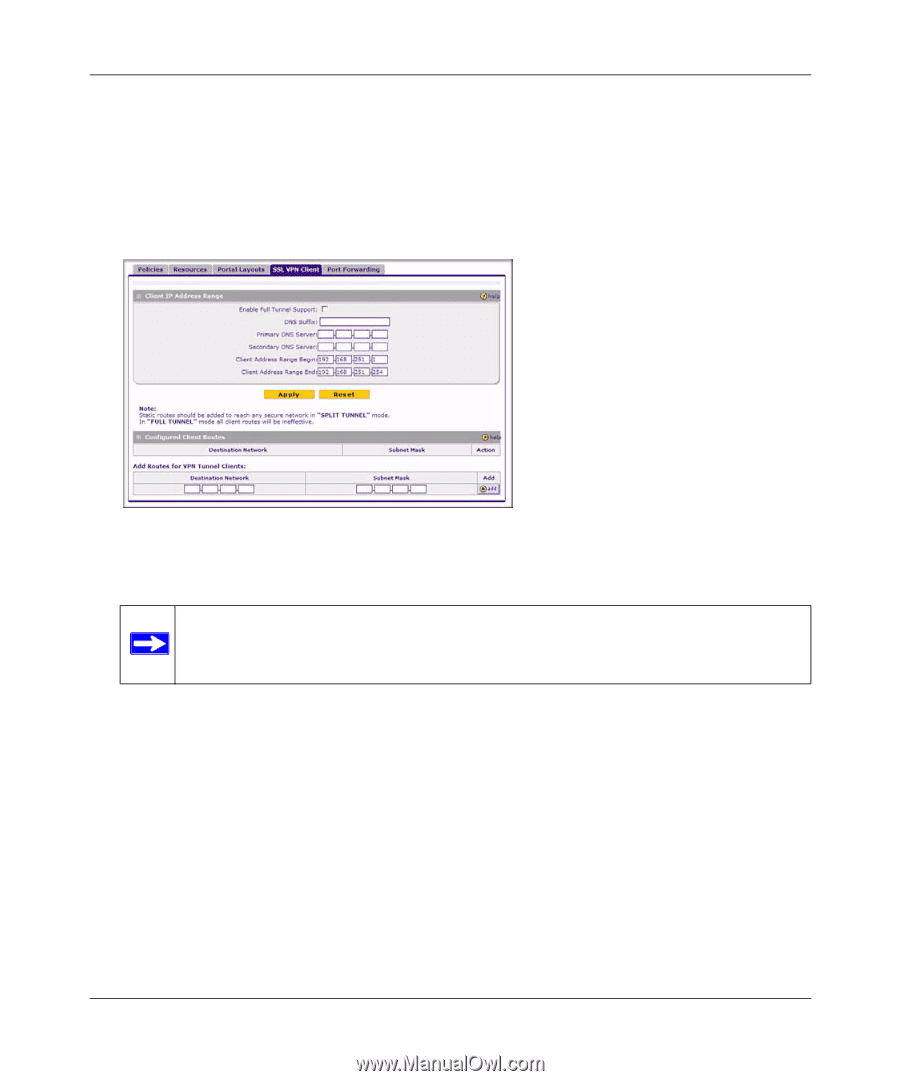
ProSafe Wireless-N VPN Firewall SRXN3205 Reference Manual Configuring the Client IP Address Range Determine the address range to be assigned to VPN tunnel clients, then define the address range. To configure the client IP address range: 1. Select VPN > SSL VPN from the main/submenu, and then select the SSL VPN Client tab. The SSL VPN Client screen displays. Figure 7-5 2. Select Enable Full Tunnel Support unless you want split tunneling. Note: In split tunneling, appropriate client routes must be added to allow traffic to be directed through the VPN tunnel. In full tunneling, all traffic is forwarded through the tunnel, including Internet traffic; client routes are not required. 3. (Optional) Enter a DNS Suffix to be appended to incomplete DNS search strings. 4. Enter Primary and Secondary DNS Server IP addresses to be assigned to the VPN tunnel clients. 5. In the Client Address Range Begin field, enter the first IP address of the IP address range. 6. In the Client Address Range End field, enter the last IP address of the IP address range. 7. Click Apply. The "Operation succeeded" message appears at the top of the tab. VPN tunnel clients are now able to connect to the firewall and receive a virtual IP address in the client address range. Virtual Private Networking Using SSL v1.0, October 2008 7-11
-
 1
1 -
2
-
3
-
4
-
5
-
6
-
7
-
8
-
9
-
10
-
11
-
12
-
13
-
14
-
15
-
16
-
17
-
18
-
19
-
20
-
21
-
22
-
23
-
24
-
25
-
26
-
27
-
28
-
29
-
30
-
31
-
32
-
33
-
34
-
35
-
36
-
37
-
38
-
39
-
40
-
41
-
42
-
43
-
44
-
45
-
46
-
47
-
48
-
49
-
50
-
51
-
52
-
53
-
54
-
55
-
56
-
57
-
58
-
59
-
60
-
61
-
62
-
63
-
64
-
65
-
66
-
67
-
68
-
69
-
70
-
71
-
72
-
73
-
74
-
75
-
76
-
77
-
78
-
79
-
80
-
81
-
82
-
83
-
84
-
85
-
86
-
87
-
88
-
89
-
90
-
91
-
92
-
93
-
94
-
95
-
96
-
97
-
98
-
99
-
100
-
101
-
102
-
103
-
104
-
105
-
106
-
107
-
108
-
109
-
110
-
111
-
112
-
113
-
114
-
115
-
116
-
117
-
118
-
119
-
120
-
121
-
122
-
123
-
124
-
125
-
126
-
127
-
128
-
129
-
130
-
131
-
132
-
133
-
 134
134 -
 135
135 -
 136
136 -
 137
137 -
 138
138 -
 139
139 -
 140
140 -
 141
141 -
 142
142 -
 143
143 -
 144
144 -
145
-
146
-
147
-
148
-
149
-
150
-
151
-
152
-
153
-
154
-
155
-
156
-
157
-
158
-
159
-
160
-
161
-
162
-
163
-
164
-
165
-
166
-
167
-
168
-
169
-
170
-
171
-
172
-
173
-
174
-
175
-
176
-
177
-
178
-
179
-
180
-
181
-
182
-
183
-
184
-
185
-
186
-
187
-
188
-
189
-
190
-
191
-
192
-
193
-
194
-
195
-
196
-
197
-
198
-
199
-
200
-
201
-
202
-
203
-
204
-
205
-
206
-
207
-
208
-
209
-
210
-
211
-
212
-
213
-
214
-
215
-
216
-
217
-
218
 |
 |