Netgear SRXN3205 SRXN3205 Reference Manual - Page 170
Enabling Remote Management Access, Administration > Remote Management, Apply
 |
UPC - 606449057461
View all Netgear SRXN3205 manuals
Add to My Manuals
Save this manual to your list of manuals |
Page 170 highlights
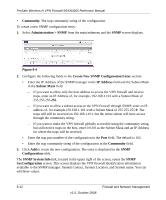
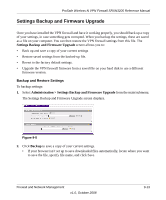
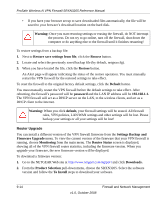
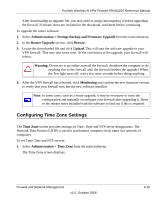
ProSafe Wireless-N VPN Firewall SRXN3205 Reference Manual Enabling Remote Management Access Using the Remote Management page, you can allow an administrator on the Internet to configure, upgrade, and check the status of your firewall. You must be logged in locally to enable remote management. Note: Be sure to change the default configuration password of the firewall to a very secure password. The ideal password should contain no dictionary words from any language, and should be a mixture of letters (both upper and lower case), numbers, and symbols. Your password can be up to 30 characters. See "Changing Passwords and Administrator Settings" on page 9-8 for the procedure on how to do this. To configure your firewall for Remote Management: 1. Select Administration > Remote Management from the main/submenu. The Remote Management screen displays. . Figure 9-3 2. Click the Yes radio box to enable HTTPS remote management (enabled by default). Note: For enhanced security, restrict access to as few external IP addresses as practical. See "Setting User Login Policies" on page 8-5 for instructions on restricting administrator access. Be sure to use strong passwords. 3. Click Apply to have your changes take effect. When accessing your firewall from the Internet, the Secure Sockets Layer (SSL) will be enabled. You will enter https:// (not http://) and type your firewall's WAN IP address into your browser. For example, if your WAN IP address is 172.16.0.123, type the following in your browser: https://172.16.0.123 9-10 v1.0, October 2008 Firewall and Network Management
-
 1
1 -
2
-
3
-
4
-
5
-
6
-
7
-
8
-
9
-
10
-
11
-
12
-
13
-
14
-
15
-
16
-
17
-
18
-
19
-
20
-
21
-
22
-
23
-
24
-
25
-
26
-
27
-
28
-
29
-
30
-
31
-
32
-
33
-
34
-
35
-
36
-
37
-
38
-
39
-
40
-
41
-
42
-
43
-
44
-
45
-
46
-
47
-
48
-
49
-
50
-
51
-
52
-
53
-
54
-
55
-
56
-
57
-
58
-
59
-
60
-
61
-
62
-
63
-
64
-
65
-
66
-
67
-
68
-
69
-
70
-
71
-
72
-
73
-
74
-
75
-
76
-
77
-
78
-
79
-
80
-
81
-
82
-
83
-
84
-
85
-
86
-
87
-
88
-
89
-
90
-
91
-
92
-
93
-
94
-
95
-
96
-
97
-
98
-
99
-
100
-
101
-
102
-
103
-
104
-
105
-
106
-
107
-
108
-
109
-
110
-
111
-
112
-
113
-
114
-
115
-
116
-
117
-
118
-
119
-
120
-
121
-
122
-
123
-
124
-
125
-
126
-
127
-
128
-
129
-
130
-
131
-
132
-
133
-
134
-
135
-
136
-
137
-
138
-
139
-
140
-
141
-
142
-
143
-
144
-
145
-
146
-
147
-
148
-
149
-
150
-
151
-
152
-
153
-
154
-
155
-
156
-
157
-
158
-
159
-
160
-
161
-
162
-
163
-
164
-
 165
165 -
 166
166 -
 167
167 -
 168
168 -
 169
169 -
 170
170 -
 171
171 -
 172
172 -
 173
173 -
 174
174 -
 175
175 -
176
-
177
-
178
-
179
-
180
-
181
-
182
-
183
-
184
-
185
-
186
-
187
-
188
-
189
-
190
-
191
-
192
-
193
-
194
-
195
-
196
-
197
-
198
-
199
-
200
-
201
-
202
-
203
-
204
-
205
-
206
-
207
-
208
-
209
-
210
-
211
-
212
-
213
-
214
-
215
-
216
-
217
-
218
 |
 |
