Netgear SRXN3205 SRXN3205 Reference Manual - Page 60
Testing Wireless Connectivity (No Security), Network Configuration, Wireless Settings, Channel - slow
 |
UPC - 606449057461
View all Netgear SRXN3205 manuals
Add to My Manuals
Save this manual to your list of manuals |
Page 60 highlights
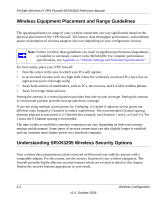
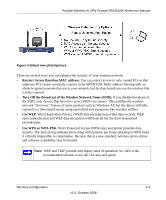
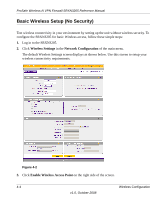
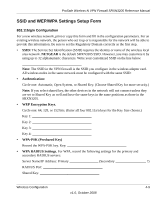
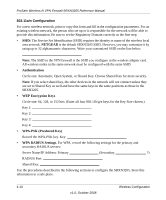
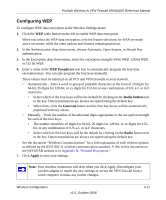
ProSafe Wireless-N VPN Firewall SRXN3205 Reference Manual 1. Select Network Configuration > Wireless Settings from main. Note: The Enable Wireless Access Point checkbox must be checked to enable all the options on this screen. 2. Configure the Wireless LAN settings based on the following field descriptions: • Mode. Select the desired wireless operating mode. The default is 11ng. The selections are 802.11[a only, b only, g only, g and b, 11ng, or 11a]. Select an "only" option if all devices in the wireless network can support. Select ng mode if there are clients in the network that support 802.11n; this mode also supports legacy 802.11b and 802.11g clients. To support 802.11a and 802.11n clients concurrently, select na mode; this mode will NOT support 802.11b or 802.11g clients. • Channel (& Frequency). This is set to Auto by default, or select a channel and frequency from the pull-down menu to use on your wireless LAN. The Auto option intelligently picks a channel & frequency with least interference. The wireless channel in use will be between 1 to 11 for US and Canada, 1 to 13 for Europe and Australia. It is not necessary to change the wireless channel unless you experience interference (shown by lost connections and/or slow data transfers). If this happens, you may need to experiment with different channels to see which is the best. See the article on "Wireless Channels" available on the NETGEAR website. A link to this article and other articles of interest can be found in Appendix B, "Related Documents." • Channel Spacing. From the pull-down menu, select the desired channel spacing. • 20 MHz - This is the static, legacy mode. It gives the least throughput. • 20/40 MHz - This is the dynamic, compatibility mode. Legacy clients can connect to 20 MHz and 11n clients can connect to 40 MHz. • 40 MHz - This is the static, high-throughput mode. Legacy clients will not be able to connect in this mode. 3. Click Apply to save your wireless settings. Testing Wireless Connectivity (No Security) Follow the instructions below to test wireless connectivity. Once you have established wireless connectivity, you can enable security settings appropriate to your needs. 4-6 Wireless Configuration v1.0, October 2008
-
 1
1 -
2
-
3
-
4
-
5
-
6
-
7
-
8
-
9
-
10
-
11
-
12
-
13
-
14
-
15
-
16
-
17
-
18
-
19
-
20
-
21
-
22
-
23
-
24
-
25
-
26
-
27
-
28
-
29
-
30
-
31
-
32
-
33
-
34
-
35
-
36
-
37
-
38
-
39
-
40
-
41
-
42
-
43
-
44
-
45
-
46
-
47
-
48
-
49
-
50
-
51
-
52
-
53
-
54
-
 55
55 -
 56
56 -
 57
57 -
 58
58 -
 59
59 -
 60
60 -
 61
61 -
 62
62 -
 63
63 -
 64
64 -
 65
65 -
66
-
67
-
68
-
69
-
70
-
71
-
72
-
73
-
74
-
75
-
76
-
77
-
78
-
79
-
80
-
81
-
82
-
83
-
84
-
85
-
86
-
87
-
88
-
89
-
90
-
91
-
92
-
93
-
94
-
95
-
96
-
97
-
98
-
99
-
100
-
101
-
102
-
103
-
104
-
105
-
106
-
107
-
108
-
109
-
110
-
111
-
112
-
113
-
114
-
115
-
116
-
117
-
118
-
119
-
120
-
121
-
122
-
123
-
124
-
125
-
126
-
127
-
128
-
129
-
130
-
131
-
132
-
133
-
134
-
135
-
136
-
137
-
138
-
139
-
140
-
141
-
142
-
143
-
144
-
145
-
146
-
147
-
148
-
149
-
150
-
151
-
152
-
153
-
154
-
155
-
156
-
157
-
158
-
159
-
160
-
161
-
162
-
163
-
164
-
165
-
166
-
167
-
168
-
169
-
170
-
171
-
172
-
173
-
174
-
175
-
176
-
177
-
178
-
179
-
180
-
181
-
182
-
183
-
184
-
185
-
186
-
187
-
188
-
189
-
190
-
191
-
192
-
193
-
194
-
195
-
196
-
197
-
198
-
199
-
200
-
201
-
202
-
203
-
204
-
205
-
206
-
207
-
208
-
209
-
210
-
211
-
212
-
213
-
214
-
215
-
216
-
217
-
218
 |
 |
