Netgear SRXN3205 SRXN3205 Reference Manual - Page 65
Configuring WEP, WEP Passphrase, Radio button, Generate, Radio, Apply
 |
UPC - 606449057461
View all Netgear SRXN3205 manuals
Add to My Manuals
Save this manual to your list of manuals |
Page 65 highlights
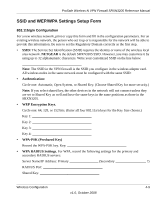
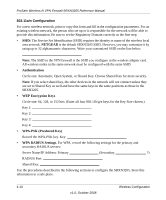
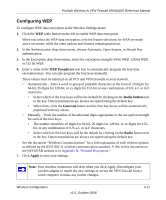
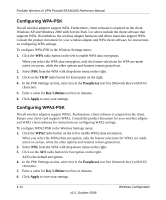
ProSafe Wireless-N VPN Firewall SRXN3205 Reference Manual Configuring WEP To configure WEP data encryption in the Wireless Settings menu: 1. Click the WEP radio button on the left to enable WEP data encryption. When you select the WEP data encryption, only the feature selections for WEP are made active on screen, while the other options and features remain grayed out. 2. In the Authentication drop-down menu, choose Automatic, Open System, or Shared Key authentication. 3. In the Encryption drop-down menu, select the encryption strength: 64 bit WEP, 128 bit WEP, or 152 bit WEP. 4. Enter a value in the WEP Passphrase text box to automatically program the four data encryption keys. You can also program the four keys manually. These values must be identical on all PCS and VPN firewalls in your network. • Automatically - Enter a word or group of printable characters in the form of 10 digits for 64-bit, 26 digits for 128-bit, or xx digits for 152-bit, in any combination of 0-9, a-f, or A-F characters. • Select which of the four keys will be the default by clicking on the Radio button next to the key. Data transmissions are always encrypted using the default key. • When done, click the Generate button and the four key boxes will be automatically populated with key values. • Manually - Enter the number of hexadecimal digits appropriate to the encryption strength for each of the four keys: • The number should be 10 digits for 64-bit, 26 digits for 128-bit, or xx digits for 152- bit, in any combination of 0-9, a-f, or A-F characters. • Select which of the four keys will be the default by clicking on the Radio button next to the key. Data transmissions are always encrypted using the default key. See the document "Wireless Communications" for a full explanation of each of these options, as defined by the IEEE 802.11 wireless communication standard. A link to this document on the NETGEAR website is in Appendix B, "Related Documents." 5. Click Apply to save your settings. Note: Your wireless connection will drop when you click Apply. Reconfigure your wireless adapter to match the new settings or access the VPN firewall from a wired computer to make any further changes. Wireless Configuration v1.0, October 2008 4-11
-
 1
1 -
2
-
3
-
4
-
5
-
6
-
7
-
8
-
9
-
10
-
11
-
12
-
13
-
14
-
15
-
16
-
17
-
18
-
19
-
20
-
21
-
22
-
23
-
24
-
25
-
26
-
27
-
28
-
29
-
30
-
31
-
32
-
33
-
34
-
35
-
36
-
37
-
38
-
39
-
40
-
41
-
42
-
43
-
44
-
45
-
46
-
47
-
48
-
49
-
50
-
51
-
52
-
53
-
54
-
55
-
56
-
57
-
58
-
59
-
 60
60 -
 61
61 -
 62
62 -
 63
63 -
 64
64 -
 65
65 -
 66
66 -
 67
67 -
 68
68 -
 69
69 -
 70
70 -
71
-
72
-
73
-
74
-
75
-
76
-
77
-
78
-
79
-
80
-
81
-
82
-
83
-
84
-
85
-
86
-
87
-
88
-
89
-
90
-
91
-
92
-
93
-
94
-
95
-
96
-
97
-
98
-
99
-
100
-
101
-
102
-
103
-
104
-
105
-
106
-
107
-
108
-
109
-
110
-
111
-
112
-
113
-
114
-
115
-
116
-
117
-
118
-
119
-
120
-
121
-
122
-
123
-
124
-
125
-
126
-
127
-
128
-
129
-
130
-
131
-
132
-
133
-
134
-
135
-
136
-
137
-
138
-
139
-
140
-
141
-
142
-
143
-
144
-
145
-
146
-
147
-
148
-
149
-
150
-
151
-
152
-
153
-
154
-
155
-
156
-
157
-
158
-
159
-
160
-
161
-
162
-
163
-
164
-
165
-
166
-
167
-
168
-
169
-
170
-
171
-
172
-
173
-
174
-
175
-
176
-
177
-
178
-
179
-
180
-
181
-
182
-
183
-
184
-
185
-
186
-
187
-
188
-
189
-
190
-
191
-
192
-
193
-
194
-
195
-
196
-
197
-
198
-
199
-
200
-
201
-
202
-
203
-
204
-
205
-
206
-
207
-
208
-
209
-
210
-
211
-
212
-
213
-
214
-
215
-
216
-
217
-
218
 |
 |
