Netgear SRXN3205 SRXN3205 Reference Manual - Page 59
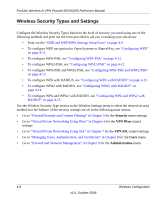
Completing Wireless Setup (No Security), Configuring 802.11b/g/n Wireless Settings
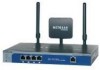 |
UPC - 606449057461
View all Netgear SRXN3205 manuals
Add to My Manuals
Save this manual to your list of manuals |
Page 59 highlights
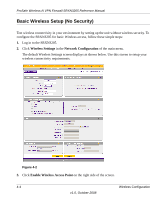
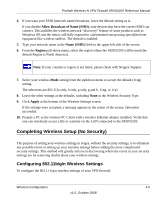
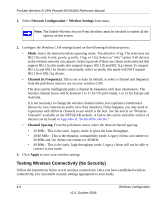
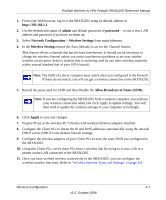
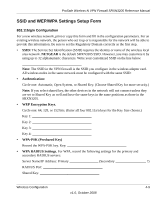
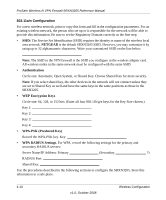
ProSafe Wireless-N VPN Firewall SRXN3205 Reference Manual 4. If you want your SSID (network name) broadcast, leave the default setting as is. If you disable Allow Broadcast of Name (SSID), only devices that have the correct SSID can connect. This nullifies the wireless network "discovery" feature of some products such as Windows XP, but the data is still fully exposed to a determined snoop using specialized test equipment like wireless sniffers. The default is enabled. 5. Type your network name in the Name (SSID) field on the upper left side of the screen. 6. From the Region pull-down menu, select the region where the SRXN3205 will be used (the default Region is North America). Note: If your country or region is not listed, please check with Netgear Support. 7. Select your wireless Mode setting from the pulldown menu or accept the default (11ng) setting. The selections are 802.11[a only, b only, g only, g and b, 11ng, or 11a]. 8. Leave the other settings at the defaults, including None as the Wireless Security Type. 9. Click Apply at the bottom of the Wireless Settings screen. If the settings were accepted, a message appears in the center of the screen, Operation succeeded. 10. Prepare a PC as the wireless PC Client with a wireless Ethernet adapter installed. Verify that you can wirelessly access a file or a printer on the LAN connected to the SRXN3205. Completing Wireless Setup (No Security) The purpose of setting your wireless settings in stages, without the security settings, is to eliminate any possible errors in setting up your wireless settings before adding the more complicated security settings. This method will greatly aid you in discovering where the errors in your security settings are by removing doubts about your wireless settings. Configuring 802.11b/g/n Wireless Settings To configure the 802.11 b/g/n wireless settings of your VPN firewall: Wireless Configuration 4-5 v1.0, October 2008
-
 1
1 -
2
-
3
-
4
-
5
-
6
-
7
-
8
-
9
-
10
-
11
-
12
-
13
-
14
-
15
-
16
-
17
-
18
-
19
-
20
-
21
-
22
-
23
-
24
-
25
-
26
-
27
-
28
-
29
-
30
-
31
-
32
-
33
-
34
-
35
-
36
-
37
-
38
-
39
-
40
-
41
-
42
-
43
-
44
-
45
-
46
-
47
-
48
-
49
-
50
-
51
-
52
-
53
-
 54
54 -
 55
55 -
 56
56 -
 57
57 -
 58
58 -
 59
59 -
 60
60 -
 61
61 -
 62
62 -
 63
63 -
 64
64 -
65
-
66
-
67
-
68
-
69
-
70
-
71
-
72
-
73
-
74
-
75
-
76
-
77
-
78
-
79
-
80
-
81
-
82
-
83
-
84
-
85
-
86
-
87
-
88
-
89
-
90
-
91
-
92
-
93
-
94
-
95
-
96
-
97
-
98
-
99
-
100
-
101
-
102
-
103
-
104
-
105
-
106
-
107
-
108
-
109
-
110
-
111
-
112
-
113
-
114
-
115
-
116
-
117
-
118
-
119
-
120
-
121
-
122
-
123
-
124
-
125
-
126
-
127
-
128
-
129
-
130
-
131
-
132
-
133
-
134
-
135
-
136
-
137
-
138
-
139
-
140
-
141
-
142
-
143
-
144
-
145
-
146
-
147
-
148
-
149
-
150
-
151
-
152
-
153
-
154
-
155
-
156
-
157
-
158
-
159
-
160
-
161
-
162
-
163
-
164
-
165
-
166
-
167
-
168
-
169
-
170
-
171
-
172
-
173
-
174
-
175
-
176
-
177
-
178
-
179
-
180
-
181
-
182
-
183
-
184
-
185
-
186
-
187
-
188
-
189
-
190
-
191
-
192
-
193
-
194
-
195
-
196
-
197
-
198
-
199
-
200
-
201
-
202
-
203
-
204
-
205
-
206
-
207
-
208
-
209
-
210
-
211
-
212
-
213
-
214
-
215
-
216
-
217
-
218
 |
 |
