Netgear SRXN3205 SRXN3205 Reference Manual - Page 35
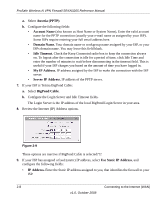
Subnet Mask., Gateway IP Address., Get dynamically from ISP, Use these DNS, Servers, Apply, Reset - web server
 |
UPC - 606449057461
View all Netgear SRXN3205 manuals
Add to My Manuals
Save this manual to your list of manuals |
Page 35 highlights
ProSafe Wireless-N VPN Firewall SRXN3205 Reference Manual • Subnet Mask. Enter the mask provided by the ISP or your network administrator. • Gateway IP Address. Enter the IP address of the ISP's gateway, provided by the ISP or your network administrator. 10. If your ISP has not assigned a static IP address, click Get dynamically from ISP. The text fields will be inactivated. The ISP will automatically assign an IP address to the firewall using DHCP network protocol. 11. Review the Domain Name Server (DNS) Servers options. Figure 2-10 • If your ISP has not assigned any Domain Name Servers (DNS) addresses, click Get dynamically from ISP. • If your ISP (or your IT department) has assigned DNS addresses, click Use these DNS Servers and enter the DNS server IP addresses provided to you in the fields. 12. Click Apply to save any changes to the WAN ISP Settings. (Or click Reset to discard any changes and revert to the previous settings.) 13. Click Test to evaluate your entries. The firewall will attempt to connect to the NETGEAR Web site. If a successful connection is made, NETGEAR's Web site appears. When you are finished, click Logout or proceed to additional setup and management tasks. Connecting to the Internet (WAN) 2-9 v1.0, October 2008
-
 1
1 -
2
-
3
-
4
-
5
-
6
-
7
-
8
-
9
-
10
-
11
-
12
-
13
-
14
-
15
-
16
-
17
-
18
-
19
-
20
-
21
-
22
-
23
-
24
-
25
-
26
-
27
-
28
-
29
-
 30
30 -
 31
31 -
 32
32 -
 33
33 -
 34
34 -
 35
35 -
 36
36 -
 37
37 -
 38
38 -
 39
39 -
 40
40 -
41
-
42
-
43
-
44
-
45
-
46
-
47
-
48
-
49
-
50
-
51
-
52
-
53
-
54
-
55
-
56
-
57
-
58
-
59
-
60
-
61
-
62
-
63
-
64
-
65
-
66
-
67
-
68
-
69
-
70
-
71
-
72
-
73
-
74
-
75
-
76
-
77
-
78
-
79
-
80
-
81
-
82
-
83
-
84
-
85
-
86
-
87
-
88
-
89
-
90
-
91
-
92
-
93
-
94
-
95
-
96
-
97
-
98
-
99
-
100
-
101
-
102
-
103
-
104
-
105
-
106
-
107
-
108
-
109
-
110
-
111
-
112
-
113
-
114
-
115
-
116
-
117
-
118
-
119
-
120
-
121
-
122
-
123
-
124
-
125
-
126
-
127
-
128
-
129
-
130
-
131
-
132
-
133
-
134
-
135
-
136
-
137
-
138
-
139
-
140
-
141
-
142
-
143
-
144
-
145
-
146
-
147
-
148
-
149
-
150
-
151
-
152
-
153
-
154
-
155
-
156
-
157
-
158
-
159
-
160
-
161
-
162
-
163
-
164
-
165
-
166
-
167
-
168
-
169
-
170
-
171
-
172
-
173
-
174
-
175
-
176
-
177
-
178
-
179
-
180
-
181
-
182
-
183
-
184
-
185
-
186
-
187
-
188
-
189
-
190
-
191
-
192
-
193
-
194
-
195
-
196
-
197
-
198
-
199
-
200
-
201
-
202
-
203
-
204
-
205
-
206
-
207
-
208
-
209
-
210
-
211
-
212
-
213
-
214
-
215
-
216
-
217
-
218
 |
 |
