Netgear SRXN3205 SRXN3205 Reference Manual - Page 38
Configuring the Advanced WAN Options (Optional), Network Configuration > Dynamic DNS - password
 |
UPC - 606449057461
View all Netgear SRXN3205 manuals
Add to My Manuals
Save this manual to your list of manuals |
Page 38 highlights
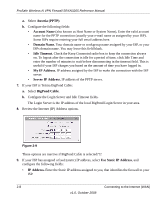
ProSafe Wireless-N VPN Firewall SRXN3205 Reference Manual To configure Dynamic DNS: 1. Select Network Configuration > Dynamic DNS from the main/submenu. The Current WAN Mode section reports the currently configured WAN mode. Only those options that match the configured WAN Mode will be accessible. 2. Select the Dynamic DNS Service you will use. The fields corresponding to the selection you have chosen will be activated. Each DDNS service provider requires its own parameters. 3. Access the Web site of one of the DDNS service providers and set up an account. Links to three DDNS providers are in the tab header. 4. After registering for your account, return to the Dynamic DNS menu and fill in the required fields for the DDNS service you selected: a. In the Host and Domain Name field, enter the entire FQDN name that your dynamic DNS service provider gave you (for example: .dyndns.org). b. Enter the User Name, User email Address, or Account Name requested by the DDNS Service to identify you when logging into your DDNS account. c. Enter the Password, or User Key, for your DDNS account. d. If your dynamic DNS provider allows the use of wildcards in resolving your URL, check Use wildcards to activate this feature. For example, the wildcard feature will cause anything.yourhost.dyndns.org to be aliased to the same IP address as yourhost.dyndns.org e. If your dynamic DNS provider requires you to renew your account monthly, check Update every 30 days to have the firewall renew the account automatically. 5. Click Apply to save your configuration. Configuring the Advanced WAN Options (Optional) To configure the Advanced WAN options: 1. Select Network Configuration > WAN Settings from the main/submenu. The WAN ISP Settings screen displays. 2-12 v1.0, October 2008 Connecting to the Internet (WAN)
-
 1
1 -
2
-
3
-
4
-
5
-
6
-
7
-
8
-
9
-
10
-
11
-
12
-
13
-
14
-
15
-
16
-
17
-
18
-
19
-
20
-
21
-
22
-
23
-
24
-
25
-
26
-
27
-
28
-
29
-
30
-
31
-
32
-
 33
33 -
 34
34 -
 35
35 -
 36
36 -
 37
37 -
 38
38 -
 39
39 -
 40
40 -
 41
41 -
 42
42 -
 43
43 -
44
-
45
-
46
-
47
-
48
-
49
-
50
-
51
-
52
-
53
-
54
-
55
-
56
-
57
-
58
-
59
-
60
-
61
-
62
-
63
-
64
-
65
-
66
-
67
-
68
-
69
-
70
-
71
-
72
-
73
-
74
-
75
-
76
-
77
-
78
-
79
-
80
-
81
-
82
-
83
-
84
-
85
-
86
-
87
-
88
-
89
-
90
-
91
-
92
-
93
-
94
-
95
-
96
-
97
-
98
-
99
-
100
-
101
-
102
-
103
-
104
-
105
-
106
-
107
-
108
-
109
-
110
-
111
-
112
-
113
-
114
-
115
-
116
-
117
-
118
-
119
-
120
-
121
-
122
-
123
-
124
-
125
-
126
-
127
-
128
-
129
-
130
-
131
-
132
-
133
-
134
-
135
-
136
-
137
-
138
-
139
-
140
-
141
-
142
-
143
-
144
-
145
-
146
-
147
-
148
-
149
-
150
-
151
-
152
-
153
-
154
-
155
-
156
-
157
-
158
-
159
-
160
-
161
-
162
-
163
-
164
-
165
-
166
-
167
-
168
-
169
-
170
-
171
-
172
-
173
-
174
-
175
-
176
-
177
-
178
-
179
-
180
-
181
-
182
-
183
-
184
-
185
-
186
-
187
-
188
-
189
-
190
-
191
-
192
-
193
-
194
-
195
-
196
-
197
-
198
-
199
-
200
-
201
-
202
-
203
-
204
-
205
-
206
-
207
-
208
-
209
-
210
-
211
-
212
-
213
-
214
-
215
-
216
-
217
-
218
 |
 |
