Netgear SRXN3205 SRXN3205 Reference Manual - Page 61
admin, password, Network Configuration, Wireless Settings, Allow Broadcast of Name SSID., Apply
 |
UPC - 606449057461
View all Netgear SRXN3205 manuals
Add to My Manuals
Save this manual to your list of manuals |
Page 61 highlights
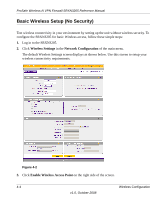
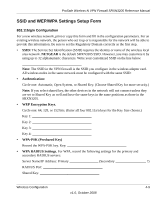
ProSafe Wireless-N VPN Firewall SRXN3205 Reference Manual 1. From your Web browser, log in to the SRXN3205 using its default address of http://192.168.1.1. 2. Use the default user name of admin and default password of password- or use a new LAN address and password if you have set them up. 3. Select Network Configuration > Wireless Settings from main/submenu. 4. In the Wireless Settings ensure the Auto (default) is set for the Channel feature. This feature selects a channel that has the least interference. It should not be necessary to change the wireless channel unless you notice interference problems or are near another wireless access point. Select a channel that is not being used by any other wireless networks within several hundred feet of your VPN firewall. Note: The SSID of a client computer must match what you configured in the firewall. If these do not match, you will not get a wireless connection to the SRXN3205. 5. Record the name used for SSID and then Disable the Allow Broadcast of Name (SSID). Note: If you are configuring the SRXN3205 from a wireless computer, you will lose your wireless connection when you click Apply to update settings. You will then need to update the wireless settings of your computer accordingly. 6. Click Apply to save any changes 7. Prepare PC(s) as the wireless PC Client(s) with wireless Ethernet adapters installed. 8. Configure the Client PCs to obtain the IP and DNS addresses automatically using the internal DHCP server (DHCP is the default firewall setting). 9. Configure the wireless adapters of your Client PCs to have the same SSID you configured in the SRXN3205. 10. Using this Client PCs, verify these PCs have a wireless link by trying to access a file or a printer on the LAN connected to the SRXN3205. 11. Once you have verified wireless connectivity to the SRXN3205, you can configure the wireless security functions. Refer to "Wireless Security Types and Settings" on page 4-8. Wireless Configuration 4-7 v1.0, October 2008
-
 1
1 -
2
-
3
-
4
-
5
-
6
-
7
-
8
-
9
-
10
-
11
-
12
-
13
-
14
-
15
-
16
-
17
-
18
-
19
-
20
-
21
-
22
-
23
-
24
-
25
-
26
-
27
-
28
-
29
-
30
-
31
-
32
-
33
-
34
-
35
-
36
-
37
-
38
-
39
-
40
-
41
-
42
-
43
-
44
-
45
-
46
-
47
-
48
-
49
-
50
-
51
-
52
-
53
-
54
-
55
-
 56
56 -
 57
57 -
 58
58 -
 59
59 -
 60
60 -
 61
61 -
 62
62 -
 63
63 -
 64
64 -
 65
65 -
 66
66 -
67
-
68
-
69
-
70
-
71
-
72
-
73
-
74
-
75
-
76
-
77
-
78
-
79
-
80
-
81
-
82
-
83
-
84
-
85
-
86
-
87
-
88
-
89
-
90
-
91
-
92
-
93
-
94
-
95
-
96
-
97
-
98
-
99
-
100
-
101
-
102
-
103
-
104
-
105
-
106
-
107
-
108
-
109
-
110
-
111
-
112
-
113
-
114
-
115
-
116
-
117
-
118
-
119
-
120
-
121
-
122
-
123
-
124
-
125
-
126
-
127
-
128
-
129
-
130
-
131
-
132
-
133
-
134
-
135
-
136
-
137
-
138
-
139
-
140
-
141
-
142
-
143
-
144
-
145
-
146
-
147
-
148
-
149
-
150
-
151
-
152
-
153
-
154
-
155
-
156
-
157
-
158
-
159
-
160
-
161
-
162
-
163
-
164
-
165
-
166
-
167
-
168
-
169
-
170
-
171
-
172
-
173
-
174
-
175
-
176
-
177
-
178
-
179
-
180
-
181
-
182
-
183
-
184
-
185
-
186
-
187
-
188
-
189
-
190
-
191
-
192
-
193
-
194
-
195
-
196
-
197
-
198
-
199
-
200
-
201
-
202
-
203
-
204
-
205
-
206
-
207
-
208
-
209
-
210
-
211
-
212
-
213
-
214
-
215
-
216
-
217
-
218
 |
 |
