Pioneer AVIC-D3 Owner's Manual - Page 49
Skipping a way point, Setting Areas to Avoid, Registering an area to avoid - change time
 |
UPC - 012562844169
View all Pioneer AVIC-D3 manuals
Add to My Manuals
Save this manual to your list of manuals |
Page 49 highlights
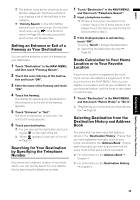
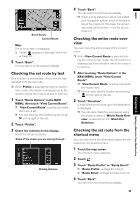
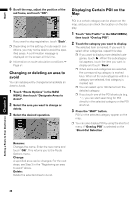
NAVI Automatic: You can sort the destination and way points automatically. The system will show the nearest way point (distance in a straight line) from the current location as way point 1, and sort the other points (including your destination) in order of distance from your current location. Original: Returns to the original order. Select from manual order, "Automatic" or "Original" and touch "Done" to start the route search. 3 Touch "Done". ❒ If you set a way point(s) in the route to your destination, the route up to the next way point will appear light green. The rest of the route will be light blue. Skipping a way point If the points are set, the next way point along the route can be skipped. 1 Touch the map screen. The Shortcut menu appears. 2 Touch . 3 Touch "Skip Way Point". A message asking whether you want to skip the next way point appears. 4 Touch "Yes". A new route to your destination through all the remaining way points, except for the skipped way point, is calculated. Setting Areas to Avoid If you register Areas to Avoid, such as crowded intersections or congested areas, routes can be calculated that avoid those areas. ❒ An area not stored on the disc cannot be set as an Area to Avoid. Registering an area to avoid This section describes how to register an Area to Avoid for the first time. You can register up to five Areas to Avoid. 1 Touch "Route Options" in the NAVI MENU, then touch "Designate Areas to Avoid". 2 Touch "Yes". 3 Select one of the items shown in "New Area". When registering for the first time, any item on the list is shown as "New Area". 4 Select the place to register and display the map. ➲ Address Search ➞ Page 25 ➲ Searching places to register ➞ Page 41 to 43 Once a search is complete, a map with the specified location at its center appears. ❒ If you select the "Map Search", move the scroll cursor to the place you want to set and touch "OK". 5 Change the map scale and decide the size of the Area to Avoid. The Area to avoid is enclosed in a red frame. You can also change the map scale though the maximum map scale for registering Areas to Avoid is 0.1 mile (100 m). Chapter 3 Setting a Route to Your Destination 47
-
 1
1 -
2
-
3
-
4
-
5
-
6
-
7
-
8
-
9
-
10
-
11
-
12
-
13
-
14
-
15
-
16
-
17
-
18
-
19
-
20
-
21
-
22
-
23
-
24
-
25
-
26
-
27
-
28
-
29
-
30
-
31
-
32
-
33
-
34
-
35
-
36
-
37
-
38
-
39
-
40
-
41
-
42
-
43
-
 44
44 -
 45
45 -
 46
46 -
 47
47 -
 48
48 -
 49
49 -
 50
50 -
 51
51 -
 52
52 -
 53
53 -
 54
54 -
55
-
56
-
57
-
58
-
59
-
60
-
61
-
62
-
63
-
64
-
65
-
66
-
67
-
68
-
69
-
70
-
71
-
72
-
73
-
74
-
75
-
76
-
77
-
78
-
79
-
80
-
81
-
82
-
83
-
84
-
85
-
86
-
87
-
88
-
89
-
90
-
91
-
92
-
93
-
94
-
95
-
96
-
97
-
98
-
99
-
100
-
101
-
102
-
103
-
104
-
105
-
106
-
107
-
108
-
109
-
110
-
111
-
112
-
113
-
114
-
115
-
116
-
117
-
118
-
119
-
120
-
121
-
122
-
123
-
124
-
125
-
126
-
127
-
128
-
129
-
130
-
131
-
132
-
133
-
134
-
135
-
136
-
137
-
138
-
139
-
140
-
141
-
142
-
143
-
144
-
145
-
146
-
147
-
148
-
149
-
150
-
151
-
152
-
153
-
154
-
155
-
156
-
157
-
158
-
159
-
160
-
161
-
162
-
163
-
164
-
165
-
166
-
167
-
168
-
169
-
170
-
171
-
172
-
173
 |
 |