Pioneer AVIC-D3 Owner's Manual - Page 68
Changing Background Picture - background images
 |
UPC - 012562844169
View all Pioneer AVIC-D3 manuals
Add to My Manuals
Save this manual to your list of manuals |
Page 68 highlights
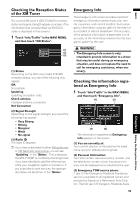
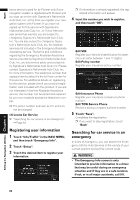
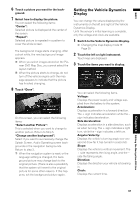
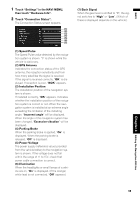
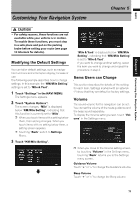
NAVI Changing Background Picture • When you burn a CD-R/-RW and DVD-R/RW, make sure the total data size of the CD-R/-RW and DVD-R/-RW is greater than the amount noted below by storing dummy data or other filler information. Otherwise, the disc may not be recognized by the built-in DVD drive. - CD-R/-RW: 1.8 MB - DVD-R/-RW: 170 MB In the menu operation screen, you can specify a picture for the background. Some pictures are already stored, but you can also use pictures (JPEG format data) created by a personal computer or a digital camera. If you save the pictures to a CD-R/-RW and DVD-R/-RW, you can use them as background pictures. The following three types of background pictures can be changed: • Splash Screen: The screen that appears when the Navigation system starts up. • AV Background: Background for the screen during audio operations or during playback. • Navigation Background: Background of nav- igation menu screen. Several background pictures are stored in the Pioneer DVD Map Disc. If you want to use these pictures, insert the Pioneer DVD Map Disc. Here, a method for changing the background picture is described with an example of loading a picture stored on a CD-R/-RW and DVD-R/-RW onto the navigation system as the background picture. ❒ When storing original pictures on a CD-R/-RW and DVD-R/-RW, create a folder named "PICTURES" in the CD-R/-RW and DVD-R/-RW, and store the picture files in this folder. Up to 20 picture files can be used in the PICTURES folder. ❒ You cannot use a CD-R/-RW and DVD-R/-RW containing MP3 files or the Audio data part (CD-DA session) for the "Background Picture Setting" function. ❒ Only JPEG format (".jpg" or ".JPG") pictures can be used as a background picture. ❒ You can only use standard characters (alphabets of both cases: A-Z, a-z) and numbers (0-9) for the file name of a background picture (international (accented) characters cannot be used). ❒ Pictures up to a maximum of 2 048×1 536 pixels can be used. We cannot guarantee proper operation for a picture bigger than this size. ❒ Progressive format JPEG pictures cannot be used. 1 Insert a CD-R (-RW) to the disc loading slot. 2 Touch "Settings" in the NAVI MENU, then touch "System Options". 3 Touch "Background Picture Setting". The picture selected for each screen is indicated on the right side of "Splash Screen", "Navigation Background" and "AV Background" items. 4 Touch "Splash Screen", "Navigation Background" or "AV Background". 5 Touch "Import from Disc". The list of the pictures stored in the CD-R (-RW) is displayed. On this screen, you can select the following item: "Back to Original": The picture originally used when the system was purchased is selected. ❒ Only when a Pioneer DVD Map Disc is inserted, you can select "Back to Original". Only when the CD-R/-RW and DVD-R/ -RW is inserted, you can select "Import from Disc". ❒ In step 5, touching other than "Import from Disc" allows you to select a background image stored on the Pioneer DVD Map Disc. Editing the Navigation Utilities Chapter 4 66
-
 1
1 -
2
-
3
-
4
-
5
-
6
-
7
-
8
-
9
-
10
-
11
-
12
-
13
-
14
-
15
-
16
-
17
-
18
-
19
-
20
-
21
-
22
-
23
-
24
-
25
-
26
-
27
-
28
-
29
-
30
-
31
-
32
-
33
-
34
-
35
-
36
-
37
-
38
-
39
-
40
-
41
-
42
-
43
-
44
-
45
-
46
-
47
-
48
-
49
-
50
-
51
-
52
-
53
-
54
-
55
-
56
-
57
-
58
-
59
-
60
-
61
-
62
-
 63
63 -
 64
64 -
 65
65 -
 66
66 -
 67
67 -
 68
68 -
 69
69 -
 70
70 -
 71
71 -
 72
72 -
 73
73 -
74
-
75
-
76
-
77
-
78
-
79
-
80
-
81
-
82
-
83
-
84
-
85
-
86
-
87
-
88
-
89
-
90
-
91
-
92
-
93
-
94
-
95
-
96
-
97
-
98
-
99
-
100
-
101
-
102
-
103
-
104
-
105
-
106
-
107
-
108
-
109
-
110
-
111
-
112
-
113
-
114
-
115
-
116
-
117
-
118
-
119
-
120
-
121
-
122
-
123
-
124
-
125
-
126
-
127
-
128
-
129
-
130
-
131
-
132
-
133
-
134
-
135
-
136
-
137
-
138
-
139
-
140
-
141
-
142
-
143
-
144
-
145
-
146
-
147
-
148
-
149
-
150
-
151
-
152
-
153
-
154
-
155
-
156
-
157
-
158
-
159
-
160
-
161
-
162
-
163
-
164
-
165
-
166
-
167
-
168
-
169
-
170
-
171
-
172
-
173
 |
 |