ZyXEL P-663HN-51 User Guide - Page 70
Bridge WAN Connection Setup, 5.15 IGMP Multicast
 |
View all ZyXEL P-663HN-51 manuals
Add to My Manuals
Save this manual to your list of manuals |
Page 70 highlights
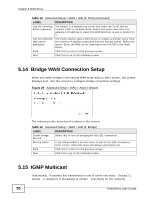
Chapter 5 WAN Setup Table 18 Advanced Setup > WAN > Add (3: IPoA) (continued) LABEL DESCRIPTION Use the following default gateway The default is a neighboring router that helps the ZyXEL Device forward traffic to its destination. Select this option and enter the gateway's IP address or select the WAN interface to use to connect to it. Use the following DNS server addresses The ZyXEL Device uses a DNS server to resolve a domain name (find the numeric IP address associated with the domain name). Select this option. Enter the DNS server addresses from the ISP in the fields below. Back Click this to return to the previous screen. Next Click this to go to the following screen. 5.14 Bridge WAN Connection Setup When you select bridge in the second WAN setup add (or edit) screen, this screen displays next. Use this screen to configure bridge connection settings. Figure 29 Advanced Setup > WAN > Add (3: Bridge) The following table describes the labels in this screen. Table 19 Advanced Setup > WAN > Add (3: Bridge) LABEL DESCRIPTION Enable Bridge Service Select this to turn on bridging for this DSL connection. Service Name If the ISP specified a service name to use for the DSL connection, enter it here. Otherwise leave the default generated text. Back Click this to return to the previous screen. Next Click this to go to the following screen. 5.15 IGMP Multicast Traditionally, IP packets are transmitted in one of either two ways - Unicast (1 sender - 1 recipient) or Broadcast (1 sender - everybody on the network). 70 P-663HN-51 User's Guide
-
 1
1 -
2
-
3
-
4
-
5
-
6
-
7
-
8
-
9
-
10
-
11
-
12
-
13
-
14
-
15
-
16
-
17
-
18
-
19
-
20
-
21
-
22
-
23
-
24
-
25
-
26
-
27
-
28
-
29
-
30
-
31
-
32
-
33
-
34
-
35
-
36
-
37
-
38
-
39
-
40
-
41
-
42
-
43
-
44
-
45
-
46
-
47
-
48
-
49
-
50
-
51
-
52
-
53
-
54
-
55
-
56
-
57
-
58
-
59
-
60
-
61
-
62
-
63
-
64
-
 65
65 -
 66
66 -
 67
67 -
 68
68 -
 69
69 -
 70
70 -
 71
71 -
 72
72 -
 73
73 -
 74
74 -
 75
75 -
76
-
77
-
78
-
79
-
80
-
81
-
82
-
83
-
84
-
85
-
86
-
87
-
88
-
89
-
90
-
91
-
92
-
93
-
94
-
95
-
96
-
97
-
98
-
99
-
100
-
101
-
102
-
103
-
104
-
105
-
106
-
107
-
108
-
109
-
110
-
111
-
112
-
113
-
114
-
115
-
116
-
117
-
118
-
119
-
120
-
121
-
122
-
123
-
124
-
125
-
126
-
127
-
128
-
129
-
130
-
131
-
132
-
133
-
134
-
135
-
136
-
137
-
138
-
139
-
140
-
141
-
142
-
143
-
144
-
145
-
146
-
147
-
148
-
149
-
150
-
151
-
152
-
153
-
154
-
155
-
156
-
157
-
158
-
159
-
160
-
161
-
162
-
163
-
164
-
165
-
166
-
167
-
168
-
169
-
170
-
171
-
172
-
173
-
174
-
175
-
176
-
177
-
178
-
179
-
180
-
181
-
182
-
183
-
184
-
185
-
186
-
187
-
188
-
189
-
190
-
191
-
192
-
193
-
194
-
195
-
196
-
197
-
198
-
199
-
200
-
201
-
202
-
203
-
204
-
205
-
206
-
207
-
208
-
209
-
210
-
211
-
212
-
213
-
214
-
215
-
216
-
217
-
218
-
219
-
220
-
221
-
222
-
223
-
224
-
225
-
226
-
227
-
228
-
229
-
230
-
231
-
232
-
233
-
234
-
235
-
236
-
237
-
238
-
239
-
240
-
241
-
242
-
243
-
244
-
245
-
246
-
247
-
248
-
249
-
250
-
251
-
252
-
253
-
254
-
255
-
256
-
257
-
258
-
259
-
260
-
261
-
262
-
263
-
264
-
265
-
266
-
267
-
268
-
269
-
270
-
271
-
272
-
273
-
274
-
275
-
276
-
277
-
278
-
279
-
280
-
281
-
282
-
283
-
284
-
285
-
286
-
287
-
288
-
289
-
290
-
291
-
292
-
293
-
294
-
295
-
296
-
297
-
298
-
299
-
300
 |
 |
