Brother International EM550 Owners Manual - English - Page 31
Setting, Margins
 |
View all Brother International EM550 manuals
Add to My Manuals
Save this manual to your list of manuals |
Page 31 highlights
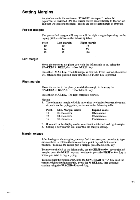
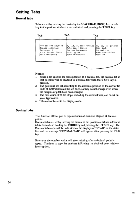
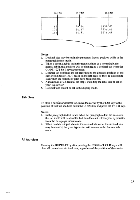
Setting Margins As you learned in the section on "POWER" in chapter 1, when the typewriter is switched ON, the carrier moves automatically to the far left and then 10 spaces to the right. This is the pre-set left margin in 10 pitch. Pre-set margins The pre-set left margin will vary as will the right margin depending on the typing pitch as shown in the following table . Pitch 10 12 15 Left margin 10 12 15 Right margin 75 90 112 Left margin Move the carrier to the place you wish the left margin to be, using the SPACEBAR, BKSP, , -) or M REL key. Press the L MAR key. The left margin is now set. From now on, the carrier will return to this position each time the RETURN key is pressed. Right margin Move the carrier to the place you wish the margin to be using the SPACEBAR, BKSP, , or M REL key. Press the R MAR key. The right margin is now set. Notes: 1. The minimum margin width is more than two inches between them and depends on the typing pitch, as shown in the following table. Pitch 10 12 15 Min. Margin Width 20 characters 24 characters 30 characters Expand mode 10 characters 12 characters 15 characters 2. If you are in the display mode, you cannot set the left and right margin. 3. Setting a new margin will clear the old margin setting. Margin release After having set the margins, you may find it necessary on occasion to type outside them or release them to reset at a point beyond their current position. To move the carrier past a margin, press the M REL key. To move to the left of the left margin, use the BKSP or 4-- key to the left margin, press the M REL key and continue to press the BKSP or 4- key to where you wish to begin typing. To move past the right margin, hold the SPACEBAR or -3 key until the carrier reaches the right margin. Press the M REL key, then continue spacing using the SPACEBAR or key. 23 CEA
-
 1
1 -
2
-
3
-
4
-
5
-
6
-
7
-
8
-
9
-
10
-
11
-
12
-
13
-
14
-
15
-
16
-
17
-
18
-
19
-
20
-
21
-
22
-
23
-
24
-
25
-
 26
26 -
 27
27 -
 28
28 -
 29
29 -
 30
30 -
 31
31 -
 32
32 -
 33
33 -
 34
34 -
 35
35 -
 36
36 -
37
-
38
-
39
-
40
-
41
-
42
-
43
-
44
-
45
-
46
-
47
-
48
-
49
-
50
-
51
-
52
-
53
-
54
-
55
-
56
-
57
-
58
-
59
-
60
-
61
-
62
-
63
-
64
-
65
-
66
-
67
-
68
-
69
-
70
-
71
-
72
-
73
-
74
-
75
-
76
-
77
-
78
-
79
-
80
-
81
-
82
-
83
-
84
-
85
-
86
-
87
-
88
-
89
-
90
-
91
-
92
-
93
-
94
-
95
-
96
-
97
-
98
-
99
-
100
-
101
-
102
-
103
-
104
 |
 |