Brother International EM550 Owners Manual - English - Page 75
Right, margin, flush, codes
 |
View all Brother International EM550 manuals
Add to My Manuals
Save this manual to your list of manuals |
Page 75 highlights
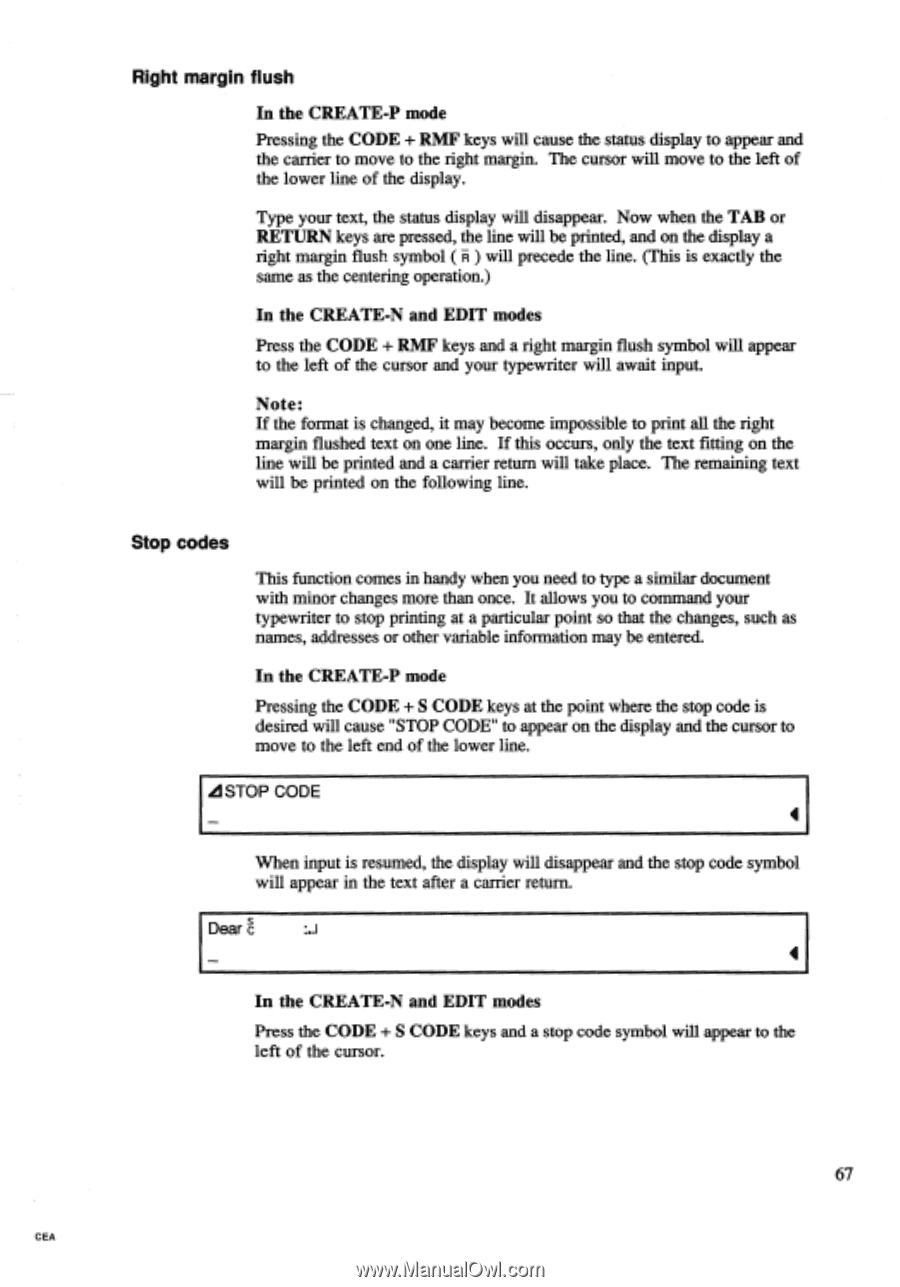
Right margin flush In the CREATE-P mode Pressing the CODE + RMF keys will cause the status display to appear and the carrier to move to the right margin. The cursor will move to the left of the lower line of the display. Type your text, the status display will disappear. Now when the TAB or RETURN keys are pressed, the line will be printed, and on the display a right margin flush symbol ( A ) will precede the line. (This is exactly the same as the centering operation.) In the CREATE-N and EDIT modes Press the CODE + RMF keys and a right margin flush symbol will appear to the left of the cursor and your typewriter will await input. Note: If the format is changed, it may become impossible to print all the right margin flushed text on one line. If this occurs, only the text fitting on the line will be printed and a carrier return will take place. The remaining text will be printed on the following line. Stop codes This function comes in handy when you need to type a similar document with minor changes more than once. It allows you to command your typewriter to stop printing at a particular point so that the changes, such as names, addresses or other variable information may be entered. In the CREATE-P mode Pressing the CODE + S CODE keys at the point where the stop code is desired will cause "STOP CODE" to appear on the display and the cursor to move to the left end of the lower line. IISTOP CODE 4 When input is resumed, the display will disappear and the stop code symbol will appear in the text after a carrier return. Dear 4 In the CREATE-N and EDIT modes Press the CODE + S CODE keys and a stop code symbol will appear to the left of the cursor. 67 CEA
-
 1
1 -
2
-
3
-
4
-
5
-
6
-
7
-
8
-
9
-
10
-
11
-
12
-
13
-
14
-
15
-
16
-
17
-
18
-
19
-
20
-
21
-
22
-
23
-
24
-
25
-
26
-
27
-
28
-
29
-
30
-
31
-
32
-
33
-
34
-
35
-
36
-
37
-
38
-
39
-
40
-
41
-
42
-
43
-
44
-
45
-
46
-
47
-
48
-
49
-
50
-
51
-
52
-
53
-
54
-
55
-
56
-
57
-
58
-
59
-
60
-
61
-
62
-
63
-
64
-
65
-
66
-
67
-
68
-
69
-
 70
70 -
 71
71 -
 72
72 -
 73
73 -
 74
74 -
 75
75 -
 76
76 -
 77
77 -
 78
78 -
 79
79 -
 80
80 -
81
-
82
-
83
-
84
-
85
-
86
-
87
-
88
-
89
-
90
-
91
-
92
-
93
-
94
-
95
-
96
-
97
-
98
-
99
-
100
-
101
-
102
-
103
-
104
 |
 |