Canon MP370 MultiPASS MP370/360 Software Guide - Page 102
To scan with the settings in the saved color adjustment file
 |
UPC - 013803037111
View all Canon MP370 manuals
Add to My Manuals
Save this manual to your list of manuals |
Page 102 highlights
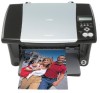
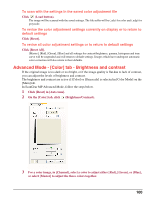
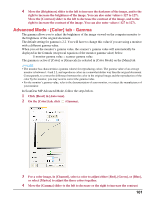
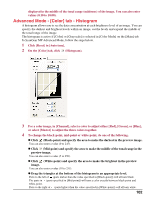
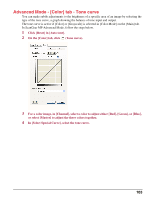
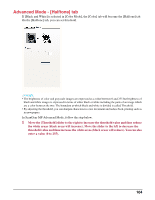
To scan with the settings in the saved color adjustment file Click (Load button). The image will be scanned with the saved settings. The file suffix will be (.adc) for color and (.adg) for grayscale. To revise the color adjustment settings currently on display or to return to default settings Click [Reset]. To revise all color adjustment settings or to return to default settings Click [Reset All]. [Master], [Red], [Green], [Blue] and all settings for contrast/brightness, gamma, histogram and tone curve will be suspended and will return to default settings. Images which have undergone automatic color correction will also return to their defaults. Advanced Mode - [Color] tab - Brightness and contrast If the original image is too dark or too bright, or if the image quality is flat due to lack of contrast, you can adjust the levels of brightness and contrast. The brightness and contrast are active if [Color] or [Grayscale] is selected in [Color Mode] on the [Main] tab. In ScanGear MP Advanced Mode, follow the steps below. 1 Click [Reset] in [Auto tone]. 2 On the [Color] tab, click (Brightness/Contrast). 3 For a color image, in [Channel], select a color to adjust either [Red], [Green], or [Blue], or select [Master] to adjust the three colors together. 100
-
 1
1 -
2
-
3
-
4
-
5
-
6
-
7
-
8
-
9
-
10
-
11
-
12
-
13
-
14
-
15
-
16
-
17
-
18
-
19
-
20
-
21
-
22
-
23
-
24
-
25
-
26
-
27
-
28
-
29
-
30
-
31
-
32
-
33
-
34
-
35
-
36
-
37
-
38
-
39
-
40
-
41
-
42
-
43
-
44
-
45
-
46
-
47
-
48
-
49
-
50
-
51
-
52
-
53
-
54
-
55
-
56
-
57
-
58
-
59
-
60
-
61
-
62
-
63
-
64
-
65
-
66
-
67
-
68
-
69
-
70
-
71
-
72
-
73
-
74
-
75
-
76
-
77
-
78
-
79
-
80
-
81
-
82
-
83
-
84
-
85
-
86
-
87
-
88
-
89
-
90
-
91
-
92
-
93
-
94
-
95
-
96
-
 97
97 -
 98
98 -
 99
99 -
 100
100 -
 101
101 -
 102
102 -
 103
103 -
 104
104 -
 105
105 -
 106
106 -
 107
107 -
108
-
109
-
110
-
111
-
112
-
113
-
114
-
115
-
116
-
117
-
118
-
119
-
120
-
121
-
122
-
123
-
124
-
125
-
126
-
127
-
128
-
129
-
130
-
131
-
132
-
133
-
134
-
135
-
136
-
137
-
138
 |
 |