Canon MP370 MultiPASS MP370/360 Software Guide - Page 93
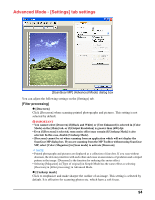
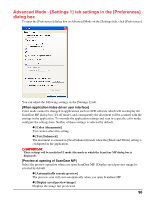
To detach and move the Toolbar, Advanced Mode - Specifying the parameters of a scan
 |
UPC - 013803037111
View all Canon MP370 manuals
Add to My Manuals
Save this manual to your list of manuals |
Page 93 highlights
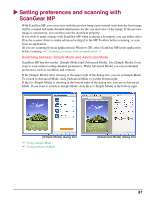
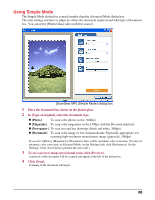
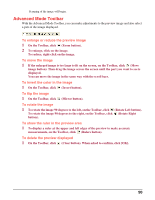
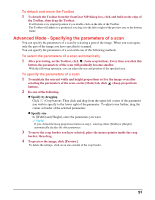
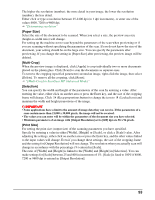
To detach and move the Toolbar 1 To detach the Toolbar from the ScanGear MP dialog box, click and hold on the edge of the Toolbar, then drag the Toolbar. It will return to its original position if you double-click on the title of the Toolbar. The Toolbar will adhere to a position if you drag it to the left or right of the preview area or the bottom frame. Advanced Mode - Specifying the parameters of a scan You can specify the parameters of a scan by selecting a part of the image. When you scan again, only the part of the image you have specified is scanned. You can specify the parameters of a scan with one of the following methods. To select the parameters of a scan automatically 1 After previewing, on the Toolbar, click (Auto crop button). Every time you click this button, the parameters of the scan will gradually become smaller. With the following operation, you can adjust the size and position of the specified area. To specify the parameters of a scan 1 To maintain the current width and height proportions set for the image even after selecting the parameters of the scan, on the [Main] tab, click (Keep proportions button). 2 Do one of the following. z Specify by dragging Click (Crop button). Then click and drag from the upper left corner of the parameter you wish to specify to the lower right of the parameter. To adjust even further, drag the corner or border of the selected parameters. z Specify size In [Width] and [Height], enter the parameters you want. NOTE If you clicked the Keep proportions button in step 1, entering either [Width] or [Height] automatically decides the other parameter. 3 To move the crop border you have selected, place the mouse pointer inside the crop border, then drag. 4 To preview the image, click [Preview]. To delete the settings, click on an area outside of the crop border. 91
-
 1
1 -
2
-
3
-
4
-
5
-
6
-
7
-
8
-
9
-
10
-
11
-
12
-
13
-
14
-
15
-
16
-
17
-
18
-
19
-
20
-
21
-
22
-
23
-
24
-
25
-
26
-
27
-
28
-
29
-
30
-
31
-
32
-
33
-
34
-
35
-
36
-
37
-
38
-
39
-
40
-
41
-
42
-
43
-
44
-
45
-
46
-
47
-
48
-
49
-
50
-
51
-
52
-
53
-
54
-
55
-
56
-
57
-
58
-
59
-
60
-
61
-
62
-
63
-
64
-
65
-
66
-
67
-
68
-
69
-
70
-
71
-
72
-
73
-
74
-
75
-
76
-
77
-
78
-
79
-
80
-
81
-
82
-
83
-
84
-
85
-
86
-
87
-
 88
88 -
 89
89 -
 90
90 -
 91
91 -
 92
92 -
 93
93 -
 94
94 -
 95
95 -
 96
96 -
 97
97 -
 98
98 -
99
-
100
-
101
-
102
-
103
-
104
-
105
-
106
-
107
-
108
-
109
-
110
-
111
-
112
-
113
-
114
-
115
-
116
-
117
-
118
-
119
-
120
-
121
-
122
-
123
-
124
-
125
-
126
-
127
-
128
-
129
-
130
-
131
-
132
-
133
-
134
-
135
-
136
-
137
-
138
 |
 |