Canon MP370 MultiPASS MP370/360 Software Guide - Page 78
Save scanned image to, JPEG], TIFF]
 |
UPC - 013803037111
View all Canon MP370 manuals
Add to My Manuals
Save this manual to your list of manuals |
Page 78 highlights
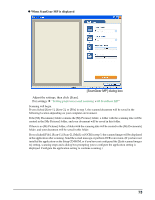
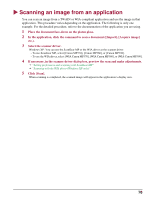
Save scanned image to [File name] Enter a file name for the scanned image. If you try to save another file with the same name, four digits starting from 0001 will be attached after the file name. [Save as type] z [BMP] Bitmap format z [JPEG] JPEG format. Select for grayscale or color images only. z [TIFF] TIFF format z [PDF] PDF format. You can make advanced settings with the [PDF settings]. The type of file which can be saved with each button is shown below. J "Creating one PDF file from two or more pages" BMP JPEG TIFF PDF [Mail] - - [OCR] - - [Save-1], [Save-2] [File] - - - [Scan-1], [Scan-2] - IMPORTANT If you select [PDF] in [Save as type], and select Color/Letter or A4-size/600 dpi or more in ScanGear MP, a warning message will appear and you will not be able to scan. Reduce the document size and lower the resolution. Save to The place the scanned image will be saved is displayed. To change the folder in which the saved image is to be saved, click [Browse], select a folder for saving the image, then click [OK]. The scanned document will be saved in the following location depending on your computer environment. -If the [My Documents] folder contains the [My Pictures] folder, a folder with the scanning date will be created in the [My Pictures] folder, and your document will be saved in this folder. -If there is no [My Pictures] folder, a folder with the scanning date will be created in the [My Documents] folder, and your document will be saved in this folder. [Put pictures in a subfolder using today's date] You can either directly save an image in the specified folder or create a folder inside the specified folder with today's date (e.g. 04/04/2003) and select to save in this folder. [Link scanned images to] The name of the application to be used by the scanned image will appear. If no name appears or you wish to change the application, click [Set], select the application you wish to use, then click [Open]. If for the [Mail] button the name of the application you wish to use does not appear in the [Settings for E-mail program] dialog box, select [None (Attach Manually)]. In this case, the application will not open so you must open the image file in the application and attach the file. 76
-
 1
1 -
2
-
3
-
4
-
5
-
6
-
7
-
8
-
9
-
10
-
11
-
12
-
13
-
14
-
15
-
16
-
17
-
18
-
19
-
20
-
21
-
22
-
23
-
24
-
25
-
26
-
27
-
28
-
29
-
30
-
31
-
32
-
33
-
34
-
35
-
36
-
37
-
38
-
39
-
40
-
41
-
42
-
43
-
44
-
45
-
46
-
47
-
48
-
49
-
50
-
51
-
52
-
53
-
54
-
55
-
56
-
57
-
58
-
59
-
60
-
61
-
62
-
63
-
64
-
65
-
66
-
67
-
68
-
69
-
70
-
71
-
72
-
 73
73 -
 74
74 -
 75
75 -
 76
76 -
 77
77 -
 78
78 -
 79
79 -
 80
80 -
 81
81 -
 82
82 -
 83
83 -
84
-
85
-
86
-
87
-
88
-
89
-
90
-
91
-
92
-
93
-
94
-
95
-
96
-
97
-
98
-
99
-
100
-
101
-
102
-
103
-
104
-
105
-
106
-
107
-
108
-
109
-
110
-
111
-
112
-
113
-
114
-
115
-
116
-
117
-
118
-
119
-
120
-
121
-
122
-
123
-
124
-
125
-
126
-
127
-
128
-
129
-
130
-
131
-
132
-
133
-
134
-
135
-
136
-
137
-
138
 |
 |