Canon MP370 MultiPASS MP370/360 Software Guide - Page 94
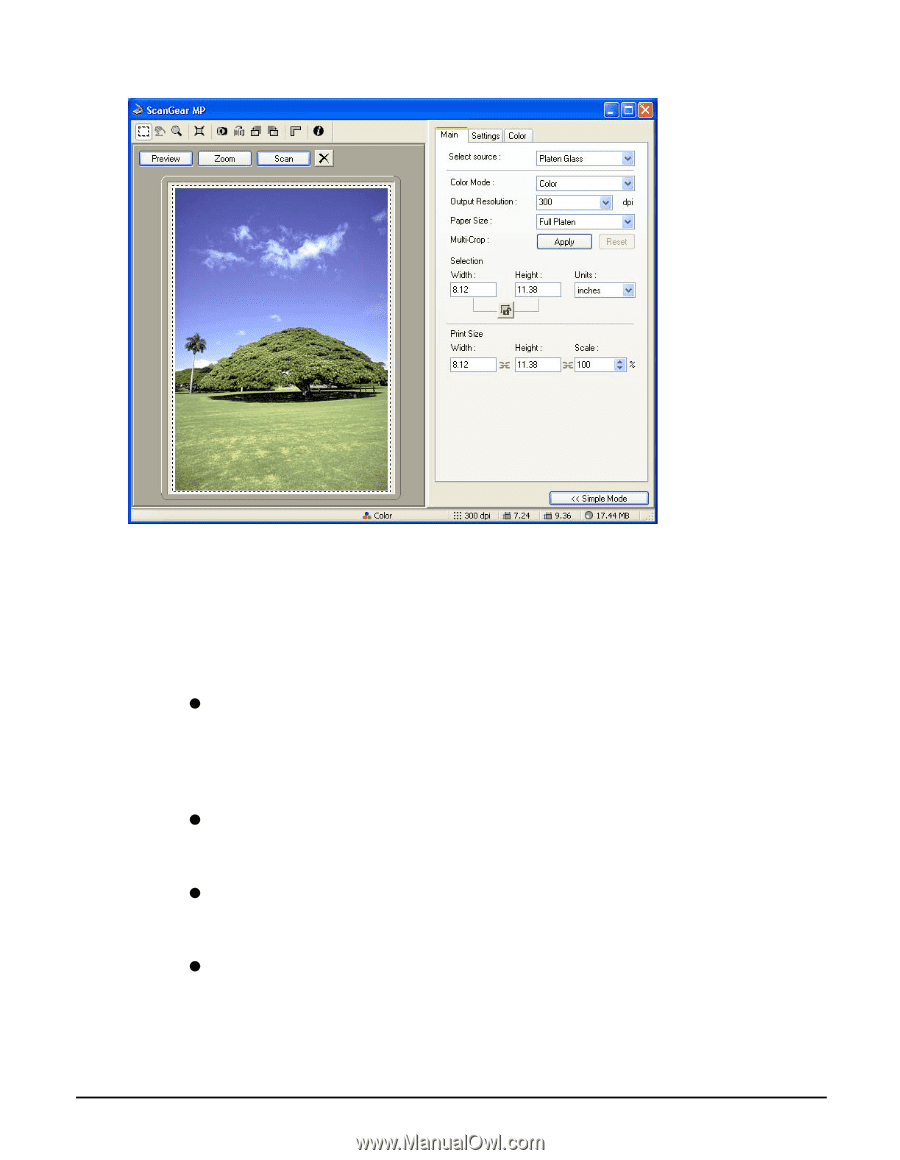
Advanced Mode - [Main] tab settings, Select source], Color Mode], Output Resolution]
 |
UPC - 013803037111
View all Canon MP370 manuals
Add to My Manuals
Save this manual to your list of manuals |
Page 94 highlights
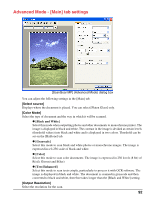
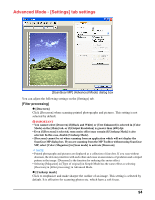
Advanced Mode - [Main] tab settings [ScanGear MP] (Advanced Mode) dialog box You can adjust the following settings in the [Main] tab. [Select source] Displays where the document is placed. You can select [Platen Glass] only. [Color Mode] Select the type of document and the way in which it will be scanned. z [Black and White] Select this mode when outputting photos and other documents to monochrome printer. The image is displayed in black and white. The contrast in the image is divided at certain levels (threshold values) into black and white and is displayed in two colors. Threshold can be set on the [Halftone] tab. z [Grayscale] Select this mode to scan black and white photos or monochrome images. The image is expressed in a 0-256 scale of black and white. z [Color] Select this mode to scan color documents. The image is expressed in 256 levels (8 bit) of R(ed), G(reen) and B(lue). z [Text Enhanced] Select this mode to scan texts crisply, particularly to process it with OCR software. The image is displayed in black and white. The document is scanned in grayscale and then converted to black and white, therefore takes longer than the [Black and White] setting. [Output Resolution] Select the resolution for the scan. 92
-
 1
1 -
2
-
3
-
4
-
5
-
6
-
7
-
8
-
9
-
10
-
11
-
12
-
13
-
14
-
15
-
16
-
17
-
18
-
19
-
20
-
21
-
22
-
23
-
24
-
25
-
26
-
27
-
28
-
29
-
30
-
31
-
32
-
33
-
34
-
35
-
36
-
37
-
38
-
39
-
40
-
41
-
42
-
43
-
44
-
45
-
46
-
47
-
48
-
49
-
50
-
51
-
52
-
53
-
54
-
55
-
56
-
57
-
58
-
59
-
60
-
61
-
62
-
63
-
64
-
65
-
66
-
67
-
68
-
69
-
70
-
71
-
72
-
73
-
74
-
75
-
76
-
77
-
78
-
79
-
80
-
81
-
82
-
83
-
84
-
85
-
86
-
87
-
88
-
 89
89 -
 90
90 -
 91
91 -
 92
92 -
 93
93 -
 94
94 -
 95
95 -
 96
96 -
 97
97 -
 98
98 -
 99
99 -
100
-
101
-
102
-
103
-
104
-
105
-
106
-
107
-
108
-
109
-
110
-
111
-
112
-
113
-
114
-
115
-
116
-
117
-
118
-
119
-
120
-
121
-
122
-
123
-
124
-
125
-
126
-
127
-
128
-
129
-
130
-
131
-
132
-
133
-
134
-
135
-
136
-
137
-
138
 |
 |