Canon MP370 MultiPASS MP370/360 Software Guide - Page 54
Cleaning the print head, Deep cleaning
 |
UPC - 013803037111
View all Canon MP370 manuals
Add to My Manuals
Save this manual to your list of manuals |
Page 54 highlights
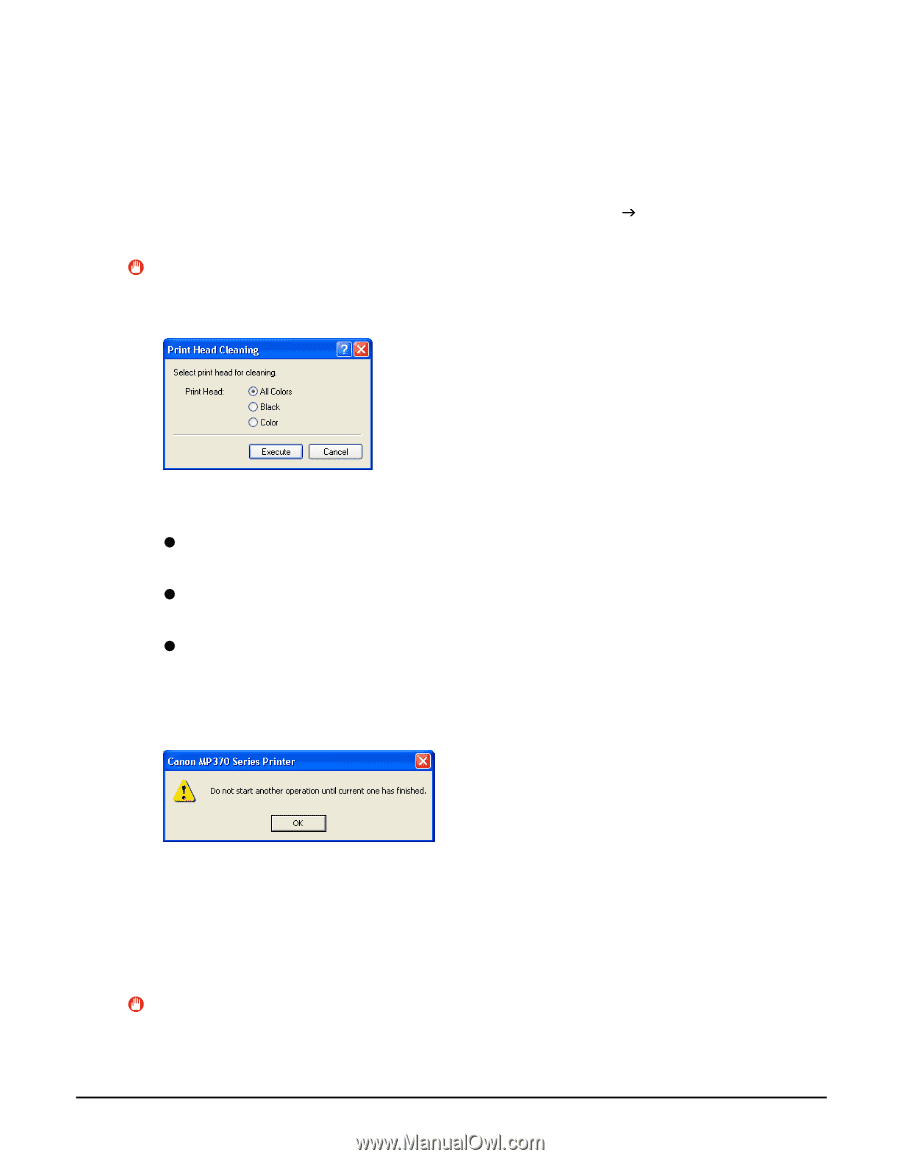
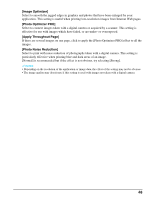
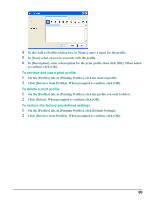
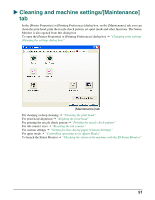
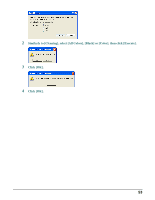
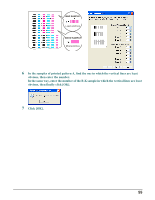
Cleaning the print head Cleaning removes blockages in the print head nozzles. Clean the print head if printing is blurred or a particular color is not printing even though there is enough ink. Please note that if you clean the print head too often, the ink will be consumed quickly. In the [Printer Properties] or [Printing Preferences] dialog box, on the [Maintenance] tab, follow the steps below. To open the [Printer Properties] or [Printing Preferences] dialog box J "Changing print settings (Opening the settings dialog box)" IMPORTANT Do not perform another operation while the print head is being cleaned. 1 On the [Maintenance] tab, click [Cleaning]. 2 In the [Print Head Cleaning] dialog box, select one of the following settings, then click [Execute]. z [All Colors] Cleans both the black and color print heads. z [Black] Cleans the black print head only. z [Color] Cleans the color print head only. 3 Windows 98/Me: When a message asking whether to start print head cleaning is displayed, click [OK]. 4 Click [OK]. Deep cleaning If you have tried cleaning several times and print quality does not improve, perform deep cleaning. [Deep Cleaning] will give the print head an even deeper clean than [Cleaning]. Please note that [Deep Cleaning] will consume more ink than [Cleaning]. IMPORTANT Do not perform another operation while the print head is being cleaned. 1 On the [Maintenance] tab, click [Deep Cleaning]. 52
-
 1
1 -
2
-
3
-
4
-
5
-
6
-
7
-
8
-
9
-
10
-
11
-
12
-
13
-
14
-
15
-
16
-
17
-
18
-
19
-
20
-
21
-
22
-
23
-
24
-
25
-
26
-
27
-
28
-
29
-
30
-
31
-
32
-
33
-
34
-
35
-
36
-
37
-
38
-
39
-
40
-
41
-
42
-
43
-
44
-
45
-
46
-
47
-
48
-
 49
49 -
 50
50 -
 51
51 -
 52
52 -
 53
53 -
 54
54 -
 55
55 -
 56
56 -
 57
57 -
 58
58 -
 59
59 -
60
-
61
-
62
-
63
-
64
-
65
-
66
-
67
-
68
-
69
-
70
-
71
-
72
-
73
-
74
-
75
-
76
-
77
-
78
-
79
-
80
-
81
-
82
-
83
-
84
-
85
-
86
-
87
-
88
-
89
-
90
-
91
-
92
-
93
-
94
-
95
-
96
-
97
-
98
-
99
-
100
-
101
-
102
-
103
-
104
-
105
-
106
-
107
-
108
-
109
-
110
-
111
-
112
-
113
-
114
-
115
-
116
-
117
-
118
-
119
-
120
-
121
-
122
-
123
-
124
-
125
-
126
-
127
-
128
-
129
-
130
-
131
-
132
-
133
-
134
-
135
-
136
-
137
-
138
 |
 |