Canon MP370 MultiPASS MP370/360 Software Guide - Page 28
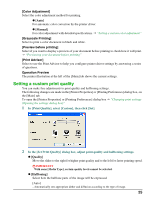
Setting a custom color adjustment, In [Color Adjustment], select [Manual], then click [Set].
 |
UPC - 013803037111
View all Canon MP370 manuals
Add to My Manuals
Save this manual to your list of manuals |
Page 28 highlights
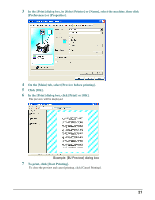
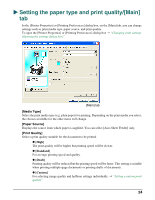
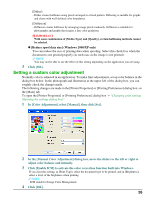
[Dither] - Dither creates halftones using pixels arranged in a fixed pattern. Dithering is suitable for graphs and charts with well-defined color boundaries. [Diffusion] - Diffusion creates halftones by arranging image pixels randomly. Diffusion is suitable for photographs and graphs that require a fine color gradation. IMPORTANT With some combination of [Media Type] and [Quality], certain halftoning methods cannot be selected. z [Reduce spool data size] (Windows 2000/XP only) You can reduce the size of printing data when spooling. Select this check box when the document is not printed properly (in such case as the image is not printed). NOTE You may not be able to see the effect of this setting depending on the application you are using. 3 Click [OK]. Setting a custom color adjustment Normally color is adjusted in an application. To make finer adjustments, set up color balance in the dialog box below. In the photograph and illustration at the upper left of the dialog box, you can roughly check the changes made. The following changes are made in the [Printer Properties] or [Printing Preferences] dialog box, on the [Main] tab. To open the [Printer Properties] or [Printing Preferences] dialog box J "Changing print settings (Opening the settings dialog box)" 1 In [Color Adjustment], select [Manual], then click [Set]. 2 In the [Manual Color Adjustment] dialog box, move the sliders to the left or right to adjust color balance and intensity. 3 Click [Enable ICM] to activate the color correction function built into Windows. If you clear this setting, in [Print Type], select the document type to be printed, and in [Brightness], select a level of the brightness when printing. NOTE ICM stands for Image Color Management. 4 Click [OK]. 26
-
 1
1 -
2
-
3
-
4
-
5
-
6
-
7
-
8
-
9
-
10
-
11
-
12
-
13
-
14
-
15
-
16
-
17
-
18
-
19
-
20
-
21
-
22
-
 23
23 -
 24
24 -
 25
25 -
 26
26 -
 27
27 -
 28
28 -
 29
29 -
 30
30 -
 31
31 -
 32
32 -
 33
33 -
34
-
35
-
36
-
37
-
38
-
39
-
40
-
41
-
42
-
43
-
44
-
45
-
46
-
47
-
48
-
49
-
50
-
51
-
52
-
53
-
54
-
55
-
56
-
57
-
58
-
59
-
60
-
61
-
62
-
63
-
64
-
65
-
66
-
67
-
68
-
69
-
70
-
71
-
72
-
73
-
74
-
75
-
76
-
77
-
78
-
79
-
80
-
81
-
82
-
83
-
84
-
85
-
86
-
87
-
88
-
89
-
90
-
91
-
92
-
93
-
94
-
95
-
96
-
97
-
98
-
99
-
100
-
101
-
102
-
103
-
104
-
105
-
106
-
107
-
108
-
109
-
110
-
111
-
112
-
113
-
114
-
115
-
116
-
117
-
118
-
119
-
120
-
121
-
122
-
123
-
124
-
125
-
126
-
127
-
128
-
129
-
130
-
131
-
132
-
133
-
134
-
135
-
136
-
137
-
138
 |
 |
