Dell 966 All In One Photo Printer User Guide - Page 53
Maintenance Mode
 |
View all Dell 966 All In One Photo Printer manuals
Add to My Manuals
Save this manual to your list of manuals |
Page 53 highlights
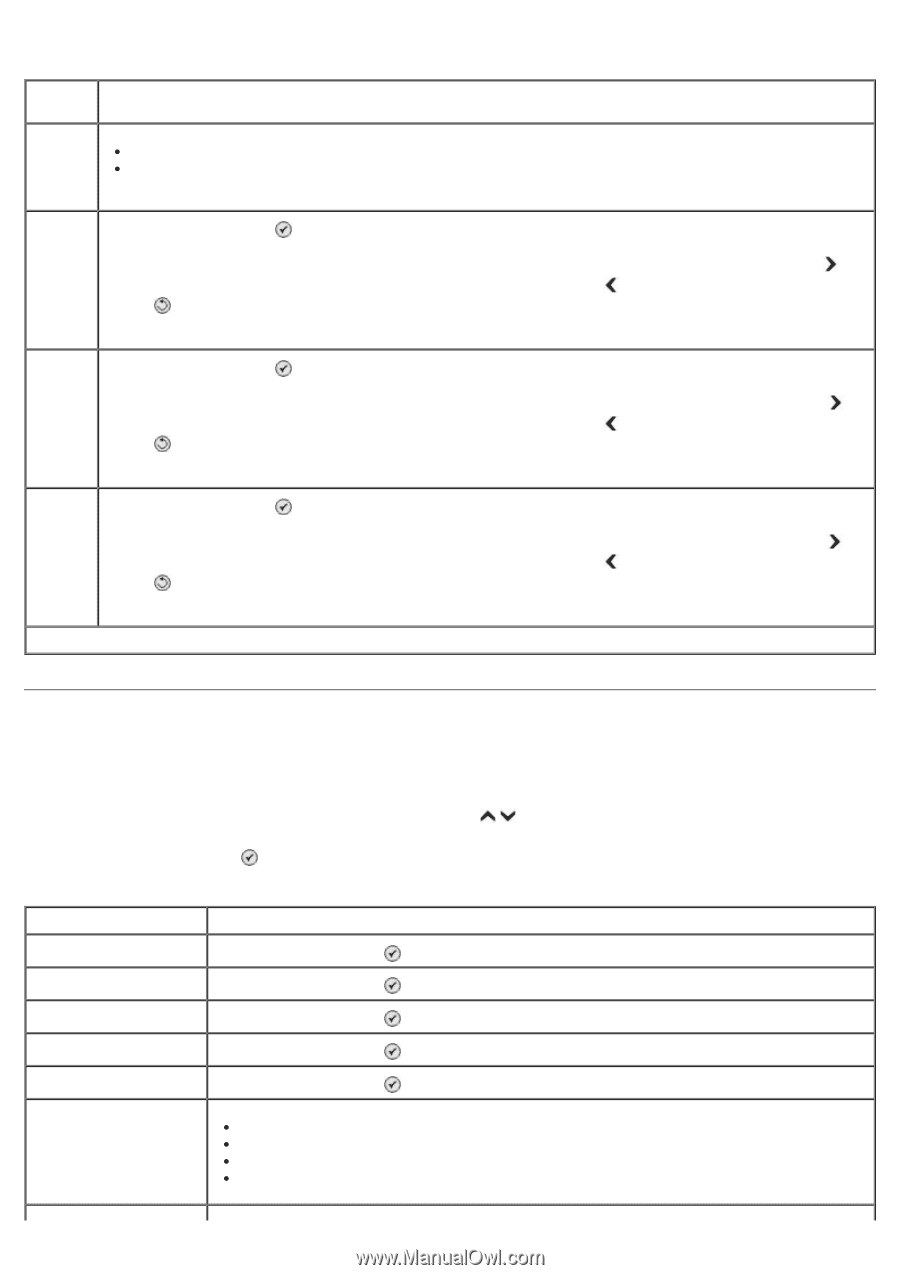
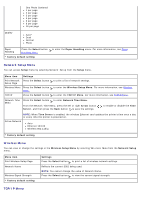
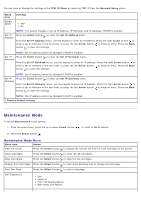
You can view or change the settings in the TCP/IP Menu by selecting TCP/IP from the Network Setup menu. Menu item Settings Enable DHCP Yes* No NOTE: You cannot change or set an IP Address, IP Netmask, and IP Gateway if DHCP is enabled. Set IP Address Press the Select button to enter the Set IP Address menu. From the Set IP Address menu, use the keypad to enter an IP address. Press the right Arrow button to enter a set of numbers in the next field, or press the left Arrow button to erase an entry. Press the Back button to save the settings. NOTE: The IP address cannot be changed if DHCP is enabled. Set IP Netmask Press the Select button to enter the Set IP Netmask menu. From the Set IP Netmask menu, use the keypad to enter an IP address. Press the right Arrow button to enter a set of numbers in the next field, or press the left Arrow button to erase an entry. Press the Back button to save the settings. NOTE: The IP address cannot be changed if DHCP is enabled. Set IP Gateway Press the Select button to enter the Set IP Gateway menu. From the Set IP Gateway menu, use the keypad to enter an IP address. Press the right Arrow button to enter a set of numbers in the next field, or press the left Arrow button to erase an entry. Press the Back button to save the settings. NOTE: The IP address cannot be changed if DHCP is enabled. * Factory default setting Maintenance Mode To access Maintenance mode options: 1. From the main menu, press the up or down Arrow button to scroll to Maintenance. 2. Press the Select button . Maintenance Mode Menu Menu item Action View Ink Levels Press the Select button to display the current ink level for each cartridge on the screen. Clean Cartridges Press the Select button to clean the ink cartridges. Align Cartridges Press the Select button to align the ink cartridges. Change Print Cartridges Press the Select button to view steps detailing how to change ink cartridges. Print Test Page Press the Select button to print a test page. Call Diagnostics Off* Audio on Print T30 Signals Report Both Audio and Report
-
 1
1 -
2
-
3
-
4
-
5
-
6
-
7
-
8
-
9
-
10
-
11
-
12
-
13
-
14
-
15
-
16
-
17
-
18
-
19
-
20
-
21
-
22
-
23
-
24
-
25
-
26
-
27
-
28
-
29
-
30
-
31
-
32
-
33
-
34
-
35
-
36
-
37
-
38
-
39
-
40
-
41
-
42
-
43
-
44
-
45
-
46
-
47
-
 48
48 -
 49
49 -
 50
50 -
 51
51 -
 52
52 -
 53
53 -
 54
54 -
 55
55 -
 56
56 -
 57
57 -
 58
58 -
59
-
60
-
61
-
62
-
63
-
64
-
65
-
66
-
67
-
68
-
69
-
70
-
71
-
72
-
73
-
74
-
75
-
76
-
77
-
78
-
79
-
80
-
81
-
82
-
83
-
84
-
85
-
86
-
87
-
88
-
89
-
90
-
91
-
92
-
93
-
94
-
95
-
96
-
97
-
98
-
99
-
100
-
101
-
102
-
103
-
104
-
105
-
106
-
107
-
108
-
109
-
110
-
111
-
112
-
113
-
114
-
115
-
116
-
117
-
118
-
119
-
120
-
121
-
122
-
123
-
124
-
125
-
126
-
127
-
128
-
129
-
130
-
131
-
132
-
133
-
134
-
135
 |
 |