Dell 966 All In One Photo Printer User Guide - Page 83
Printing More Than One on a Sheet of Paper, Duplexing a Print Job Two-Sided Printing
 |
View all Dell 966 All In One Photo Printer manuals
Add to My Manuals
Save this manual to your list of manuals |
Page 83 highlights
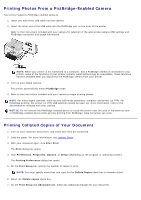
8. When you are finished customizing your settings, click OK. The Printing Preferences dialog box closes. 9. Click OK or Print. Printing More Than One Page on a Sheet of Paper 1. Turn on your computer and printer, and make sure they are connected. 2. Load the paper. For more information, see Loading Paper. 3. With your document open, click File® Print. 4. Click Preferences, Properties, Options, or Setup (depending on the program or operating system). The Printing Preferences dialog box opens. 5. On the Advanced tab, select N-up from the Layout drop-down list. 6. From the Pages per sheet drop-down list, select how many pages you want to be printed on one sheet. 7. Select the Print Page Borders check box if you want borders between pages. 8. On the Print Setup tab and Advanced tab, make any additional changes for your document. 9. Select the number of pages to print on each page. 10. When you are finished customizing your settings, click OK. The Printing Preferences dialog box closes. 11. Click OK or Print. Duplexing a Print Job (Two-Sided Printing) Automatic Duplex Automatic duplex allows you to print your document on both sides of the paper without having to manually re-orient the sheets. Make sure: You installed the optional duplex unit. You loaded letter size or A4 plain paper. You cannot duplex-print on envelopes, card stock, or photo paper. 1. Turn on your computer and printer, and make sure they are connected. 2. Load the paper. For more information, see Loading Paper. 3. With your document open, click File® Print. 4. Click Preferences, Properties, Options, or Setup (depending on the program or operating system). 5. Click the Advanced tab, and then select the 2-sided printing check box. 6. From the drop-down list, select Automatic.
-
 1
1 -
2
-
3
-
4
-
5
-
6
-
7
-
8
-
9
-
10
-
11
-
12
-
13
-
14
-
15
-
16
-
17
-
18
-
19
-
20
-
21
-
22
-
23
-
24
-
25
-
26
-
27
-
28
-
29
-
30
-
31
-
32
-
33
-
34
-
35
-
36
-
37
-
38
-
39
-
40
-
41
-
42
-
43
-
44
-
45
-
46
-
47
-
48
-
49
-
50
-
51
-
52
-
53
-
54
-
55
-
56
-
57
-
58
-
59
-
60
-
61
-
62
-
63
-
64
-
65
-
66
-
67
-
68
-
69
-
70
-
71
-
72
-
73
-
74
-
75
-
76
-
77
-
 78
78 -
 79
79 -
 80
80 -
 81
81 -
 82
82 -
 83
83 -
 84
84 -
 85
85 -
 86
86 -
 87
87 -
 88
88 -
89
-
90
-
91
-
92
-
93
-
94
-
95
-
96
-
97
-
98
-
99
-
100
-
101
-
102
-
103
-
104
-
105
-
106
-
107
-
108
-
109
-
110
-
111
-
112
-
113
-
114
-
115
-
116
-
117
-
118
-
119
-
120
-
121
-
122
-
123
-
124
-
125
-
126
-
127
-
128
-
129
-
130
-
131
-
132
-
133
-
134
-
135
 |
 |