Dell 966 All In One Photo Printer User Guide - Page 79
Printing Envelopes, Printing From a Bluetooth-enabled Device
 |
View all Dell 966 All In One Photo Printer manuals
Add to My Manuals
Save this manual to your list of manuals |
Page 79 highlights
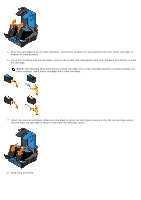
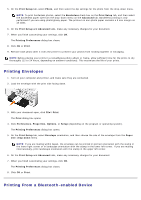
5. On the Print Setup tab, select Photo, and then select the dpi settings for the photo from the drop-down menu. NOTE: To print borderless photos, select the Borderless check box on the Print Setup tab, and then select the borderless paper size from the drop-down menu on the Advanced tab. Borderless printing is only performed if you are using photo/glossy paper. The printout on non-photo paper contains a 2 mm margin on all sides. 6. On the Print Setup and Advanced tabs, make any necessary changes for your document. 7. When you finish customizing your settings, click OK. The Printing Preferences dialog box closes. 8. Click OK or Print. 9. Remove each photo after it exits the printer to prevent your photos from sticking together or smudging. NOTE: Before placing your prints in a nonadhesive photo album or frame, allow sufficient time for the prints to dry thoroughly (12 to 24 hours, depending on ambient conditions). This maximizes the life of your prints. Printing Envelopes 1. Turn on your computer and printer, and make sure they are connected. 2. Load the envelope with the print side facing down. 3. With your document open, click File® Print. The Print dialog box opens. 4. Click Preferences, Properties, Options, or Setup (depending on the program or operating system). The Printing Preferences dialog box opens. 5. On the Print Setup tab, select Envelope orientation, and then choose the size of the envelope from the Paper size: drop-down menu. NOTE: If you are mailing within Japan, the envelope can be printed in portrait orientation with the stamp in the lower right corner or in landscape orientation with the stamp in the lower left corner. If you are mailing internationally, print landscape orientation with the stamp in the upper left corner. 6. On the Print Setup and Advanced tabs, make any necessary changes for your document. 7. When you finish customizing your settings, click OK. The Printing Preferences dialog box closes. 8. Click OK or Print. Printing From a Bluetooth-enabled Device
-
 1
1 -
2
-
3
-
4
-
5
-
6
-
7
-
8
-
9
-
10
-
11
-
12
-
13
-
14
-
15
-
16
-
17
-
18
-
19
-
20
-
21
-
22
-
23
-
24
-
25
-
26
-
27
-
28
-
29
-
30
-
31
-
32
-
33
-
34
-
35
-
36
-
37
-
38
-
39
-
40
-
41
-
42
-
43
-
44
-
45
-
46
-
47
-
48
-
49
-
50
-
51
-
52
-
53
-
54
-
55
-
56
-
57
-
58
-
59
-
60
-
61
-
62
-
63
-
64
-
65
-
66
-
67
-
68
-
69
-
70
-
71
-
72
-
73
-
 74
74 -
 75
75 -
 76
76 -
 77
77 -
 78
78 -
 79
79 -
 80
80 -
 81
81 -
 82
82 -
 83
83 -
 84
84 -
85
-
86
-
87
-
88
-
89
-
90
-
91
-
92
-
93
-
94
-
95
-
96
-
97
-
98
-
99
-
100
-
101
-
102
-
103
-
104
-
105
-
106
-
107
-
108
-
109
-
110
-
111
-
112
-
113
-
114
-
115
-
116
-
117
-
118
-
119
-
120
-
121
-
122
-
123
-
124
-
125
-
126
-
127
-
128
-
129
-
130
-
131
-
132
-
133
-
134
-
135
 |
 |
