Dell 966 All In One Photo Printer User Guide - Page 8
Sending a Fax
 |
View all Dell 966 All In One Photo Printer manuals
Add to My Manuals
Save this manual to your list of manuals |
Page 8 highlights
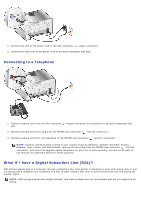
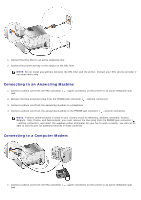
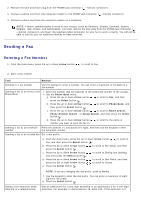
2. Remove the blue protective plug from the PHONE jack connector ( -bottom connector). 3. Connect a phone cord from the computer modem to the PHONE jack connector ( -bottom connector). 4. Connect a phone cord from the computer modem to a telephone. NOTE: If phone communication is serial in your country (such as Germany, Sweden, Denmark, Austria, Belgium, Italy, France, and Switzerland), you must remove the blue plug from the PHONE jack connector ( -bottom connector), and insert the supplied yellow terminator for your fax to work correctly. You will not be able to use this port for additional devices in these countries. Sending a Fax Entering a Fax Number 1. From the main menu, press the up or down Arrow button to scroll to Fax. 2. Enter a fax number. Task Method Sending to a fax number Use the keypad to enter a number. You can enter a maximum of 64 digits in a fax number. Sending a fax to an entry in the Phone Book Enter the number that corresponds to the speed dial number of the contact. Use the Phone Book menu. a. Press the up or down Arrow button to scroll to Fax, and then press the Select button . b. Press the up or down Arrow button then press the Select button . to scroll to Phone Book, and c. Press the up or down Arrow button to scroll to Name Search, Phone Number Search , or Group Search, and then press the Select button . d. Press the up or down Arrow button number you want to send the fax to. to scroll to the name or Sending a fax to an extension Press the asterisk (*) and pound (#) signs, and then use the keypad to enter number the extension number. Sending a fax to an outside line Set a dial prefix: a. From the main menu, press the up or down Arrow button to scroll to Fax, and then press the Select button . b. Press the up or down Arrow button to scroll to Fax Setup, and then press the Select button . c. Press the up or down Arrow button and then press the Select button . to scroll to Dialing and Sending, d. Press the up or down Arrow button to scroll to Dial Prefix, and then press the left or right Arrow button to scroll to Create. e. Press the Select button . NOTE: If you are changing the dial prefix, scroll to Modify. f. Use the keypad to enter the dial prefix. You can enter a maximum of eight digits for the prefix. g. Press the Select button . Dialing a fax extension while listening to a telephone line Dial an additional 0 for a two-digit extension or an additional 0 0 for a one-digit extension. For example, to dial extension 12, enter 120. If the extension is 2,
-
 1
1 -
2
-
 3
3 -
 4
4 -
 5
5 -
 6
6 -
 7
7 -
 8
8 -
 9
9 -
 10
10 -
 11
11 -
 12
12 -
 13
13 -
14
-
15
-
16
-
17
-
18
-
19
-
20
-
21
-
22
-
23
-
24
-
25
-
26
-
27
-
28
-
29
-
30
-
31
-
32
-
33
-
34
-
35
-
36
-
37
-
38
-
39
-
40
-
41
-
42
-
43
-
44
-
45
-
46
-
47
-
48
-
49
-
50
-
51
-
52
-
53
-
54
-
55
-
56
-
57
-
58
-
59
-
60
-
61
-
62
-
63
-
64
-
65
-
66
-
67
-
68
-
69
-
70
-
71
-
72
-
73
-
74
-
75
-
76
-
77
-
78
-
79
-
80
-
81
-
82
-
83
-
84
-
85
-
86
-
87
-
88
-
89
-
90
-
91
-
92
-
93
-
94
-
95
-
96
-
97
-
98
-
99
-
100
-
101
-
102
-
103
-
104
-
105
-
106
-
107
-
108
-
109
-
110
-
111
-
112
-
113
-
114
-
115
-
116
-
117
-
118
-
119
-
120
-
121
-
122
-
123
-
124
-
125
-
126
-
127
-
128
-
129
-
130
-
131
-
132
-
133
-
134
-
135
 |
 |