HTC EVO Shift 4G Sprint EVO Shift 4G - Quick Reference Guide & Manual - Page 105
Creating Another Email Account, Composing and Sending Email
 |
View all HTC EVO Shift 4G Sprint manuals
Add to My Manuals
Save this manual to your list of manuals |
Page 105 highlights
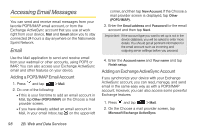
3. Enter the Exchange ActiveSync account details and then tap Next. Note: Your corporate Exchange Server must support autodetect for the device to automatically set up the Exchange ActiveSync account. If your corporate Exchange Server does not support auto-detect, you will need to enter your Exchange Server settings after you tap Next. Ask your Exchange Server administrator for details. 4. Select the type of information you want to synchronize and tap Finish setup. Creating Another Email Account ᮣ If you are in the Inbox of an email account, press and then tap More > New account. Composing and Sending Email 1. Press and tap > Mail. 2. On the email account Inbox, press and tap Compose. Tip: Tap on the upper-left corner to switch to a different email account. 3. Fill in one or more recipients. You can: Ⅲ Enter email addresses directly in the To field. If you're sending the email to several recipients, separate the email addresses with a comma. As you enter email addresses, any matching addresses from your contacts list are displayed. Tap a match to enter the address directly. Ⅲ Tap the icon, and then select the email addresses of the contacts to whom you want to send the email. You can also select contact groups as recipients, or add contacts from the company directory if you have set up an Exchange ActiveSync account on your device. When you have selected all the message recipients, tap Done. Tip: If you want to send a carbon copy (Cc) or a blind carbon copy (Bcc) of the email to other recipients, press and tap Show Cc/Bcc. 4. Enter the subject, and then compose your message. Web and Data 2B. Web and Data Services 99
-
 1
1 -
2
-
3
-
4
-
5
-
6
-
7
-
8
-
9
-
10
-
11
-
12
-
13
-
14
-
15
-
16
-
17
-
18
-
19
-
20
-
21
-
22
-
23
-
24
-
25
-
26
-
27
-
28
-
29
-
30
-
31
-
32
-
33
-
34
-
35
-
36
-
37
-
38
-
39
-
40
-
41
-
42
-
43
-
44
-
45
-
46
-
47
-
48
-
49
-
50
-
51
-
52
-
53
-
54
-
55
-
56
-
57
-
58
-
59
-
60
-
61
-
62
-
63
-
64
-
65
-
66
-
67
-
68
-
69
-
70
-
71
-
72
-
73
-
74
-
75
-
76
-
77
-
78
-
79
-
80
-
81
-
82
-
83
-
84
-
85
-
86
-
87
-
88
-
89
-
90
-
91
-
92
-
93
-
94
-
95
-
96
-
97
-
98
-
99
-
 100
100 -
 101
101 -
 102
102 -
 103
103 -
 104
104 -
 105
105 -
 106
106 -
 107
107 -
 108
108 -
 109
109 -
 110
110 -
111
-
112
-
113
-
114
-
115
-
116
-
117
-
118
-
119
-
120
-
121
-
122
-
123
-
124
-
125
-
126
-
127
-
128
-
129
-
130
-
131
-
132
-
133
-
134
-
135
-
136
-
137
-
138
-
139
-
140
-
141
-
142
-
143
-
144
-
145
-
146
-
147
-
148
-
149
-
150
-
151
-
152
-
153
-
154
-
155
-
156
-
157
-
158
-
159
-
160
 |
 |