HP 2300d HP LaserJet 2300 printer - External Software Technical Reference - Page 215
IBM OS/2 Warp 3.0 and later, OS/2 installation instructions - laserjet printer driver download
 |
UPC - 808736471091
View all HP 2300d manuals
Add to My Manuals
Save this manual to your list of manuals |
Page 215 highlights
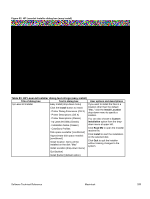
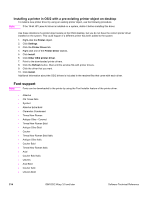
Figure 94: Installing dialog box Table 85: Installing dialog text strings Title of dialog box Text in dialog box User options and descriptions Installing Items remaining to be installed: This dialog box shows the [conditional number] installation progress. No action is Installing: HP LaserJet XXXX Series required unless you want to stop Stop [button] the installation. Click Stop to interrupt the install file copy process. IBM OS/2 Warp 3.0 and later OS/2 installation instructions Installation procedures differ depending upon whether or not a printer object exists on the OS/2 desktop. Use the instructions that match the desktop. Installing a printer in OS/2 when the printer object is missing Use this procedure when a printer object does not appear on the computer desktop. To create a printer object and install a printer driver, follow these steps. Note Use this procedure if the OS/2 desktop does not have a printer object. A system can have this configuration if no printer was selected during OS/2 installation, or if all the print objects have been deleted from the desktop. 1. Open the templates folder that is located in the OS/2 system folder after OS/2 installation. 2. Click the Printer template. Press and hold the right mouse button. 3. Drag the template to the Desktop. 4. Release the right mouse button. 5. Type a name for the printer in the Name field. 6. Select the port to which the printer is connected. 7. Click Install new printer driver. A window appears that contains a list of the printer drivers that are shipped with OS/2. 8. Click Other printer driver. 9. Point to the downloaded printer drivers. 10. Click Refresh. Wait until the window fills with printer drivers. 11. Click the driver that you want. 12. Click Install. Software Technical Reference IBM OS/2 Warp 3.0 and later 213
-
 1
1 -
2
-
3
-
4
-
5
-
6
-
7
-
8
-
9
-
10
-
11
-
12
-
13
-
14
-
15
-
16
-
17
-
18
-
19
-
20
-
21
-
22
-
23
-
24
-
25
-
26
-
27
-
28
-
29
-
30
-
31
-
32
-
33
-
34
-
35
-
36
-
37
-
38
-
39
-
40
-
41
-
42
-
43
-
44
-
45
-
46
-
47
-
48
-
49
-
50
-
51
-
52
-
53
-
54
-
55
-
56
-
57
-
58
-
59
-
60
-
61
-
62
-
63
-
64
-
65
-
66
-
67
-
68
-
69
-
70
-
71
-
72
-
73
-
74
-
75
-
76
-
77
-
78
-
79
-
80
-
81
-
82
-
83
-
84
-
85
-
86
-
87
-
88
-
89
-
90
-
91
-
92
-
93
-
94
-
95
-
96
-
97
-
98
-
99
-
100
-
101
-
102
-
103
-
104
-
105
-
106
-
107
-
108
-
109
-
110
-
111
-
112
-
113
-
114
-
115
-
116
-
117
-
118
-
119
-
120
-
121
-
122
-
123
-
124
-
125
-
126
-
127
-
128
-
129
-
130
-
131
-
132
-
133
-
134
-
135
-
136
-
137
-
138
-
139
-
140
-
141
-
142
-
143
-
144
-
145
-
146
-
147
-
148
-
149
-
150
-
151
-
152
-
153
-
154
-
155
-
156
-
157
-
158
-
159
-
160
-
161
-
162
-
163
-
164
-
165
-
166
-
167
-
168
-
169
-
170
-
171
-
172
-
173
-
174
-
175
-
176
-
177
-
178
-
179
-
180
-
181
-
182
-
183
-
184
-
185
-
186
-
187
-
188
-
189
-
190
-
191
-
192
-
193
-
194
-
195
-
196
-
197
-
198
-
199
-
200
-
201
-
202
-
203
-
204
-
205
-
206
-
207
-
208
-
209
-
 210
210 -
 211
211 -
 212
212 -
 213
213 -
 214
214 -
 215
215 -
 216
216 -
 217
217 -
 218
218 -
 219
219 -
 220
220 -
221
-
222
-
223
-
224
-
225
-
226
-
227
-
228
-
229
-
230
-
231
-
232
-
233
-
234
-
235
 |
 |
