HP 2300d HP LaserJet 2300 printer - External Software Technical Reference - Page 88
Using Job Storage options when printing, Releasing private jobs stored at the printer
 |
UPC - 808736471091
View all HP 2300d manuals
Add to My Manuals
Save this manual to your list of manuals |
Page 88 highlights
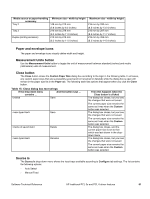
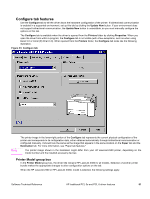
The Job Name and the User Name fields can contain no more than 16 characters each, and are limited to A through Z and 0 through 9, because the name appears on the printer control-panel display. If you try to type a lowercase character, it automatically shifts to uppercase. If you try to type a character with an ASCII code of fewer than 32 or more than 126 characters, the character is removed from the edit field, along with all characters that follow it. If you try to type more than 16 characters, any character beyond 16 is truncated. When the dialog box is closed, or the edit box loses focus, an empty string is replaced with "Untitled". In those languages for which "Untitled" cannot be translated without the use of invalid characters, the driver uses a string of three dashes. The acceptable characters for job name and user name vary for each operating system. The string must meet requirements to be able to appear on the printer control-panel display. Using Job Storage options when printing You can use Job Storage options in the Destination tab of the printer driver. Note The printer driver that is installed on your computer must be configured to use the Job Storage features. To enable Job Storage, click Start, click Settings, click Printers, and right-click the printer icon. Click Properties, click the Configure tab, and select the Job Storage Enabled check box. Note 1. Click Print from the software program. The Print dialog box appears. 2. Click Properties. The Properties dialog box appears. 3. Click the Destination tab to show the destination options. 4. Click Job Storage on the drop-down menu under Destination Features. 5. Click Settings. The Job Storage Settings dialog box appears. You can then select one of the Job Storage options described above by clicking the appropriate option button. These instructions are specific to the Windows 95, Windows 98, Windows Me, and Windows NT 4.0 environments when using the latest available PCL 5e and PCL 6 drivers. While the basic concepts of Job Storage are the same for PS print jobs, there are significant differences in the driver user interface. Also, there are some limitations in naming and PIN selection. Releasing private jobs stored at the printer Once you send a print job using Job Storage, you can release the job to print at the printer control panel. 1. Press the select button (the one with the check mark) to open the menus. 2. Press the up and down buttons to scroll to RETRIEVE JOB, and then press the select button. 3. Press the up and down buttons to scroll to the user or job name, and then press the select button. 4. Press the up and down buttons to scroll to PRINT. The PRINT selection has an icon next to it indicating that the job is locked, type. If so, type the PIN, and then press the select button.) Press the select button. Note Type the PIN one digit at a time. Use the up or down arrow to obtain the first digit, and then press the select button. The cursor in the control panel then moves to the place for the next digit. Proceed likewise for each digit, and press the select button when the PIN is complete. Deleting a print job Sometimes it is necessary to delete a print job from the printer memory. This can be done at the printer control panel. Random text again. 1. Press the select button (the one with the check mark) to open the menus. 2. Press the up and down buttons to scroll to RETRIEVE JOB. 3. Press the up and down buttons to scroll to the user or job name, and then press the select button. 4. Press the up and down buttons to scroll to DELETE. (The DELETE selection might have an icon next to it indicating that the job is locked. If so, type the PIN number, and then press the select button.) 86 HP traditional PCL 5e and PCL 6 driver features Software Technical Reference
-
 1
1 -
2
-
3
-
4
-
5
-
6
-
7
-
8
-
9
-
10
-
11
-
12
-
13
-
14
-
15
-
16
-
17
-
18
-
19
-
20
-
21
-
22
-
23
-
24
-
25
-
26
-
27
-
28
-
29
-
30
-
31
-
32
-
33
-
34
-
35
-
36
-
37
-
38
-
39
-
40
-
41
-
42
-
43
-
44
-
45
-
46
-
47
-
48
-
49
-
50
-
51
-
52
-
53
-
54
-
55
-
56
-
57
-
58
-
59
-
60
-
61
-
62
-
63
-
64
-
65
-
66
-
67
-
68
-
69
-
70
-
71
-
72
-
73
-
74
-
75
-
76
-
77
-
78
-
79
-
80
-
81
-
82
-
 83
83 -
 84
84 -
 85
85 -
 86
86 -
 87
87 -
 88
88 -
 89
89 -
 90
90 -
 91
91 -
 92
92 -
 93
93 -
94
-
95
-
96
-
97
-
98
-
99
-
100
-
101
-
102
-
103
-
104
-
105
-
106
-
107
-
108
-
109
-
110
-
111
-
112
-
113
-
114
-
115
-
116
-
117
-
118
-
119
-
120
-
121
-
122
-
123
-
124
-
125
-
126
-
127
-
128
-
129
-
130
-
131
-
132
-
133
-
134
-
135
-
136
-
137
-
138
-
139
-
140
-
141
-
142
-
143
-
144
-
145
-
146
-
147
-
148
-
149
-
150
-
151
-
152
-
153
-
154
-
155
-
156
-
157
-
158
-
159
-
160
-
161
-
162
-
163
-
164
-
165
-
166
-
167
-
168
-
169
-
170
-
171
-
172
-
173
-
174
-
175
-
176
-
177
-
178
-
179
-
180
-
181
-
182
-
183
-
184
-
185
-
186
-
187
-
188
-
189
-
190
-
191
-
192
-
193
-
194
-
195
-
196
-
197
-
198
-
199
-
200
-
201
-
202
-
203
-
204
-
205
-
206
-
207
-
208
-
209
-
210
-
211
-
212
-
213
-
214
-
215
-
216
-
217
-
218
-
219
-
220
-
221
-
222
-
223
-
224
-
225
-
226
-
227
-
228
-
229
-
230
-
231
-
232
-
233
-
234
-
235
 |
 |