HP 2700n HP Color LaserJet 2700 - Software Technical Reference - Page 110
Microsoft Windows 2000 and Microsoft Windows XP - color laserjet driver windows xp
 |
View all HP 2700n manuals
Add to My Manuals
Save this manual to your list of manuals |
Page 110 highlights
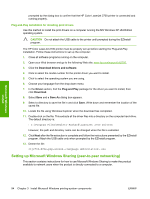
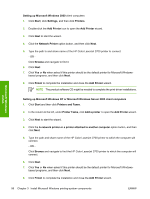
Microsoft Windows install Follow these steps to install the HP Color LaserJet 2700 printing system software. 1. Quit all open programs. 2. Insert the HP Color LaserJet 2700 printing-system CD into the CD-ROM drive on the computer. NOTE If the CD starts automatically, click Exit to exit the installation program and continue with Step 3. 3. Click Printers and Faxes, then click Add a Printer. 4. Click Next on the Welcome dialog box. 5. On the Local or Network Printer dialog box, click Local printer attached to this computer, and then click Next. 6. On the Select a Printer Port dialog box, click Create a new port. From the Type of port dropdown menu, select HP Standard TCP/IP Port. Click Next. 7. The Welcome to the Add Standard TCP/IP Port Wizard dialog box appears. Click Next. 8. The Add Port dialog box appears. Type the printer's IP address in the Printer Name or IP Address text box. The Port Name fills automatically. Click Next to continue. To find the printer IP address, run a configuration page from the printer control panel. Make sure the control panel heading reads Ready. (If the printer control panels does not read Ready, press the square orange X button to the right of the printer control panel window). ● Use the arrow key to scroll to Main menu/Reports, and then press OK. ● Use the arrow key to scroll to Reports/Config report, and then press OK. The configuration page will print. ● Find the IP address on the printed sheet beneath the Product Settings heading. 9. On the Completing the Add Standard TCP/IP Printer Port Wizard screen, click Finish to continue with the installation. 10. On the Install Printer Software screen, click Have Disk. Click Next. 11. On the Install from Disk dialog box, click Browse and navigate to the following path:.:\Drivers\Win2000_XP. Click Open. Click OK to continue. 12. On the Install Printer Software dialog box, click Printers to select the driver to install, and then click Next. NOTE Microsoft Windows Server 2003 uses the same print driver as Microsoft Windows 2000 and Microsoft Windows XP. 13. On the Name Your Printer screen, type a name for the printer or accept the default name. Click Yes to make this printer the default printer. Click Next to continue. 14. On the Printer Sharing screen, determine sharing for this printer, and then click on the Print Test Page dialog box. 15. Click Yes to print a test page or No to decline, and then click Next. 92 Chapter 3 Install Microsoft Windows printing-system components ENWW
-
 1
1 -
2
-
3
-
4
-
5
-
6
-
7
-
8
-
9
-
10
-
11
-
12
-
13
-
14
-
15
-
16
-
17
-
18
-
19
-
20
-
21
-
22
-
23
-
24
-
25
-
26
-
27
-
28
-
29
-
30
-
31
-
32
-
33
-
34
-
35
-
36
-
37
-
38
-
39
-
40
-
41
-
42
-
43
-
44
-
45
-
46
-
47
-
48
-
49
-
50
-
51
-
52
-
53
-
54
-
55
-
56
-
57
-
58
-
59
-
60
-
61
-
62
-
63
-
64
-
65
-
66
-
67
-
68
-
69
-
70
-
71
-
72
-
73
-
74
-
75
-
76
-
77
-
78
-
79
-
80
-
81
-
82
-
83
-
84
-
85
-
86
-
87
-
88
-
89
-
90
-
91
-
92
-
93
-
94
-
95
-
96
-
97
-
98
-
99
-
100
-
101
-
102
-
103
-
104
-
 105
105 -
 106
106 -
 107
107 -
 108
108 -
 109
109 -
 110
110 -
 111
111 -
 112
112 -
 113
113 -
 114
114 -
 115
115 -
116
-
117
-
118
-
119
-
120
-
121
-
122
-
123
-
124
-
125
-
126
-
127
-
128
-
129
-
130
-
131
-
132
-
133
-
134
-
135
-
136
-
137
-
138
-
139
-
140
-
141
-
142
-
143
-
144
-
145
-
146
-
147
-
148
-
149
-
150
-
151
-
152
-
153
-
154
-
155
-
156
-
157
-
158
-
159
-
160
-
161
-
162
-
163
-
164
-
165
-
166
-
167
-
168
-
169
-
170
-
171
-
172
-
173
-
174
-
175
-
176
-
177
-
178
-
179
-
180
-
181
-
182
-
183
-
184
-
185
-
186
-
187
-
188
-
189
-
190
-
191
-
192
-
193
-
194
-
195
-
196
-
197
-
198
-
199
-
200
-
201
-
202
-
203
-
204
-
205
-
206
-
207
-
208
-
209
-
210
-
211
-
212
-
213
-
214
-
215
-
216
-
217
-
218
-
219
-
220
-
221
-
222
-
223
-
224
-
225
-
226
-
227
-
228
-
229
-
230
-
231
-
232
-
233
-
234
-
235
-
236
-
237
-
238
-
239
-
240
-
241
-
242
-
243
-
244
-
245
-
246
-
247
-
248
-
249
-
250
-
251
-
252
-
253
-
254
-
255
-
256
-
257
-
258
-
259
-
260
-
261
-
262
-
263
-
264
-
265
-
266
-
267
-
268
-
269
-
270
-
271
-
272
 |
 |
