HP 2700n HP Color LaserJet 2700 - Software Technical Reference - Page 124
Connection Type, Directly to this computer using a USB cable, Installing, Connect Your Device Now
 |
View all HP 2700n manuals
Add to My Manuals
Save this manual to your list of manuals |
Page 124 highlights
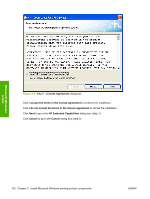
Microsoft Windows install Figure 3-10 Step 10 - Connection Type dialog box NOTE This is the first screen to appear if you are installing the printing-system software on a computer running Microsoft Windows Server 2003. Click Directly to this computer using a USB cable (a "direct connection"), then Next to go to the Installing screen, which automatically leads to the Connect Your Device Now dialog box (step 11). Click Through the network, then Next to go to the Identify Printer dialog box (step 12). Click Cancel to go to the Cancel dialog box (step 2). 106 Chapter 3 Install Microsoft Windows printing-system components ENWW
-
 1
1 -
2
-
3
-
4
-
5
-
6
-
7
-
8
-
9
-
10
-
11
-
12
-
13
-
14
-
15
-
16
-
17
-
18
-
19
-
20
-
21
-
22
-
23
-
24
-
25
-
26
-
27
-
28
-
29
-
30
-
31
-
32
-
33
-
34
-
35
-
36
-
37
-
38
-
39
-
40
-
41
-
42
-
43
-
44
-
45
-
46
-
47
-
48
-
49
-
50
-
51
-
52
-
53
-
54
-
55
-
56
-
57
-
58
-
59
-
60
-
61
-
62
-
63
-
64
-
65
-
66
-
67
-
68
-
69
-
70
-
71
-
72
-
73
-
74
-
75
-
76
-
77
-
78
-
79
-
80
-
81
-
82
-
83
-
84
-
85
-
86
-
87
-
88
-
89
-
90
-
91
-
92
-
93
-
94
-
95
-
96
-
97
-
98
-
99
-
100
-
101
-
102
-
103
-
104
-
105
-
106
-
107
-
108
-
109
-
110
-
111
-
112
-
113
-
114
-
115
-
116
-
117
-
118
-
 119
119 -
 120
120 -
 121
121 -
 122
122 -
 123
123 -
 124
124 -
 125
125 -
 126
126 -
 127
127 -
 128
128 -
 129
129 -
130
-
131
-
132
-
133
-
134
-
135
-
136
-
137
-
138
-
139
-
140
-
141
-
142
-
143
-
144
-
145
-
146
-
147
-
148
-
149
-
150
-
151
-
152
-
153
-
154
-
155
-
156
-
157
-
158
-
159
-
160
-
161
-
162
-
163
-
164
-
165
-
166
-
167
-
168
-
169
-
170
-
171
-
172
-
173
-
174
-
175
-
176
-
177
-
178
-
179
-
180
-
181
-
182
-
183
-
184
-
185
-
186
-
187
-
188
-
189
-
190
-
191
-
192
-
193
-
194
-
195
-
196
-
197
-
198
-
199
-
200
-
201
-
202
-
203
-
204
-
205
-
206
-
207
-
208
-
209
-
210
-
211
-
212
-
213
-
214
-
215
-
216
-
217
-
218
-
219
-
220
-
221
-
222
-
223
-
224
-
225
-
226
-
227
-
228
-
229
-
230
-
231
-
232
-
233
-
234
-
235
-
236
-
237
-
238
-
239
-
240
-
241
-
242
-
243
-
244
-
245
-
246
-
247
-
248
-
249
-
250
-
251
-
252
-
253
-
254
-
255
-
256
-
257
-
258
-
259
-
260
-
261
-
262
-
263
-
264
-
265
-
266
-
267
-
268
-
269
-
270
-
271
-
272
 |
 |

Figure 3-10
Step 10 -
Connection Type
dialog box
NOTE
This is the first screen to appear if you are installing the printing-system software on a
computer running Microsoft Windows Server 2003.
Click
Directly to this computer using a USB cable
(a "direct connection"), then
Next
to go to the
Installing
screen, which automatically leads to the
Connect Your Device Now
dialog box (step 11).
Click
Through the network
, then
Next
to go to the
Identify Printer
dialog box (step 12).
Click
Cancel
to go to the
Cancel
dialog box (step 2).
106
Chapter 3
Install Microsoft Windows printing-system components
ENWW
Microsoft Windows
install